HP Photosmart A630 User Guide - Page 10
The HP Photosmart at a glance, Front and rear views - printer driver
 |
View all HP Photosmart A630 manuals
Add to My Manuals
Save this manual to your list of manuals |
Page 10 highlights
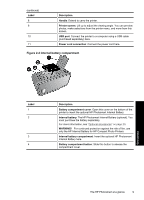
Chapter 2 (continued) www.hp.com/support Help from your device: Help is available from your device and contains additional information on select topics. Touch the question mark icon on the printer screen to get help on the current task. You can also view Help topics in the Setup menu. See "How to use the Setup Menu" on page 17 for information on accessing these help topics. If you have Internet access, you can get help and support from the HP Web site. This Web site offers product documentation, technical support, drivers, supplies, and ordering information. The HP Photosmart at a glance Figure 2-1 Front and rear views Get started Label 1 2 3 4 5 6 7 8 Get started Description Input tray extension: Pull out to support paper. Input tray: Load paper here. Open the output tray first. The input tray opens automatically when you open the output tray. Paper-width guide: Move to the width of the current paper to position the paper properly. Print cartridge door: Open to insert or remove the HP 110 Tri-color Inkjet print cartridge. Output tray (open): The printer deposits prints here. The input tray opens automatically when you open the output tray. Memory card slots: Insert memory cards here. Camera port: Connect a PictBridge digital camera, the optional HP Bluetooth wireless printer adapter, or a USB flash/thumb drive here.
-
 1
1 -
2
-
3
-
4
-
 5
5 -
 6
6 -
 7
7 -
 8
8 -
 9
9 -
 10
10 -
 11
11 -
 12
12 -
 13
13 -
 14
14 -
 15
15 -
16
-
17
-
18
-
19
-
20
-
21
-
22
-
23
-
24
-
25
-
26
-
27
-
28
-
29
-
30
-
31
-
32
-
33
-
34
-
35
-
36
-
37
-
38
-
39
-
40
-
41
-
42
-
43
-
44
-
45
-
46
-
47
-
48
-
49
-
50
-
51
-
52
-
53
-
54
-
55
-
56
-
57
-
58
-
59
-
60
-
61
-
62
-
63
-
64
-
65
-
66
-
67
-
68
-
69
-
70
-
71
-
72
-
73
-
74
-
75
-
76
-
77
-
78
-
79
-
80
-
81
-
82
-
83
-
84
-
85
-
86
-
87
-
88
-
89
-
90
-
91
-
92
-
93
-
94
-
95
-
96
-
97
-
98
 |
 |
