HP Photosmart A630 User Guide - Page 40
Select, Album s, Add Title, Change Photo, Shuffle, Print, Touch
 |
View all HP Photosmart A630 manuals
Add to My Manuals
Save this manual to your list of manuals |
Page 40 highlights
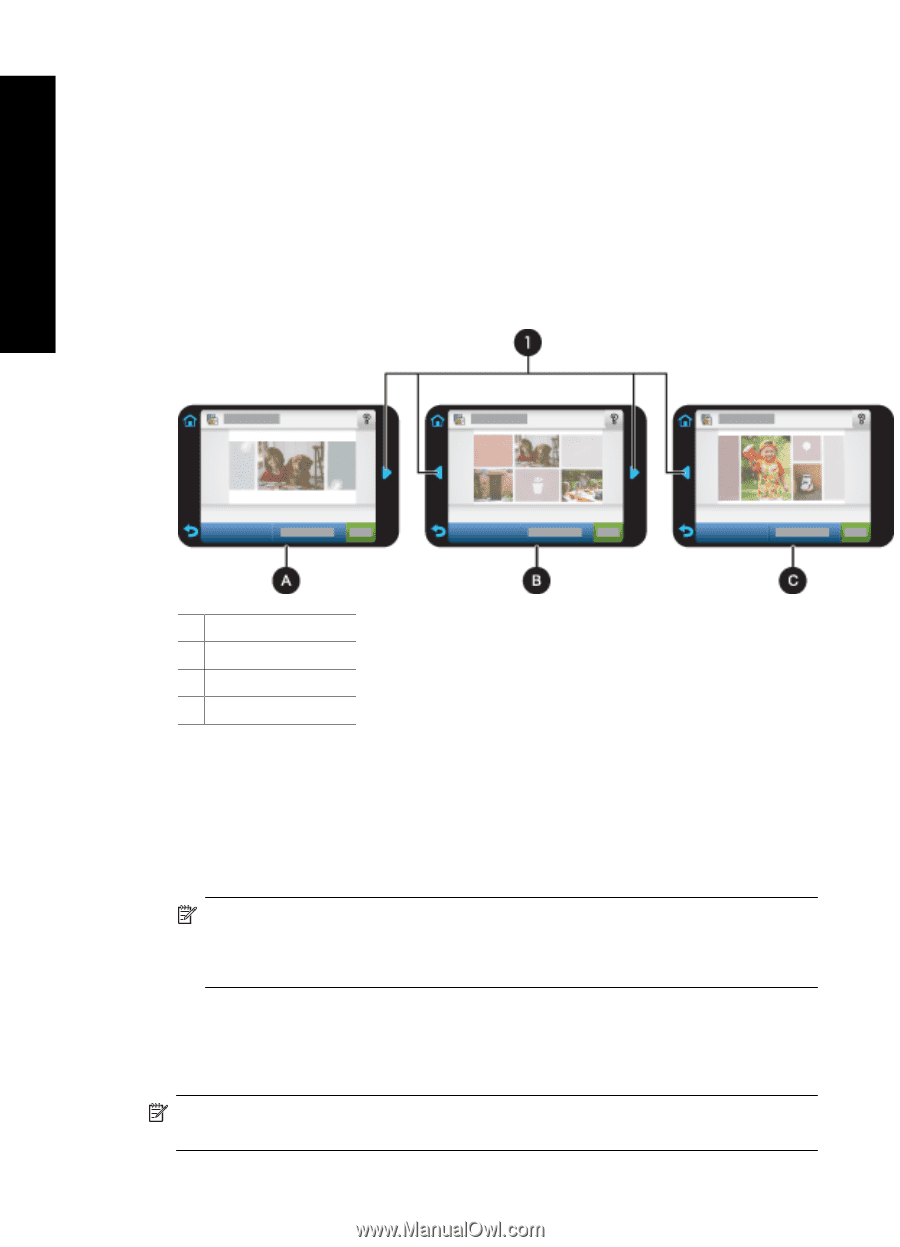
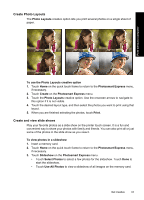
Print without a computer Chapter 4 8. Follow the prompt to use selected photos (if any) or to select photos. Touch Select All if you want to include all photos on the memory card in your album. 9. Touch Done when you are ready to preview the album. 10. In the Album Pages window the recommended number of pages that will create the best looking album is displayed. Change the number of pages if desired, and then touch Done. The album opens with the selected photos placed on pages. The first selected photo appears on the album cover page.Touch Add Title to add a title to the cover page using the onscreen keyboard. Use the onscreen arrows to move among the pages of the album. 1 Arrow keys A Album cover page B Album first page C Album second page 11. Touch Add Title to add a title to the cover page using the onscreen keyboard. You can change the cover photo by touching Change Photo. Use the onscreen arrows to move among the pages of the album. 12. Touch the Shuffle button to move photos among the template positions on the current page. Touch Shuffle repeatedly, if necessary, until the photos are in the desired positions. NOTE: The Shuffle button does not appear for the cover page. NOTE: If the template has both portrait and landscape positions, note that photos will rotate only into positions with the same orientation as themselves. 13. Touch Done. A dialog box will be displayed with the number of pages created for the album. Touch Ok. 14. Touch Print to print the album. NOTE: Albums cannot be saved. Print as many copies of your album as you need before turning off the printer or removing the memory card. 38 Print without a computer
-
 1
1 -
2
-
3
-
4
-
5
-
6
-
7
-
8
-
9
-
10
-
11
-
12
-
13
-
14
-
15
-
16
-
17
-
18
-
19
-
20
-
21
-
22
-
23
-
24
-
25
-
26
-
27
-
28
-
29
-
30
-
31
-
32
-
33
-
34
-
 35
35 -
 36
36 -
 37
37 -
 38
38 -
 39
39 -
 40
40 -
 41
41 -
 42
42 -
 43
43 -
 44
44 -
 45
45 -
46
-
47
-
48
-
49
-
50
-
51
-
52
-
53
-
54
-
55
-
56
-
57
-
58
-
59
-
60
-
61
-
62
-
63
-
64
-
65
-
66
-
67
-
68
-
69
-
70
-
71
-
72
-
73
-
74
-
75
-
76
-
77
-
78
-
79
-
80
-
81
-
82
-
83
-
84
-
85
-
86
-
87
-
88
-
89
-
90
-
91
-
92
-
93
-
94
-
95
-
96
-
97
-
98
 |
 |