HP Presario 6000 Getting Started - Compaq Presario 6000 and 8000 Series Comput - Page 113
finished with the task of removing
 |
View all HP Presario 6000 manuals
Add to My Manuals
Save this manual to your list of manuals |
Page 113 highlights
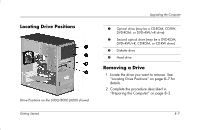
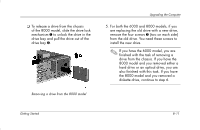
❏ To release a drive from the chassis of the 8000 model, slide the drive lock mechanism 1 to unlock the drive in the drive bay and pull the drive out of the drive bay 2. Removing a drive from the 8000 model Upgrading the Computer 5. For both the 6000 and 8000 models, if you are replacing the old drive with a new drive, remove the four screws 3 (two on each side) from the old drive. You need these screws to install the new drive. If you have the 6000 model, you are finished with the task of removing a drive from the chassis. If you have the 8000 model and you removed either a hard drive or an optical drive, you are also finished with this task. If you have the 8000 model and you removed a diskette drive, continue to step 6. Getting Started 8-11
-
 1
1 -
2
-
3
-
4
-
5
-
6
-
7
-
8
-
9
-
10
-
11
-
12
-
13
-
14
-
15
-
16
-
17
-
18
-
19
-
20
-
21
-
22
-
23
-
24
-
25
-
26
-
27
-
28
-
29
-
30
-
31
-
32
-
33
-
34
-
35
-
36
-
37
-
38
-
39
-
40
-
41
-
42
-
43
-
44
-
45
-
46
-
47
-
48
-
49
-
50
-
51
-
52
-
53
-
54
-
55
-
56
-
57
-
58
-
59
-
60
-
61
-
62
-
63
-
64
-
65
-
66
-
67
-
68
-
69
-
70
-
71
-
72
-
73
-
74
-
75
-
76
-
77
-
78
-
79
-
80
-
81
-
82
-
83
-
84
-
85
-
86
-
87
-
88
-
89
-
90
-
91
-
92
-
93
-
94
-
95
-
96
-
97
-
98
-
99
-
100
-
101
-
102
-
103
-
104
-
105
-
106
-
107
-
 108
108 -
 109
109 -
 110
110 -
 111
111 -
 112
112 -
 113
113 -
 114
114 -
 115
115 -
 116
116 -
 117
117 -
 118
118 -
119
-
120
-
121
-
122
-
123
-
124
-
125
-
126
-
127
-
128
-
129
-
130
-
131
-
132
-
133
-
134
-
135
-
136
-
137
-
138
-
139
-
140
-
141
-
142
 |
 |
