HP Presario 6000 Getting Started - Compaq Presario 6000 and 8000 Series Comput - Page 116
Sliding the Drive into the Drive Bay on the, 8000 6000 shown, Reconnecting the Diskette Drive Cables
 |
View all HP Presario 6000 manuals
Add to My Manuals
Save this manual to your list of manuals |
Page 116 highlights
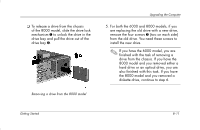
Upgrading the Computer 2. Slide the drive into the drive bay 1, making sure to align the guide screws with the guide slots, until it snaps into place. 3. Reconnect the power and data cables to your drive as indicated in the following illustrations. Sliding the Drive into the Drive Bay on the 6000/8000 (6000 shown) 8-14 Reconnecting the Diskette Drive Cables Getting Started
-
 1
1 -
2
-
3
-
4
-
5
-
6
-
7
-
8
-
9
-
10
-
11
-
12
-
13
-
14
-
15
-
16
-
17
-
18
-
19
-
20
-
21
-
22
-
23
-
24
-
25
-
26
-
27
-
28
-
29
-
30
-
31
-
32
-
33
-
34
-
35
-
36
-
37
-
38
-
39
-
40
-
41
-
42
-
43
-
44
-
45
-
46
-
47
-
48
-
49
-
50
-
51
-
52
-
53
-
54
-
55
-
56
-
57
-
58
-
59
-
60
-
61
-
62
-
63
-
64
-
65
-
66
-
67
-
68
-
69
-
70
-
71
-
72
-
73
-
74
-
75
-
76
-
77
-
78
-
79
-
80
-
81
-
82
-
83
-
84
-
85
-
86
-
87
-
88
-
89
-
90
-
91
-
92
-
93
-
94
-
95
-
96
-
97
-
98
-
99
-
100
-
101
-
102
-
103
-
104
-
105
-
106
-
107
-
108
-
109
-
110
-
 111
111 -
 112
112 -
 113
113 -
 114
114 -
 115
115 -
 116
116 -
 117
117 -
 118
118 -
 119
119 -
 120
120 -
 121
121 -
122
-
123
-
124
-
125
-
126
-
127
-
128
-
129
-
130
-
131
-
132
-
133
-
134
-
135
-
136
-
137
-
138
-
139
-
140
-
141
-
142
 |
 |

8–14
Getting Started
Upgrading the Computer
2. Slide the drive into the drive bay
1
, making
sure to align the guide screws with the guide
slots, until it snaps into place.
Sliding the Drive into the Drive Bay on the
6000/8000 (6000 shown)
3. Reconnect the power and data cables to your
drive as indicated in the following illustrations.
Reconnecting the Diskette Drive Cables