HP ProBook 650 Maintenance and Service Guide - Page 59
Optical drive see, WLAN module see
 |
View all HP ProBook 650 manuals
Add to My Manuals
Save this manual to your list of manuals |
Page 59 highlights
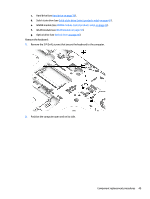
c. Hard drive (see Hard drive on page 39). d. Solid-state drive (see Solid-state drive (select products only) on page 41). e. WWAN module (see WWAN module (select products only) on page 42). f. WLAN module (see WLAN module on page 44). g. Optical drive (see Optical drive on page 46). Remove the keyboard: 1. Remove the 3 M 2x4L screws that secure the keyboard to the computer. 2. Position the computer open and on its side. Component replacement procedures 49
-
 1
1 -
2
-
3
-
4
-
5
-
6
-
7
-
8
-
9
-
10
-
11
-
12
-
13
-
14
-
15
-
16
-
17
-
18
-
19
-
20
-
21
-
22
-
23
-
24
-
25
-
26
-
27
-
28
-
29
-
30
-
31
-
32
-
33
-
34
-
35
-
36
-
37
-
38
-
39
-
40
-
41
-
42
-
43
-
44
-
45
-
46
-
47
-
48
-
49
-
50
-
51
-
52
-
53
-
 54
54 -
 55
55 -
 56
56 -
 57
57 -
 58
58 -
 59
59 -
 60
60 -
 61
61 -
 62
62 -
 63
63 -
 64
64 -
65
-
66
-
67
-
68
-
69
-
70
-
71
-
72
-
73
-
74
-
75
-
76
-
77
-
78
-
79
-
80
-
81
-
82
-
83
-
84
-
85
-
86
-
87
-
88
-
89
-
90
-
91
-
92
-
93
-
94
-
95
-
96
-
97
-
98
-
99
-
100
-
101
-
102
-
103
-
104
-
105
-
106
-
107
-
108
-
109
-
110
-
111
-
112
-
113
-
114
-
115
-
116
-
117
-
118
-
119
-
120
-
121
-
122
-
123
-
124
-
125
-
126
-
127
-
128
-
129
-
130
-
131
-
132
-
133
-
134
-
135
-
136
-
137
-
138
-
139
-
140
-
141
-
142
-
143
-
144
-
145
-
146
 |
 |

c.
Hard drive (see
Hard drive
on page
39
).
d.
Solid-state drive (see
Solid-state drive (select products only)
on page
41
).
e.
WWAN module (see
WWAN module (select products only)
on page
42
).
f.
WLAN module (see
WLAN module
on page
44
).
g.
Optical drive (see
Optical drive
on page
46
).
Remove the keyboard:
1.
Remove the 3 M 2x4L screws that secure the keyboard to the computer.
2.
Position the computer open and on its side.
Component replacement procedures
49