HP ProBook 650 Maintenance and Service Guide - Page 60
CAUTION, Release the keyboard connector
 |
View all HP ProBook 650 manuals
Add to My Manuals
Save this manual to your list of manuals |
Page 60 highlights
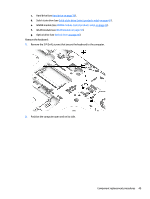
3. Gently insert a Torx screwdriver or other blunt tool into the keyboard release opening under the memory module, and then press gently on the back of the keyboard until the keyboard disengages from the computer. CAUTION: Press gently to avoid damaging the mylar on the back of the keyboard. 4. Rotate the keyboard downward (1) onto the top cover (1), and then release and disconnect the following connectors and cables: ● Release the keyboard connector (2) and then remove the cable (3). ● For products with a backlit keyboard, release the backlight connectors (4) and (6), and then remove the cables (5) and (7). 50 Chapter 5 Removal and replacement procedures for Customer Self-Repair parts
-
 1
1 -
2
-
3
-
4
-
5
-
6
-
7
-
8
-
9
-
10
-
11
-
12
-
13
-
14
-
15
-
16
-
17
-
18
-
19
-
20
-
21
-
22
-
23
-
24
-
25
-
26
-
27
-
28
-
29
-
30
-
31
-
32
-
33
-
34
-
35
-
36
-
37
-
38
-
39
-
40
-
41
-
42
-
43
-
44
-
45
-
46
-
47
-
48
-
49
-
50
-
51
-
52
-
53
-
54
-
 55
55 -
 56
56 -
 57
57 -
 58
58 -
 59
59 -
 60
60 -
 61
61 -
 62
62 -
 63
63 -
 64
64 -
 65
65 -
66
-
67
-
68
-
69
-
70
-
71
-
72
-
73
-
74
-
75
-
76
-
77
-
78
-
79
-
80
-
81
-
82
-
83
-
84
-
85
-
86
-
87
-
88
-
89
-
90
-
91
-
92
-
93
-
94
-
95
-
96
-
97
-
98
-
99
-
100
-
101
-
102
-
103
-
104
-
105
-
106
-
107
-
108
-
109
-
110
-
111
-
112
-
113
-
114
-
115
-
116
-
117
-
118
-
119
-
120
-
121
-
122
-
123
-
124
-
125
-
126
-
127
-
128
-
129
-
130
-
131
-
132
-
133
-
134
-
135
-
136
-
137
-
138
-
139
-
140
-
141
-
142
-
143
-
144
-
145
-
146
 |
 |

3.
Gently insert a Torx screwdriver or other blunt tool into the keyboard release opening under the memory
module, and then press gently on the back of the keyboard until the keyboard disengages from the
computer.
CAUTION:
Press gently to avoid damaging the mylar on the back of the keyboard.
4.
Rotate the keyboard downward
(1)
onto the top cover
(1)
, and then release and disconnect the following
connectors and cables:
●
Release the keyboard connector
(2)
and then remove the cable
(3)
.
●
For products with a backlit keyboard, release the backlight connectors
(4)
and
(6)
, and then
remove the cables
(5)
and
(7)
.
50
Chapter 5
Removal and replacement procedures for Customer Self-Repair parts