HP ProBook 650 Maintenance and Service Guide - Page 62
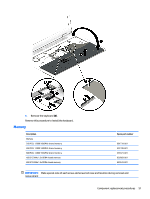
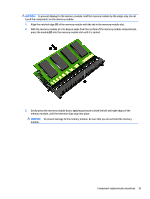
The memory module tilts up., Grasp the edge of the memory module
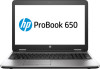 |
View all HP ProBook 650 manuals
Add to My Manuals
Save this manual to your list of manuals |
Page 62 highlights
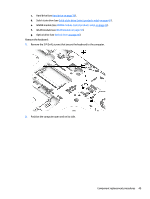
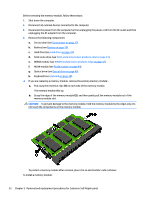
Before removing the memory module, follow these steps: 1. Shut down the computer. 2. Disconnect all external devices connected to the computer. 3. Disconnect the power from the computer by first unplugging the power cord from the AC outlet and then unplugging the AC adapter from the computer. 4. Remove the following components: a. Service door (see Service door on page 37). b. Battery (see Battery on page 38). c. Hard drive (see Hard drive on page 39). d. Solid-state drive (see Solid-state drive (select products only) on page 41). e. WWAN module (see WWAN module (select products only) on page 42). f. WLAN module (see WLAN module on page 44). g. Optical drive (see Optical drive on page 46). h. Keyboard (see Keyboard on page 48). ▲ If you are replacing a memory module, remove the existing memory module:. ▲ Pull away the retention clips (1) on each side of the memory module. The memory module tilts up. ▲ Grasp the edge of the memory module (2), and then gently pull the memory module out of the memory module slot. CAUTION: To prevent damage to the memory module, hold the memory module by the edges only. Do not touch the components on the memory module. To protect a memory module after removal, place it in an electrostatic-safe container. To install a memory module: 52 Chapter 5 Removal and replacement procedures for Customer Self-Repair parts
-
 1
1 -
2
-
3
-
4
-
5
-
6
-
7
-
8
-
9
-
10
-
11
-
12
-
13
-
14
-
15
-
16
-
17
-
18
-
19
-
20
-
21
-
22
-
23
-
24
-
25
-
26
-
27
-
28
-
29
-
30
-
31
-
32
-
33
-
34
-
35
-
36
-
37
-
38
-
39
-
40
-
41
-
42
-
43
-
44
-
45
-
46
-
47
-
48
-
49
-
50
-
51
-
52
-
53
-
54
-
55
-
56
-
 57
57 -
 58
58 -
 59
59 -
 60
60 -
 61
61 -
 62
62 -
 63
63 -
 64
64 -
 65
65 -
 66
66 -
 67
67 -
68
-
69
-
70
-
71
-
72
-
73
-
74
-
75
-
76
-
77
-
78
-
79
-
80
-
81
-
82
-
83
-
84
-
85
-
86
-
87
-
88
-
89
-
90
-
91
-
92
-
93
-
94
-
95
-
96
-
97
-
98
-
99
-
100
-
101
-
102
-
103
-
104
-
105
-
106
-
107
-
108
-
109
-
110
-
111
-
112
-
113
-
114
-
115
-
116
-
117
-
118
-
119
-
120
-
121
-
122
-
123
-
124
-
125
-
126
-
127
-
128
-
129
-
130
-
131
-
132
-
133
-
134
-
135
-
136
-
137
-
138
-
139
-
140
-
141
-
142
-
143
-
144
-
145
-
146
 |
 |
