HP RP7 Maintenance & Service Guide HP RP7 Retail System Model 7800 - Page 81
Reconnect the power cord and press the power button on both displays.
 |
View all HP RP7 manuals
Add to My Manuals
Save this manual to your list of manuals |
Page 81 highlights
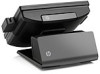
12. Replace the rear I/O cover by placing the hooks on the bottom of the cover into the slots on the bottom of the chassis (1). Then rotate the top of the I/O cover up so that it snaps securely onto the chassis (2). 13. Reconnect the power cord and press the power button on both displays. Optional HP Retail RP7 10.4" Customer Display 71
-
 1
1 -
2
-
3
-
4
-
5
-
6
-
7
-
8
-
9
-
10
-
11
-
12
-
13
-
14
-
15
-
16
-
17
-
18
-
19
-
20
-
21
-
22
-
23
-
24
-
25
-
26
-
27
-
28
-
29
-
30
-
31
-
32
-
33
-
34
-
35
-
36
-
37
-
38
-
39
-
40
-
41
-
42
-
43
-
44
-
45
-
46
-
47
-
48
-
49
-
50
-
51
-
52
-
53
-
54
-
55
-
56
-
57
-
58
-
59
-
60
-
61
-
62
-
63
-
64
-
65
-
66
-
67
-
68
-
69
-
70
-
71
-
72
-
73
-
74
-
75
-
 76
76 -
 77
77 -
 78
78 -
 79
79 -
 80
80 -
 81
81 -
 82
82 -
 83
83 -
 84
84 -
 85
85 -
 86
86 -
87
-
88
-
89
-
90
-
91
-
92
-
93
-
94
-
95
-
96
-
97
-
98
-
99
-
100
-
101
-
102
-
103
-
104
-
105
-
106
-
107
-
108
-
109
-
110
-
111
-
112
-
113
-
114
-
115
-
116
-
117
-
118
-
119
-
120
-
121
-
122
-
123
-
124
-
125
-
126
-
127
-
128
-
129
-
130
-
131
-
132
-
133
-
134
-
135
-
136
-
137
-
138
-
139
-
140
-
141
-
142
-
143
-
144
-
145
-
146
-
147
-
148
-
149
-
150
-
151
-
152
-
153
-
154
-
155
-
156
-
157
-
158
-
159
-
160
-
161
-
162
-
163
-
164
-
165
-
166
-
167
-
168
-
169
-
170
-
171
-
172
-
173
-
174
 |
 |

12.
Replace the rear I/O cover by placing the hooks on the bottom of the cover into the slots on the
bottom of the chassis
(1)
. Then rotate the top of the I/O cover up so that it snaps securely onto
the chassis
(2)
.
13.
Reconnect the power cord and press the power button on both displays.
Optional HP Retail RP7 10.4” Customer Display
71