HP dx2290 Service Reference Guide - HP Compaq dx2290 Business PC - Page 51
Removing the hard disk drive, Lay the computer gently on its side.
 |
View all HP dx2290 manuals
Add to My Manuals
Save this manual to your list of manuals |
Page 51 highlights
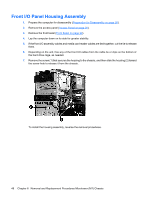
Removing the hard disk drive NOTE: On some models, the primary hard disk drive is located in the internal 3.5-inch drive cage as shown in this section. On other models, the primary hard disk drive is located in the external 3.5-inch drive bay. For those models, refer to Removing the diskette or hard disk drive on page 41. 1. Prepare the computer for disassembly (Preparation for Disassembly on page 26). 2. Remove the access panel (Access Panel on page 28). 3. Remove the front bezel (Front Bezel on page 29). 4. Lay the computer gently on its side. 5. Remove the two screws that secure the hard disk drive cage to the chassis. 6. Push down the latch on the side of the hard disk drive cage, and then slide the hard disk drive cage away from the bottom of the chassis as shown below. Removing and replacing drives 43
-
 1
1 -
2
-
3
-
4
-
5
-
6
-
7
-
8
-
9
-
10
-
11
-
12
-
13
-
14
-
15
-
16
-
17
-
18
-
19
-
20
-
21
-
22
-
23
-
24
-
25
-
26
-
27
-
28
-
29
-
30
-
31
-
32
-
33
-
34
-
35
-
36
-
37
-
38
-
39
-
40
-
41
-
42
-
43
-
44
-
45
-
 46
46 -
 47
47 -
 48
48 -
 49
49 -
 50
50 -
 51
51 -
 52
52 -
 53
53 -
 54
54 -
 55
55 -
 56
56 -
57
-
58
-
59
-
60
-
61
-
62
-
63
-
64
-
65
-
66
-
67
-
68
-
69
-
70
-
71
-
72
-
73
-
74
-
75
-
76
-
77
-
78
-
79
-
80
-
81
-
82
-
83
-
84
-
85
-
86
-
87
-
88
-
89
-
90
-
91
-
92
-
93
-
94
-
95
-
96
-
97
-
98
-
99
-
100
-
101
-
102
-
103
-
104
-
105
-
106
-
107
-
108
-
109
-
110
 |
 |
