HP dx2290 Service Reference Guide - HP Compaq dx2290 Business PC - Page 64
Type 1 Battery Holder, Computer Setup F10 Utility Guide
 |
View all HP dx2290 manuals
Add to My Manuals
Save this manual to your list of manuals |
Page 64 highlights
Type 1 Battery Holder 1. Lift the battery out of its holder. 2. Slide the replacement battery into position, positive side up. 3. The battery holder automatically secures the battery in the proper position. 4. Replace the computer access panel. 5. Plug in the computer and turn on power to the computer. 6. Reset the date and time, your passwords, and any special system setups, using Computer Setup. Refer to the Computer Setup (F10) Utility Guide. 56 Chapter 6 Removal and Replacement Procedures Microtower (MT) Chassis
-
 1
1 -
2
-
3
-
4
-
5
-
6
-
7
-
8
-
9
-
10
-
11
-
12
-
13
-
14
-
15
-
16
-
17
-
18
-
19
-
20
-
21
-
22
-
23
-
24
-
25
-
26
-
27
-
28
-
29
-
30
-
31
-
32
-
33
-
34
-
35
-
36
-
37
-
38
-
39
-
40
-
41
-
42
-
43
-
44
-
45
-
46
-
47
-
48
-
49
-
50
-
51
-
52
-
53
-
54
-
55
-
56
-
57
-
58
-
 59
59 -
 60
60 -
 61
61 -
 62
62 -
 63
63 -
 64
64 -
 65
65 -
 66
66 -
 67
67 -
 68
68 -
 69
69 -
70
-
71
-
72
-
73
-
74
-
75
-
76
-
77
-
78
-
79
-
80
-
81
-
82
-
83
-
84
-
85
-
86
-
87
-
88
-
89
-
90
-
91
-
92
-
93
-
94
-
95
-
96
-
97
-
98
-
99
-
100
-
101
-
102
-
103
-
104
-
105
-
106
-
107
-
108
-
109
-
110
 |
 |

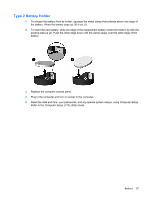
Type 1 Battery Holder
1.
Lift the battery out of its holder.
2.
Slide the replacement battery into position, positive side up.
3.
The battery holder automatically secures the battery in the proper position.
4.
Replace the computer access panel.
5.
Plug in the computer and turn on power to the computer.
6.
Reset the date and time, your passwords, and any special system setups, using Computer Setup.
Refer to the
Computer Setup (F10) Utility Guide
.
56
Chapter 6
Removal and Replacement Procedures Microtower (MT) Chassis