HP dx2290 Service Reference Guide - HP Compaq dx2290 Business PC - Page 56
Front I/O Panel Housing Assembly
 |
View all HP dx2290 manuals
Add to My Manuals
Save this manual to your list of manuals |
Page 56 highlights
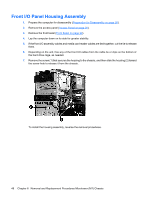
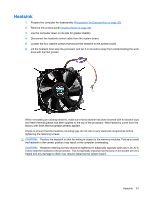
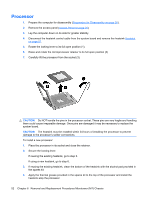
Front I/O Panel Housing Assembly 1. Prepare the computer for disassembly (Preparation for Disassembly on page 26). 2. Remove the access panel (Access Panel on page 28). 3. Remove the front bezel (Front Bezel on page 29). 4. Lay the computer down on its side for greater stability. 5. If the front I/O assembly cables and media card reader cables are tied together, cut the tie to release them. 6. Depending on the unit, free any of the front I/O cables from the cable tie or clips on the bottom of the hard drive cage, as needed. 7. Remove the screw (1) that secures the housing to the chassis, and then slide the housing (2) toward the screw hole to release it from the chassis. To install the housing assembly, reverse the removal procedures. 48 Chapter 6 Removal and Replacement Procedures Microtower (MT) Chassis
-
 1
1 -
2
-
3
-
4
-
5
-
6
-
7
-
8
-
9
-
10
-
11
-
12
-
13
-
14
-
15
-
16
-
17
-
18
-
19
-
20
-
21
-
22
-
23
-
24
-
25
-
26
-
27
-
28
-
29
-
30
-
31
-
32
-
33
-
34
-
35
-
36
-
37
-
38
-
39
-
40
-
41
-
42
-
43
-
44
-
45
-
46
-
47
-
48
-
49
-
50
-
 51
51 -
 52
52 -
 53
53 -
 54
54 -
 55
55 -
 56
56 -
 57
57 -
 58
58 -
 59
59 -
 60
60 -
 61
61 -
62
-
63
-
64
-
65
-
66
-
67
-
68
-
69
-
70
-
71
-
72
-
73
-
74
-
75
-
76
-
77
-
78
-
79
-
80
-
81
-
82
-
83
-
84
-
85
-
86
-
87
-
88
-
89
-
90
-
91
-
92
-
93
-
94
-
95
-
96
-
97
-
98
-
99
-
100
-
101
-
102
-
103
-
104
-
105
-
106
-
107
-
108
-
109
-
110
 |
 |
