HP dx6120 HP Business Desktop dx6100 Series Personal Computers Service Referen - Page 141
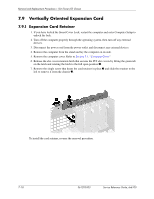
Horizontally Oriented Expansion Card
 |
View all HP dx6120 manuals
Add to My Manuals
Save this manual to your list of manuals |
Page 141 highlights
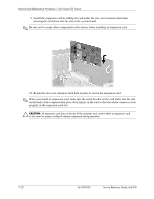
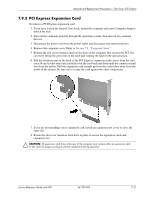
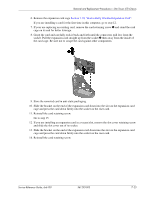
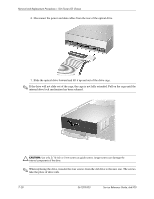
Removal and Replacement Procedures- Slim Tower (ST) Chassis 6. Remove the expansion card cage Section 7.10, "Horizontally Oriented Expansion Card". If you are installing a card for the first time in this computer, go to step 12. 7. If your are replacing an existing card, remove the card retaining screw 1 and stand the card cage on its end for better leverage. 8. Grasp the card and carefully rock it back and forth until the connectors pull free from the socket. Pull the expansion card straight up from the socket 2 then away from the inside of the card cage. Be sure not to scrape the card against other components. 9. Store the removed card in anti-static packaging. 10. Slide the bracket on the end of the expansion card down into the slot on the expansion card cage and press the card down firmly into the socket on the riser card. 11. Reinstall the card retaining screw. Go to step 15. 12. If you are installing an expansion card in a vacant slot, remove the slot cover retaining screw and slide the slot cover out of its socket. 13. Slide the bracket on the end of the expansion card down into the slot on the expansion card cage and press the card down firmly into the socket on the riser card. 14. Reinstall the card retaining screw. Service Reference Guide, dx6100 361293-003 7-23
-
 1
1 -
2
-
3
-
4
-
5
-
6
-
7
-
8
-
9
-
10
-
11
-
12
-
13
-
14
-
15
-
16
-
17
-
18
-
19
-
20
-
21
-
22
-
23
-
24
-
25
-
26
-
27
-
28
-
29
-
30
-
31
-
32
-
33
-
34
-
35
-
36
-
37
-
38
-
39
-
40
-
41
-
42
-
43
-
44
-
45
-
46
-
47
-
48
-
49
-
50
-
51
-
52
-
53
-
54
-
55
-
56
-
57
-
58
-
59
-
60
-
61
-
62
-
63
-
64
-
65
-
66
-
67
-
68
-
69
-
70
-
71
-
72
-
73
-
74
-
75
-
76
-
77
-
78
-
79
-
80
-
81
-
82
-
83
-
84
-
85
-
86
-
87
-
88
-
89
-
90
-
91
-
92
-
93
-
94
-
95
-
96
-
97
-
98
-
99
-
100
-
101
-
102
-
103
-
104
-
105
-
106
-
107
-
108
-
109
-
110
-
111
-
112
-
113
-
114
-
115
-
116
-
117
-
118
-
119
-
120
-
121
-
122
-
123
-
124
-
125
-
126
-
127
-
128
-
129
-
130
-
131
-
132
-
133
-
134
-
135
-
 136
136 -
 137
137 -
 138
138 -
 139
139 -
 140
140 -
 141
141 -
 142
142 -
 143
143 -
 144
144 -
 145
145 -
 146
146 -
147
-
148
-
149
-
150
-
151
-
152
-
153
-
154
-
155
-
156
-
157
-
158
-
159
-
160
-
161
-
162
-
163
-
164
-
165
-
166
-
167
-
168
-
169
-
170
-
171
-
172
-
173
-
174
-
175
-
176
-
177
-
178
-
179
-
180
-
181
-
182
-
183
-
184
-
185
-
186
-
187
-
188
-
189
-
190
-
191
-
192
-
193
-
194
-
195
-
196
-
197
-
198
-
199
-
200
-
201
-
202
-
203
-
204
-
205
-
206
-
207
-
208
-
209
-
210
-
211
-
212
-
213
-
214
-
215
-
216
-
217
-
218
-
219
-
220
-
221
-
222
-
223
-
224
-
225
-
226
-
227
-
228
-
229
-
230
-
231
-
232
-
233
-
234
-
235
-
236
-
237
-
238
-
239
-
240
-
241
-
242
-
243
-
244
-
245
-
246
-
247
-
248
-
249
-
250
 |
 |
