IBM 79856au Installation Guide - Page 35
Attention
 |
UPC - 883436004374
View all IBM 79856au manuals
Add to My Manuals
Save this manual to your list of manuals |
Page 35 highlights
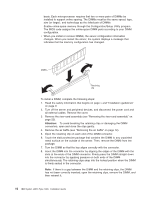
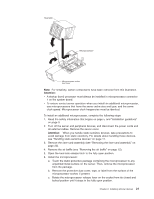
Heat sink Microprocessor Microprocessor socket dust cover Note: For simplicity, certain components have been removed from this illustration. Attention: v A startup (boot) processor must always be installed in microprocessor connector 1 on the system board. v To ensure correct server operation when you install an additional microprocessor, use microprocessors that have the same cache size and type, and the same clock speed. Microprocessor clock frequencies must be identical. To install an additional microprocessor, complete the following steps: 1. Read the safety information that begins on page v, and "Installation guidelines" on page 9. 2. Turn off the server and peripheral devices, and disconnect the power cords and all external cables. Remove the server cover. Attention: When you handle static-sensitive devices, take precautions to avoid damage from static electricity. For details about handling these devices, see "Handling static-sensitive devices" on page 11. 3. Remove the riser-card assembly (see "Removing the riser-card assembly" on page 23). 4. Remove the air baffle (see "Removing the air baffle" on page 12). 5. Open the heat-sink release latch to the fully open position. 6. Install the microprocessor: a. Touch the static-protective package containing the microprocessor to any unpainted metal surface on the server. Then, remove the microprocessor from the package. b. Remove the protective dust cover, tape, or label from the surface of the microprocessor socket, if present. c. Rotate the microprocessor release lever on the socket from its closed and locked position until it stops in the fully open position. Chapter 2. Installing optional devices 21
-
 1
1 -
2
-
3
-
4
-
5
-
6
-
7
-
8
-
9
-
10
-
11
-
12
-
13
-
14
-
15
-
16
-
17
-
18
-
19
-
20
-
21
-
22
-
23
-
24
-
25
-
26
-
27
-
28
-
29
-
 30
30 -
 31
31 -
 32
32 -
 33
33 -
 34
34 -
 35
35 -
 36
36 -
 37
37 -
 38
38 -
 39
39 -
 40
40 -
41
-
42
-
43
-
44
-
45
-
46
-
47
-
48
-
49
-
50
-
51
-
52
-
53
-
54
-
55
-
56
-
57
-
58
-
59
-
60
-
61
-
62
-
63
-
64
-
65
-
66
-
67
-
68
-
69
-
70
-
71
-
72
-
73
-
74
-
75
-
76
-
77
-
78
-
79
-
80
-
81
-
82
-
83
-
84
-
85
-
86
-
87
-
88
-
89
-
90
-
91
-
92
-
93
-
94
-
95
-
96
-
97
-
98
-
99
-
100
-
101
-
102
-
103
-
104
 |
 |
