IBM 79856au Installation Guide - Page 37
Removing, riser-card, assembly
 |
UPC - 883436004374
View all IBM 79856au manuals
Add to My Manuals
Save this manual to your list of manuals |
Page 37 highlights
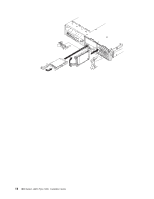
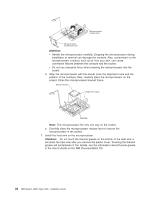
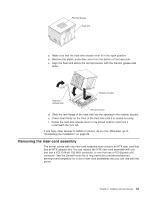
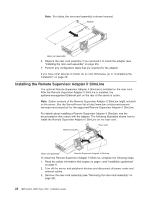
Thermal grease Heat sink a. Make sure that the heat-sink release lever is in the open position. b. Remove the plastic protective cover from the bottom of the heat sink. c. Align the heat sink above the microprocessor with the thermal grease side down. Retainer bracket Heat sink release lever Microprocessor d. Slide the rear flange of the heat sink into the opening in the retainer bracket. e. Press down firmly on the front of the heat sink until it is seated securely. f. Rotate the heat-sink release lever to the closed position and hook it underneath the lock tab. If you have other devices to install or remove, do so now. Otherwise, go to "Completing the installation" on page 29. Removing the riser-card assembly The server comes with one riser-card assembly that contains an HTX riser card that has an HTX adapter slot. You can replace the HTX riser-card assembly with one that has a PCI-X 64-bit 133 MHz connector, or one that has a PCI-Express x16 connector. See the ServerProven list at http://www.ibm.com/servers/eserver/ serverproven/compat/us/ for a list of riser-card assemblies that you can use with the server. Chapter 2. Installing optional devices 23
-
 1
1 -
2
-
3
-
4
-
5
-
6
-
7
-
8
-
9
-
10
-
11
-
12
-
13
-
14
-
15
-
16
-
17
-
18
-
19
-
20
-
21
-
22
-
23
-
24
-
25
-
26
-
27
-
28
-
29
-
30
-
31
-
 32
32 -
 33
33 -
 34
34 -
 35
35 -
 36
36 -
 37
37 -
 38
38 -
 39
39 -
 40
40 -
 41
41 -
 42
42 -
43
-
44
-
45
-
46
-
47
-
48
-
49
-
50
-
51
-
52
-
53
-
54
-
55
-
56
-
57
-
58
-
59
-
60
-
61
-
62
-
63
-
64
-
65
-
66
-
67
-
68
-
69
-
70
-
71
-
72
-
73
-
74
-
75
-
76
-
77
-
78
-
79
-
80
-
81
-
82
-
83
-
84
-
85
-
86
-
87
-
88
-
89
-
90
-
91
-
92
-
93
-
94
-
95
-
96
-
97
-
98
-
99
-
100
-
101
-
102
-
103
-
104
 |
 |
