IBM 79856au Installation Guide - Page 42
Installing, Remote, Supervisor, Adapter, SlimLine
 |
UPC - 883436004374
View all IBM 79856au manuals
Add to My Manuals
Save this manual to your list of manuals |
Page 42 highlights
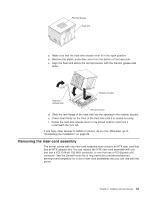
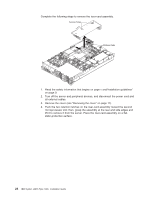
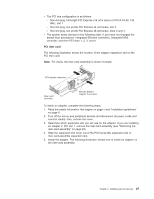
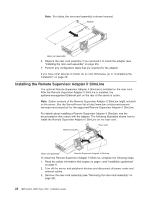
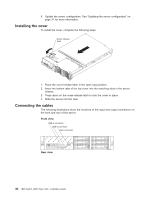
Note: For clarity, the riser-card assembly is shown inverted. Adapter Riser card assembly 6. Replace the riser card assembly if you removed it to install the adapter (see "Installing the riser-card assembly" on page 25). 7. Perform any configuration tasks that are required for the adapter. If you have other devices to install, do so now. Otherwise, go to "Completing the installation" on page 29. Installing the Remote Supervisor Adapter II SlimLine The optional Remote Supervisor Adapter II SlimLine is installed on the riser card. After the Remote Supervisor Adapter II SlimLine is installed, the systems-management Ethernet port on the rear of the server is active. Note: Earlier versions of the Remote Supervisor Adapter II SlimLine might not work in this server. See the ServerProven list at http://www.ibm.com/servers/eserver/ serverproven/compat/us/ for the supported Remote Supervisor Adapter II SlimLine. For details about installing a Remote Supervisor Adapter II SlimLine, see the documentation that comes with the adapter. The following illustration shows how to install the Remote Supervisor Adapter II SlimLine on the riser-card. Retainer bracket Riser card Riser card assembly Remote Supervisor Adapter II SlimLine To install the Remote Supervisor Adapter II SlimLine, complete the following steps: 1. Read the safety information that begins on page v and "Installation guidelines" on page 9. 2. Turn off the server and peripheral devices and disconnect all power cords and external cables. 3. Remove the riser-card assembly (see "Removing the riser-card assembly" on page 23). 28 IBM System x3655 Type 7985: Installation Guide
-
 1
1 -
2
-
3
-
4
-
5
-
6
-
7
-
8
-
9
-
10
-
11
-
12
-
13
-
14
-
15
-
16
-
17
-
18
-
19
-
20
-
21
-
22
-
23
-
24
-
25
-
26
-
27
-
28
-
29
-
30
-
31
-
32
-
33
-
34
-
35
-
36
-
 37
37 -
 38
38 -
 39
39 -
 40
40 -
 41
41 -
 42
42 -
 43
43 -
 44
44 -
 45
45 -
 46
46 -
 47
47 -
48
-
49
-
50
-
51
-
52
-
53
-
54
-
55
-
56
-
57
-
58
-
59
-
60
-
61
-
62
-
63
-
64
-
65
-
66
-
67
-
68
-
69
-
70
-
71
-
72
-
73
-
74
-
75
-
76
-
77
-
78
-
79
-
80
-
81
-
82
-
83
-
84
-
85
-
86
-
87
-
88
-
89
-
90
-
91
-
92
-
93
-
94
-
95
-
96
-
97
-
98
-
99
-
100
-
101
-
102
-
103
-
104
 |
 |
