IBM 79856au Installation Guide - Page 41
riser
 |
UPC - 883436004374
View all IBM 79856au manuals
Add to My Manuals
Save this manual to your list of manuals |
Page 41 highlights
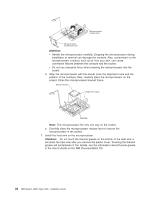
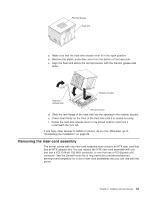
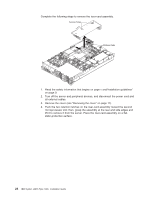
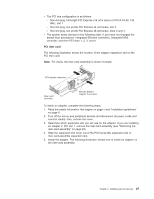
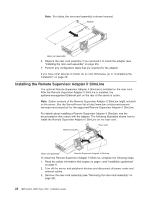
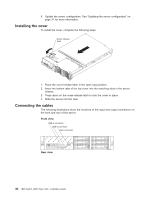
v The PCI bus configuration is as follows: - Non-hot-plug, full-length PCI Express x16 (x16 lanes) or PCI-X 64 bit, 133 MHz, slot 1 - Non-hot-plug, low profile PCI Express x4 (x4 lanes), slot 2 - Non-hot-plug, low profile PCI Express x8 (x8 lanes), slots 3 and 4 v The system scans devices in the following order, if you have not changed the default boot precedence: integrated Ethernet controllers, integrated SAS controller, and then PCI slots 1, 2, 3, and 4. PCI riser card The following illustration shows the location of the adapter expansion slot on the PCI riser card. Note: For clarity, the riser-card assembly is shown inverted. HTX adapter connector Riser card assembly Remote Slimline Adapter II connector To install an adapter, complete the following steps: 1. Read the safety information that begins on page v and "Installation guidelines" on page 9. 2. Turn off the server and peripheral devices and disconnect all power cords and external cables; then, remove the cover. 3. Determine which expansion slot you will use for the adapter. If you are installing an adapter in PCI slot 1, remove the riser-card assembly (see "Removing the riser-card assembly" on page 23). 4. Slide the expansion-slot cover out of the PCI low-profile expansion slot or riser-card assembly expansion slot. 5. Install the adapter. The following illustration shows how to install an adapter on the riser-card assembly. Chapter 2. Installing optional devices 27
-
 1
1 -
2
-
3
-
4
-
5
-
6
-
7
-
8
-
9
-
10
-
11
-
12
-
13
-
14
-
15
-
16
-
17
-
18
-
19
-
20
-
21
-
22
-
23
-
24
-
25
-
26
-
27
-
28
-
29
-
30
-
31
-
32
-
33
-
34
-
35
-
 36
36 -
 37
37 -
 38
38 -
 39
39 -
 40
40 -
 41
41 -
 42
42 -
 43
43 -
 44
44 -
 45
45 -
 46
46 -
47
-
48
-
49
-
50
-
51
-
52
-
53
-
54
-
55
-
56
-
57
-
58
-
59
-
60
-
61
-
62
-
63
-
64
-
65
-
66
-
67
-
68
-
69
-
70
-
71
-
72
-
73
-
74
-
75
-
76
-
77
-
78
-
79
-
80
-
81
-
82
-
83
-
84
-
85
-
86
-
87
-
88
-
89
-
90
-
91
-
92
-
93
-
94
-
95
-
96
-
97
-
98
-
99
-
100
-
101
-
102
-
103
-
104
 |
 |
