IBM 79856au Installation Guide - Page 44
Installing, cover, Connecting, cables
 |
UPC - 883436004374
View all IBM 79856au manuals
Add to My Manuals
Save this manual to your list of manuals |
Page 44 highlights
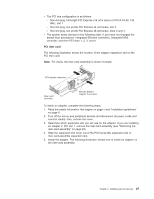
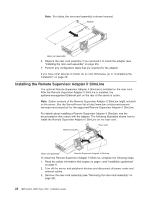
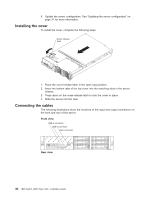
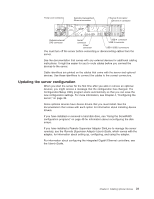
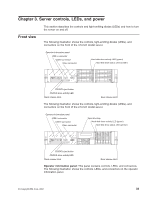
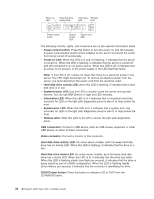
6. Update the server configuration. See "Updating the server configuration" on page 31 for more information. Installing the cover To install the cover, complete the following steps. Cover-release latch 1. Place the cover-release latch in the open (up) position. 2. Insert the bottom tabs of the top cover into the matching slots in the server chassis. 3. Press down on the cover-release latch to lock the cover in place. 4. Slide the server into the rack. Connecting the cables The following illustrations show the locations of the input and output connectors on the front and rear of the server. Front view USB 5 connector USB 6 connector Video connector Rear view 30 IBM System x3655 Type 7985: Installation Guide
-
 1
1 -
2
-
3
-
4
-
5
-
6
-
7
-
8
-
9
-
10
-
11
-
12
-
13
-
14
-
15
-
16
-
17
-
18
-
19
-
20
-
21
-
22
-
23
-
24
-
25
-
26
-
27
-
28
-
29
-
30
-
31
-
32
-
33
-
34
-
35
-
36
-
37
-
38
-
 39
39 -
 40
40 -
 41
41 -
 42
42 -
 43
43 -
 44
44 -
 45
45 -
 46
46 -
 47
47 -
 48
48 -
 49
49 -
50
-
51
-
52
-
53
-
54
-
55
-
56
-
57
-
58
-
59
-
60
-
61
-
62
-
63
-
64
-
65
-
66
-
67
-
68
-
69
-
70
-
71
-
72
-
73
-
74
-
75
-
76
-
77
-
78
-
79
-
80
-
81
-
82
-
83
-
84
-
85
-
86
-
87
-
88
-
89
-
90
-
91
-
92
-
93
-
94
-
95
-
96
-
97
-
98
-
99
-
100
-
101
-
102
-
103
-
104
 |
 |

6.
Update
the
server
configuration.
See
“Updating
the
server
configuration”
on
page
31
for
more
information.
Installing
the
cover
To
install
the
cover,
complete
the
following
steps.
Cover-release
latch
1.
Place
the
cover-release
latch
in
the
open
(up)
position.
2.
Insert
the
bottom
tabs
of
the
top
cover
into
the
matching
slots
in
the
server
chassis.
3.
Press
down
on
the
cover-release
latch
to
lock
the
cover
in
place.
4.
Slide
the
server
into
the
rack.
Connecting
the
cables
The
following
illustrations
show
the
locations
of
the
input
and
output
connectors
on
the
front
and
rear
of
the
server.
Front
view
USB 5 connector
USB 6 connector
Video connector
Rear
view
30
IBM
System
x3655
Type
7985:
Installation
Guide