IBM 8840 Installation Guide - Page 75
Diagnosing, problems, using, light, diagnostics, Light
 |
UPC - 000435863799
View all IBM 8840 manuals
Add to My Manuals
Save this manual to your list of manuals |
Page 75 highlights
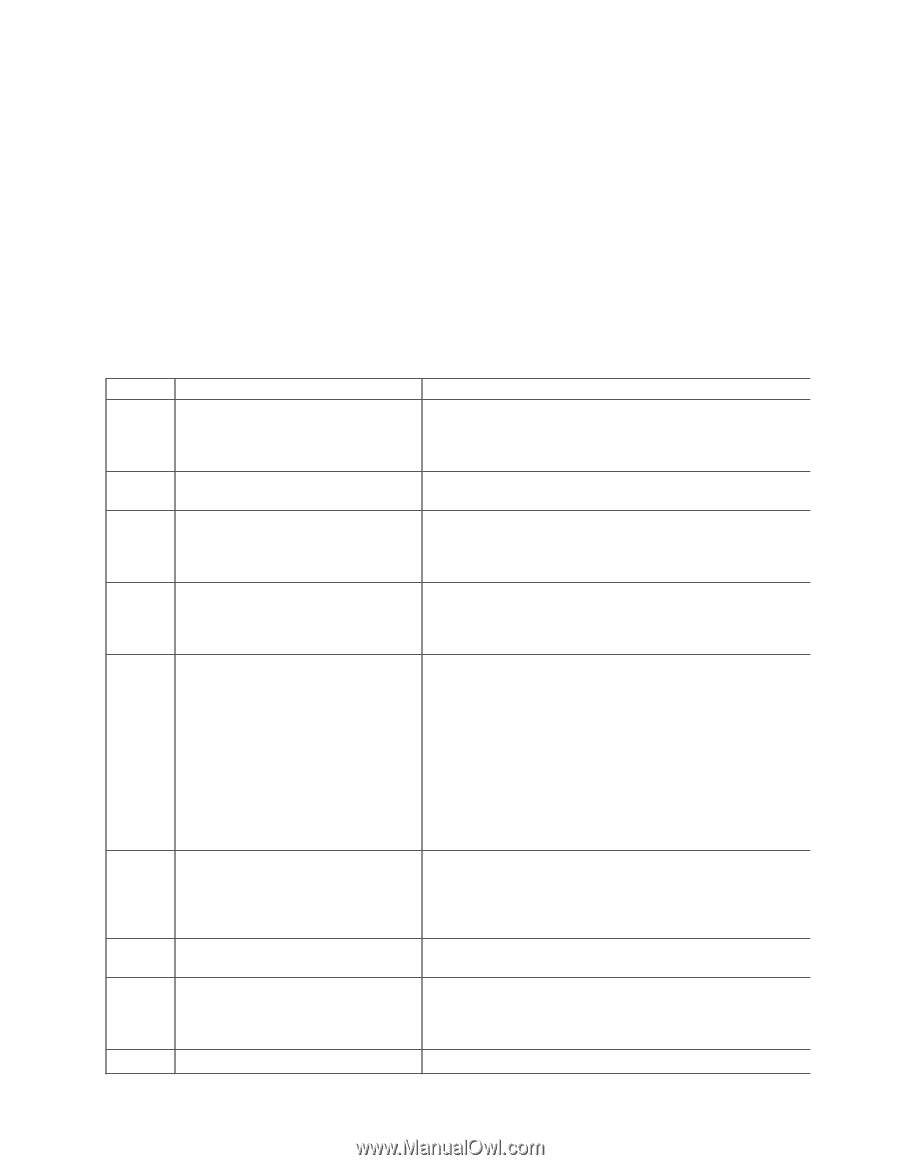
Diagnosing problems using light path diagnostics LEDs in two locations on the server are available to help you diagnose problems that might occur during installation. Use them in the following order: 1. Light path diagnostics panel - Look at this panel first. If a system error has occurred, the system-error LED on the front of the light path diagnostics drawer is lit. Slide the latch to the left on the front of the light path diagnostics drawer to access the light path diagnostics panel. Note any LEDs that are lit, and then close the drawer. 2. LEDs on the system board - To identify the component that is causing the error, note the lit LED on or beside the component. Light path diagnostics LEDs The following table lists the LEDs on the light path diagnostics panel, the problems that they indicate, and actions to solve the problems. LED None OVER SPEC PS 1 PS 2 CPU Problem Action An error has occurred and cannot be Check the system error log for information about the error. diagnosed, or the ASM processor has failed. The error is not represented by a light path diagnostics LED. The power supplies are using more power than their maximum rating. Replace the failing power supply, or remove optional devices from the server. When the LED is lit, the power supply in bay 1 has failed. When the LED flashes, an invalid power-supply configuration has occurred. If the power supply has failed, call for service. If a configuration error has occurred, make sure that the power supply is installed correctly. When the LED is lit, the power supply in bay 2 has failed. When the LED flashes, an invalid power-supply configuration has occurred. If the power supply has failed, call for service. If a configuration error has occurred, make sure that the power supply is installed correctly. When the LED is lit, a microprocessor If a lit LED on the system board indicates a problem with a has failed. When the LED flashes, an microprocessor, make sure that the microprocessor is installed invalid microprocessor configuration has correctly. See the Option Installation Guide on the IBM xSeries occurred. Documentation CD for information about installing a microprocessor. If the problem remains, call for service. VRM CNFG MEM NMI If a configuration error has occurred, make sure that the microprocessors have the same cache size and type, and the same clock speed. Microprocessor internal and external clock frequencies must be identical. When the LED is lit, an error occurred Replace the VRM. If the problem remains, call for service. on the microprocessor voltage regulator module (VRM). When the LED flashes, If a configuration error has occurred, make sure that the VRM is an invalid VRM configuration has installed correctly. If the problem remains, replace the VRM. occurred. When this LED is lit, the front system Check the newly installed microprocessor options to make sure error LED will also be lit. they are compatible with each other and change as needed. When the LED is on, a memory error has occurred. When the LED flashes, an invalid DIMM configuration has occurred. Replace the failing DIMM, which is indicated by the lit LED on the system board. If a configuration error has occurred, make sure the DIMMs are installed correctly. A machine check error has occurred. Check the system error log for information about the error. Chapter 6. Solving problems 61
-
 1
1 -
2
-
3
-
4
-
5
-
6
-
7
-
8
-
9
-
10
-
11
-
12
-
13
-
14
-
15
-
16
-
17
-
18
-
19
-
20
-
21
-
22
-
23
-
24
-
25
-
26
-
27
-
28
-
29
-
30
-
31
-
32
-
33
-
34
-
35
-
36
-
37
-
38
-
39
-
40
-
41
-
42
-
43
-
44
-
45
-
46
-
47
-
48
-
49
-
50
-
51
-
52
-
53
-
54
-
55
-
56
-
57
-
58
-
59
-
60
-
61
-
62
-
63
-
64
-
65
-
66
-
67
-
68
-
69
-
 70
70 -
 71
71 -
 72
72 -
 73
73 -
 74
74 -
 75
75 -
 76
76 -
 77
77 -
 78
78 -
 79
79 -
 80
80 -
81
-
82
-
83
-
84
-
85
-
86
-
87
-
88
-
89
-
90
-
91
-
92
-
93
-
94
-
95
-
96
-
97
-
98
-
99
-
100
-
101
-
102
-
103
-
104
-
105
-
106
-
107
-
108
 |
 |