JVC DLA-NX5 Operation Manual 1 - Page 41
Setting Frame Adapt HDR*1, Set to HDR Level in the Picture Adjust menu. *2
 |
View all JVC DLA-NX5 manuals
Add to My Manuals
Save this manual to your list of manuals |
Page 41 highlights
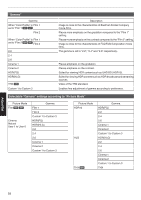
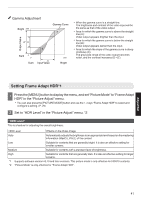
Gamma Adjustment Bright 255 Gamma Curve A Output Value D" D B Dark 0 0 Dark C Input Value 255 Bright 0 When the gamma curve is a straight line: The brightness and contrast of the video input will be the same as that of the video output. 0 Area for which the gamma curve is above the straight line (A): Video output appears brighter than the input. 0 Area for which the gamma curve is below the straight line (B): Video output appears darker than the input. 0 Area for which the slope of the gamma curve is steep (midtone) (C): The grayscale range of the video output becomes wider, and the contrast increases (D"D'). Setting Frame Adapt HDR*1 1 Press the [MENU] button to display the menu, and set "Picture Mode" to "Frame Adapt HDR" in the "Picture Adjust" menu. 0 You can also press the [PICTURE MODE] button and use the ↑↓ keys "Frame Adapt HDR" to select and configure a setting. (P. 29) 2 Set to "HDR Level" in the "Picture Adjust" menu. *2 "HDR Level" This is a feature for adjusting the overall brightness. HDR Level Effects on the Video Image Auto Automatically adjusts the brightness to an appropriate level based on the mastering information (MaxCLL/FALL) of the content. Low Suitable for contents that are generally bright. It is also an effective setting for smaller screens. Medium Suitable for contents with a standard level of brightness. High Suitable for contents that are generally dark. It is also an effective setting for larger screens. *1 Supports software version v3.10 and later versions. This picture mode is only effective for HDR10 contents. *2 "Picture Mode" is only effective for "Frame Adapt HDR". Adjust/Set 41
-
 1
1 -
2
-
3
-
4
-
5
-
6
-
7
-
8
-
9
-
10
-
11
-
12
-
13
-
14
-
15
-
16
-
17
-
18
-
19
-
20
-
21
-
22
-
23
-
24
-
25
-
26
-
27
-
28
-
29
-
30
-
31
-
32
-
33
-
34
-
35
-
 36
36 -
 37
37 -
 38
38 -
 39
39 -
 40
40 -
 41
41 -
 42
42 -
 43
43 -
 44
44 -
 45
45 -
 46
46 -
47
-
48
-
49
-
50
-
51
-
52
-
53
-
54
-
55
-
56
-
57
-
58
-
59
-
60
-
61
-
62
-
63
-
64
-
65
-
66
-
67
-
68
-
69
-
70
-
71
-
72
-
73
-
74
-
75
-
76
-
77
-
78
-
79
-
80
-
81
-
82
-
83
-
84
-
85
-
86
-
87
-
88
-
89
-
90
-
91
-
92
-
93
-
94
 |
 |
