JVC DLA-NX5 Operation Manual 1 - Page 61
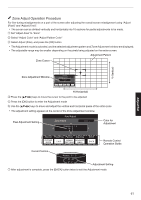
Zone Adjust Operation Procedure, V Vertical, H Horizontal, Zone Adjustment Window, Zone Cursor
 |
View all JVC DLA-NX5 manuals
Add to My Manuals
Save this manual to your list of manuals |
Page 61 highlights
Zone Adjust Operation Procedure For fine-tuning misalignments on a part of the screen after adjusting the overall screen misalignment using "Adjust (Pixel)" and "Adjust (Fine)". 0 The screen can be divided vertically and horizontally into 10 sections for partial adjustments to be made. A Set "Adjust Area" to "Zone" B Select "Adjust Color" and "Adjust Pattern Color" C Select Adjust (Fine), and press the [OK] button 0 The Adjustment mode is activated, and the selected adjustment pattern and Zone Adjustment window are displayed. 0 The adjustable range may be smaller depending on the pixels being adjusted on the entire screen. Adjustment Pattern Zone Cursor V (Vertical) Zone Adjustment Window Pixel Adjust Zone Adjust Red Position 0 / 0 H 0 V 0 Adj.Col. Pixel/Fine Pat.Col. Adj.Area PICTURE MODE C.M.D. GAMMA ADVANCED SETTINGS MENU Back BACK H (Horizontal) D Press the [JKH I] keys to move the cursor to the point to be adjusted E Press the [OK] button to enter the Adjustment mode F Use the [JKH I] keys to move and adjust the vertical and horizontal pixels of the entire zone 0 The adjustment setting appears at the center of the Zone Adjustment window. Pixel Adjustment Setting Pixel Adjust Zone Adjust Red Position 0 / 0 H 0 V 0 Color for Adjustment Adj.Col. Pixel/Fine Pat.Col. Adj.Area PICTURE MODE C.M.D. GAMMA ADVANCED SETTINGS MENU Back BACK Remote Control Operation Guide Cursor Position Position 8 / 5 H -31 V7 Adjustment Setting G After adjustment is complete, press the [BACK] button twice to exit the Adjustment mode Adjust/Set 61
-
 1
1 -
2
-
3
-
4
-
5
-
6
-
7
-
8
-
9
-
10
-
11
-
12
-
13
-
14
-
15
-
16
-
17
-
18
-
19
-
20
-
21
-
22
-
23
-
24
-
25
-
26
-
27
-
28
-
29
-
30
-
31
-
32
-
33
-
34
-
35
-
36
-
37
-
38
-
39
-
40
-
41
-
42
-
43
-
44
-
45
-
46
-
47
-
48
-
49
-
50
-
51
-
52
-
53
-
54
-
55
-
 56
56 -
 57
57 -
 58
58 -
 59
59 -
 60
60 -
 61
61 -
 62
62 -
 63
63 -
 64
64 -
 65
65 -
 66
66 -
67
-
68
-
69
-
70
-
71
-
72
-
73
-
74
-
75
-
76
-
77
-
78
-
79
-
80
-
81
-
82
-
83
-
84
-
85
-
86
-
87
-
88
-
89
-
90
-
91
-
92
-
93
-
94
 |
 |
