JVC DT-3D24G1U DT-3D24G1U Operation Manual - Page 29
Commands, Functions, <Basic command list>
 |
View all JVC DT-3D24G1U manuals
Add to My Manuals
Save this manual to your list of manuals |
Page 29 highlights
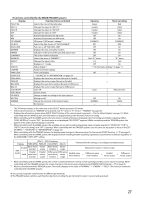
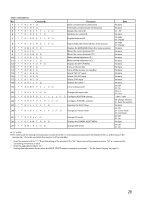
No. Commands 1 ! * **1 B C N 1 Cr 2 ! * **1 B C N 0 Cr 3 ! * **1 B I D S E T x x*2 Cr 4 ! * **1 B I D R E T Cr 5 ! * **1 B I D D S P x x*2 Cr Functions Starts communication (connection) Terminates communication (termination) Assigns the control ID Initializes the control ID Displays/hides the ID 6 ! * **1 B I D C H K x x*2 Cr 7 ! * **1 B M E N U Cr 8 ! * **1 B U P Cr 9 ! * **1 B D O W N Cr 10 ! * **1 B A D J R Cr 11 ! * **1 B A D J L Cr 12 ! * **1 B S E T U P Cr 13 ! * **1 B P W 1 Cr 14 ! * **1 B P W 0 Cr 15 ! * **1 B I N A Cr 16 ! * **1 B I N B Cr 17 ! * **1 B I N C Cr 18 ! * **1 B D I S P Cr 19 ! * **1 B A M U T E x x*2 Cr Flashes/hides the selected ID No. of the monitor Displays the MAIN MENU/Quits the menu operation Moves the cursor downward ( ) Moves the cursor downward ( ) Makes setting/adjustment ( ) Makes setting/adjustment ( ) Displays the SET-UP MENU Turns on the monitor Turns off the monitor (on standby) Selects "SDI 1/L" input Selects "SDI 2/R" input Selects "DVI" input Displays the status *3 Turns muting on/off 20 ! * **1 B A S P x x*2 Cr Changes the aspect ratio 21 ! * **1 B R O P O S I x x x x*2 Cr Configures POSITION settings 22 ! * **1 B R O P U S H x x*2 Cr Configures PUSH SEL. settings 23 ! * **1 B S E L E C T Cr Operates the SELECT keys 24 ! * **1 B 3 D S C A L E x x*2 Cr Changes 3D cursor mode 25 ! * **1 B 3 D x x*2 Cr 26 ! * **1 B C A M E R A Cr 27 ! * **1 B M I X x x*2 Cr Changes 3D mode Displays the CAMERA ASSIST MENU Changes MIX mode Data No data No data 01 - 99 No data 00: Hide 01: Display 00: Hide 01: Display No data No data No data No data No data No data No data No data No data No data No data No data 00: Off 01: On 00: 4:3 01: 16:9 −999 - +999 00: Change selection, 01: Reset the position No data 00: Off 01: Cursor mode 02: Grid mode 00: Off 01: On No data 00: Off 01: On ● "Cr" is 0Dh. ● The commands for starting communication (connection) (No. 1), terminating communication (termination) (No. 2), and turning on the monitor (No. 13) can be used while the monitor is off (on standby). *1 Enter the monitor's ID for "**." The initial setting of the monitor's ID is "00." When connecting several monitors, "00" is a command for controlling all monitors at once. *2 Enter the appropriate data to "xx." *3 Displays the information shown when the INPUT SELECT button currently lit is pressed (→ "On the Status Display" on page 11). 29
-
 1
1 -
2
-
3
-
4
-
5
-
6
-
7
-
8
-
9
-
10
-
11
-
12
-
13
-
14
-
15
-
16
-
17
-
18
-
19
-
20
-
21
-
22
-
23
-
 24
24 -
 25
25 -
 26
26 -
 27
27 -
 28
28 -
 29
29 -
 30
30 -
 31
31 -
 32
32 -
 33
33 -
 34
34 -
35
-
36
 |
 |
