JVC GR-SX851U Instruction Manual - Page 15
Grip Adjustment, Viewfinder Adjustment, Shoulder Strap Attachment, Tripod Mounting
 |
UPC - 046838158049
View all JVC GR-SX851U manuals
Add to My Manuals
Save this manual to your list of manuals |
Page 15 highlights
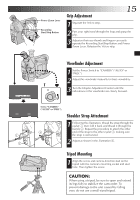
Power Zoom Lever Recording Start/Stop Button Grip Adjustment EN15 1 Separate the Velcro strip. 2 Pass your right hand through the loop and grasp the grip. 3 Adjust so that your thumb and fingers can easily operate the Recording Start/Stop Button and Power Zoom Lever. Refasten the Velcro strip. 3 2 180° 1 Viewfinder Adjustment 1 Set the Power Switch to "CAMERA" ("AUTO" or "PRO."). 2 Adjust the viewfinder manually for best viewability. 3 Turn the Diopter Adjustment Control until the indications in the viewfinder are clearly focused. PAUSE 1 2 3 Set to "CAMERA" ("AUTO" or "PRO."). Shoulder Strap Attachment 1 Following the illustration, thread the strap through the eyelet 1, then fold it back and thread it through the buckle 2. Repeat the procedure to attach the other 4 end of the strap to the other eyelet 3, making sure the strap is not twisted. 2 Adjust as shown in the illustration 4. Tripod Mounting 1 Align the screw and camera direction stud on the tripod with the camera's mounting socket and stud hole. Then tighten the screw. CAUTION: When using a tripod, be sure to open and extend its legs fully to stabilize the camcorder. To prevent damage to the unit caused by falling over, do not use a small-sized tripod.
-
 1
1 -
2
-
3
-
4
-
5
-
6
-
7
-
8
-
9
-
 10
10 -
 11
11 -
 12
12 -
 13
13 -
 14
14 -
 15
15 -
 16
16 -
 17
17 -
 18
18 -
 19
19 -
 20
20 -
21
-
22
-
23
-
24
-
25
-
26
-
27
-
28
-
29
-
30
-
31
-
32
-
33
-
34
-
35
-
36
-
37
-
38
-
39
-
40
-
41
-
42
-
43
-
44
-
45
-
46
-
47
-
48
-
49
-
50
-
51
-
52
-
53
-
54
-
55
-
56
 |
 |
