JVC GR-SX851U Instruction Manual - Page 26
Instant Titles, Date/Time Insert
 |
UPC - 046838158049
View all JVC GR-SX851U manuals
Add to My Manuals
Save this manual to your list of manuals |
Page 26 highlights
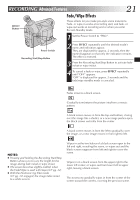
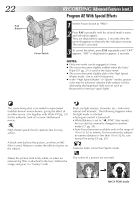
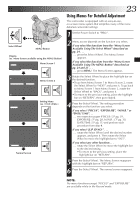
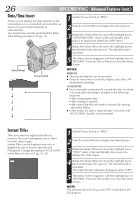
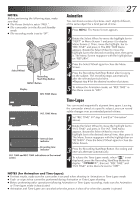
26 EN RECORDING Advanced Features (cont.) Date/Time Insert Allows you to display the date and time in the camcorder or on a connected color monitor, as well as to record them manually or automatically. You should have already performed the Date/ Time Setting procedure (੬ pg. 11). 1 Set the Power Switch to "PRO.". 2 Press the Select Wheel to display the Menu Screen. 3 Rotate the Select Wheel to move the highlight bar to "DATE/TIME DISP." while in Record-Standby, then press it to display the Date/Time DISP. Menu. 4 Rotate the Select Wheel to move the highlight bar to the desired mode, then press it. The desired mode is activated. Select Wheel Power Switch DEC 2 5 . 9 9 AUTO DATE DEC 25. 99 (DATE) AM 10 : 25 : 00 (TIME) DEC 25. 99 AM 10 : 25 : 00 (DATE&TIME) No indication (OFF) 5 The Menu Screen reappears with the highlight bar on "RETURN". Press the Select Wheel to close the Menu Screen. NOTES: DISPLAY ● The selected display can be recorded. ● If you do not want to record the display, select the OFF mode before shooting. AUTO DATE ● Your camcorder automatically records the date for about 5 seconds after recording is initiated in the following situations: •After changing the date. •After loading a cassette. •After Auto Date Record mode is selected by rotating the Select Wheel. ● In this mode, the date is replaced after 5 seconds with "AUTO DATE" but this is not recorded. Instant Titles The camcorder has eight preset titles in memory. You can superimpose one of them over the video image. Instant Titles can be displayed not only in English but also in French, Spanish and Portuguese. Change the setting in TITLE LANG. in the Menu Screen. (੬ pg. 23, 25). T I TLE OF F HAPPY B I RTHDAY OUR VACAT I ON MERRY CHR I STMAS A SPEC I AL DAY HAPPY HOL I DAYS OUR NEW BABY WEDD I NG DAY CONGRATULAT I ONS EX I T 1 Set the Power Switch to "PRO.". 2 Press the Select Wheel to display the Menu Screen. 3 Rotate the Select Wheel to move the highlight bar to "TITLE" while in Record-Standby, then press it to display the TITLE Menu. 4 Rotate the Select Wheel to move the highlight bar to the desired mode, then press it. The desired mode is activated. •To make the title indication disappear, select "OFF". 5 The Menu Screen reappears with the highlight bar on "RETURN". Press the Select Wheel to close the Menu Screen. NOTE: The selected title will remain until OFF is selected in the TITLE Menu.
-
 1
1 -
2
-
3
-
4
-
5
-
6
-
7
-
8
-
9
-
10
-
11
-
12
-
13
-
14
-
15
-
16
-
17
-
18
-
19
-
20
-
 21
21 -
 22
22 -
 23
23 -
 24
24 -
 25
25 -
 26
26 -
 27
27 -
 28
28 -
 29
29 -
 30
30 -
 31
31 -
32
-
33
-
34
-
35
-
36
-
37
-
38
-
39
-
40
-
41
-
42
-
43
-
44
-
45
-
46
-
47
-
48
-
49
-
50
-
51
-
52
-
53
-
54
-
55
-
56
 |
 |
