JVC GR-SX851U Instruction Manual - Page 29
Focusing
 |
UPC - 046838158049
View all JVC GR-SX851U manuals
Add to My Manuals
Save this manual to your list of manuals |
Page 29 highlights
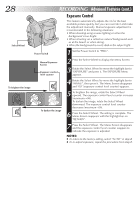
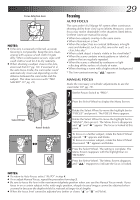
Focus detection zone NOTES: ● If the lens is smeared or blurred, accurate focusing is not possible. Keep the lens clean, wiping with a piece of soft cloth if it gets dirty. When condensation occurs, wipe with a soft cloth or wait for it to dry naturally. ● When shooting a subject close to the lens, zoom out first (੬ pg. 18). If zoomed in in the auto focus mode, the camcorder could automatically zoom out depending on the distance between the camcorder and the subject. This does not occur with "TELE MACRO" (੬ pg. 24). Select Wheel Power Switch EN29 Focusing AUTO FOCUS The camcorder's Full Range AF system offers continuous shooting ability from close-up to infinity. However, correct focus may not be obtainable in the situations listed below (in these cases use manual focusing): •When two subjects overlap in the same scene. •When illumination is low.* •When the subject has no contrast (difference in bright- ness and darkness), such as a flat, one-color wall, or a clear, blue sky.* •When a dark object is barely visible in the viewfinder.* •When the scene contains minute patterns or identical patterns that are regularly repeated. •When the scene is affected by sunbeams or light reflecting off the surface of a body of water. •When shooting a scene with a high-contrast background. * The low-contrast warning " " appears MANUAL FOCUS Make the necessary viewfinder adjustments to use the viewfinder (੬ pg. 15). 1 Set the Power Switch to "PRO.". 2 Press the Select Wheel to display the Menu Screen. 3 Rotate the Select Wheel to move the highlight bar to "FOCUS" and press it. The FOCUS Menu appears. 4 Rotate the Select Wheel to move the highlight bar to "MANU", then press it. The Menu Screen disappears and " " and " " appear. The focus is locked at this point. 5 To focus on a farther subject, rotate the Select Wheel upward. " " appears and blinks. To focus on a nearer subject, rotate the Select Wheel downward. " " appears and blinks. 6 Press the Select Wheel. The setting is complete. The Menu Screen reappears with the highlight bar on "RETURN". 7 Press the Select Wheel. The Menu Screen disppears and " " reappears to indicate the focus is locked. NOTES: ● To return to Auto Focus, select "AUTO" in step 4. ● To re-adjust Manual Focus, repeat the procedure from step 2. ● Be sure to focus the lens in the maximum telephoto position when you use the Manual Focus mode. If you focus in on a certain subject in the wide-angle position, sharply focused images cannot be obtained when zoomed in because the depth-of-field is reduced at longer focal lengths. ● When the focus level cannot be adjusted any farther or closer, " " or " " will blink.
-
 1
1 -
2
-
3
-
4
-
5
-
6
-
7
-
8
-
9
-
10
-
11
-
12
-
13
-
14
-
15
-
16
-
17
-
18
-
19
-
20
-
21
-
22
-
23
-
 24
24 -
 25
25 -
 26
26 -
 27
27 -
 28
28 -
 29
29 -
 30
30 -
 31
31 -
 32
32 -
 33
33 -
 34
34 -
35
-
36
-
37
-
38
-
39
-
40
-
41
-
42
-
43
-
44
-
45
-
46
-
47
-
48
-
49
-
50
-
51
-
52
-
53
-
54
-
55
-
56
 |
 |
