JVC GR-SX851U Instruction Manual - Page 21
Advanced Features
 |
UPC - 046838158049
View all JVC GR-SX851U manuals
Add to My Manuals
Save this manual to your list of manuals |
Page 21 highlights
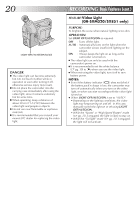
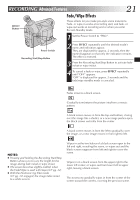
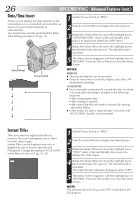
RECORDING Advanced Features EN21 Fade/Wipe Effects EFFECT Button These effects let you make pro-style scene transitions. Fade- or wipe-in works at recording start, and fade- or wipe-out works at recording end or when you enter Record-Standby mode. 1 Set the Power Switch to "PRO.". Power Switch Recording Start/Stop Button 2 3 Press EFFECT repeatedly until the desired mode's name and indication appear. They are displayed for approx. 2 seconds, then the name disappears so that only the indication remains. The effect is reserved. 3 Press the Recording Start/Stop Button to activate fadein/out or wipe-in/out. 4 To cancel a fade or wipe, press EFFECT repeatedly until "OFF" appears. "OFF" is displayed for approx. 2 seconds and the fade/wipe standby mode is canceled. NOTES: ● Pressing and holding the Recording Start/Stop Button allows you to vary the length for the image during fade in/out or wipe in/out. ● The screen becomes slightly reddish when the Fade/Wipe is used with Sepia (੬ pg. 22). ● With the Electronic fog filter mode (੬ pg. 22) engaged, the image fades in/out to a white screen. FADER Fades in/out to a black screen. MOSAIC (Fader) Gradually turns/returns the picture into/from a mosaic pattern. SHUTTER (Wipe) A black screen moves in from the top and bottom, closing over the image like a shutter, or a new image pushes open the black screen vertically from the center. SLIDE (Wipe) A black screen moves in from the left to gradually cover the image, or a new image moves in from right to left. DOOR (Wipe) Wipes in as the two halves of a black screen open to the left and right, revealing the scene, or wipes out and the black screen reappears from left and right to cover the scene. CW:CORNER (Wipe) Wipes in on a black screen from the upper right to the lower left corner, or wipes out from lower left to upper right, leaving a black screen. WW:WINDOW (Wipe) The next scene gradually wipes in from the center of the screen toward the corners, covering the previous scene.
-
 1
1 -
2
-
3
-
4
-
5
-
6
-
7
-
8
-
9
-
10
-
11
-
12
-
13
-
14
-
15
-
 16
16 -
 17
17 -
 18
18 -
 19
19 -
 20
20 -
 21
21 -
 22
22 -
 23
23 -
 24
24 -
 25
25 -
 26
26 -
27
-
28
-
29
-
30
-
31
-
32
-
33
-
34
-
35
-
36
-
37
-
38
-
39
-
40
-
41
-
42
-
43
-
44
-
45
-
46
-
47
-
48
-
49
-
50
-
51
-
52
-
53
-
54
-
55
-
56
 |
 |
