JVC GR-SX851U Instruction Manual - Page 45
Warning Indications, Indications During Playback
 |
UPC - 046838158049
View all JVC GR-SX851U manuals
Add to My Manuals
Save this manual to your list of manuals |
Page 45 highlights
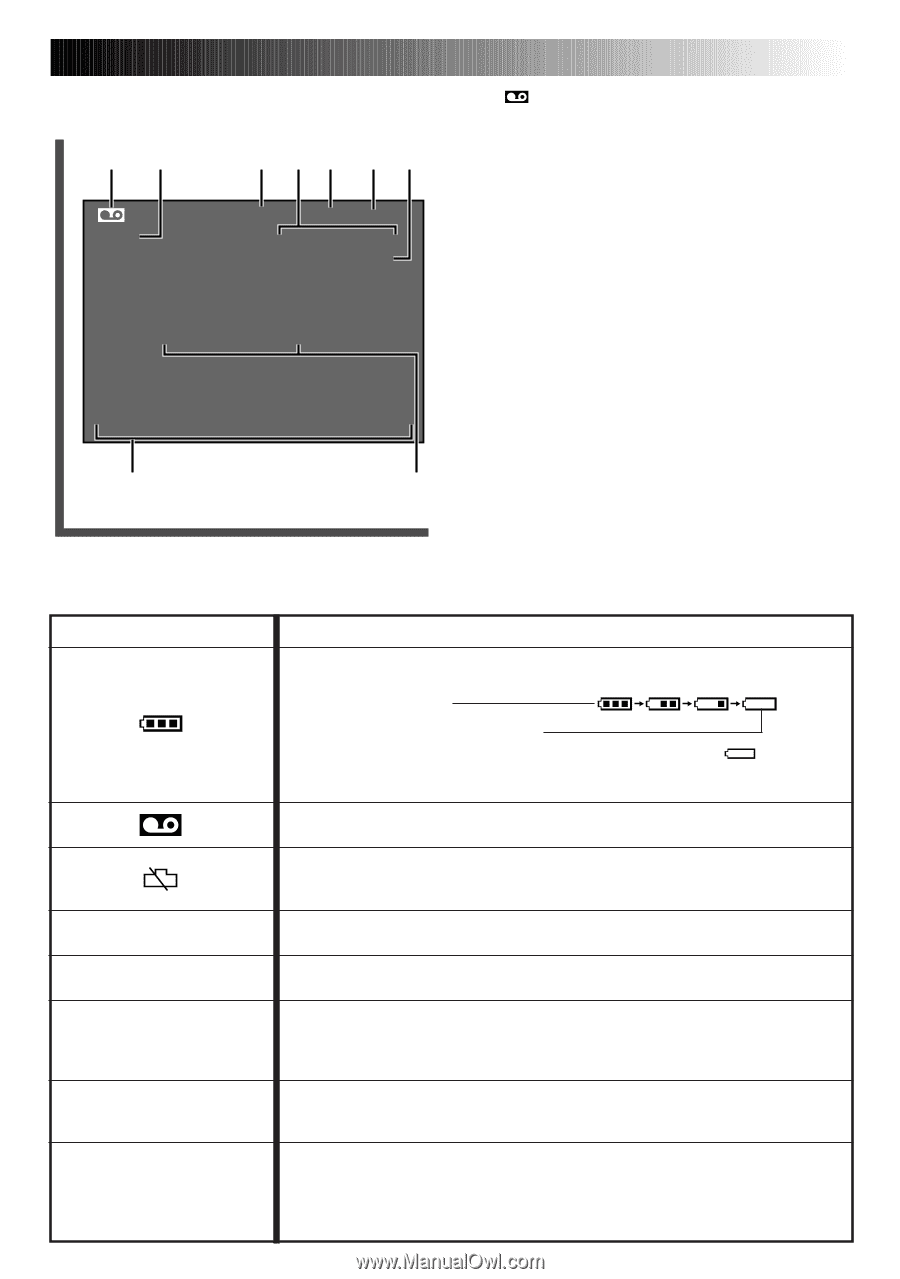
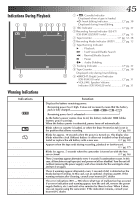
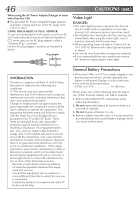
Indications During Playback 12 3 45 6 7 S-ET SP 4 TBC -1 : 23 : 45 AT M- 0 : 1 2 : 3 4 VOLUME - - - - - -6- - - - - + 9 8 EN45 1 • : Cassette Indicator Displayed when a tape is loaded. •w: Insert Editing Indicator pg. 38 Displayed during Insert Editing. 2 TBC Indicator pg. 32 3 Recording Format Indicator (S/S-ET) (GR-SXM320/SX851 only pg. 13 4 Tape Counter pg. 32, 38 5 Recording Mode Indicator (SP/EP pg. 12 6 Tape Running Indicator 4 : Playback 3 : Fast-Forward/Shuttle Search 2 : Rewind/Shuttle Search 6 : Pause e4 : Audio Dubbing 7 Tracking Indicator pg. 32 8 Tape Counter pg. 38 Displayed only during Insert Editing. 9 •BRIGHT: Bright Level Indicator (GR-SXM320 only pg. 31 •VOLUME: Speaker Volume Indicator (GR-SXM320 only pg. 31 Warning Indications Indications TAPE END LENS COVER CONDENSATION PLEASE WAIT TAPE HEAD IS DIRTY USE CLEANING CASSETTE E01 - E06 SAFEGUARD FUNCTION HAS BEEN ACTIVATED REATTACH BATTERY Function Displays the battery remaining power. Remaining power level: high. It does not necessarily mean that the battery pack is fully charged. Remaining power level: exhausted As the battery power comes close to nil, the battery indicator blinks (battery power warning). When the battery power is exhausted, power turns off automatically. Blinks when no cassette is loaded, or when the Erase Protection tab is not in the position that allows recording. (੬ pg. 10) Blinks for approx. 10 seconds when the power is turned on. This display also blinks when the clock (lithium) battery is either not installed or has discharged. Install or replace the old battery with a new one. (੬ pg. 10) Appears when the tape ends during recording, playback or fast-forward. (੬ pg. 17) Blinks for approx. 5 seconds when the camcorder is turned on with the lens cover closed. (੬ pg. 16) These 2 warnings appear alternately every 3 seconds if condensation occurs. In this case, all functions except tape eject and power on/off are disabled. Turn the unit off (without removing the power supply), wait a few minutes for the warnings to clear, and turn it on again. These 2 warnings appear alternately every 3 seconds if dirt is detected on the heads during recording. In this case, use an optional cleaning cassette. If the warning remains after cleaning, consult your nearest JVC dealer. The error indications (E01 - E06) show what type of malfunction has occured. If an error indication and warning appear, turn the unit off, remove the power supply (battery, etc.) and wait a few minutes for them to clear. When it does, you can resume using the camcorder. If the indication remains, consult your nearest JVC dealer.
-
 1
1 -
2
-
3
-
4
-
5
-
6
-
7
-
8
-
9
-
10
-
11
-
12
-
13
-
14
-
15
-
16
-
17
-
18
-
19
-
20
-
21
-
22
-
23
-
24
-
25
-
26
-
27
-
28
-
29
-
30
-
31
-
32
-
33
-
34
-
35
-
36
-
37
-
38
-
39
-
 40
40 -
 41
41 -
 42
42 -
 43
43 -
 44
44 -
 45
45 -
 46
46 -
 47
47 -
 48
48 -
 49
49 -
 50
50 -
51
-
52
-
53
-
54
-
55
-
56
 |
 |