JVC KW-V820BT Instruction Manual
JVC KW-V820BT Manual
 |
View all JVC KW-V820BT manuals
Add to My Manuals
Save this manual to your list of manuals |
JVC KW-V820BT manual content summary:
- JVC KW-V820BT | Instruction Manual - Page 1
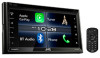
KW-V820BT MONITOR WITH DVD RECEIVER INSTRUCTION MANUAL © 2016 JVC KENWOOD Corporation B5A-1051-00 c (KN) - JVC KW-V820BT | Instruction Manual - Page 2
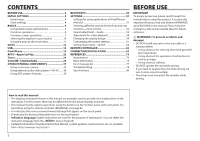
12 USB 16 iPod/iPhone 19 APPS-Apple CarPlay 22 manual. Please keep the manual in a safe and accessible place for future reference. ◊ WARNINGS: (To prevent accidents and damage) • DO NOT install any unit or wire any cable Updated information (the latest Instruction Manual, system updates, new - JVC KW-V820BT | Instruction Manual - Page 3
to laser product safety. JVC KENWOOD Corporation 2967-3, ISHIKAWA- approved in the instruction manual. The user could But it is desirable that it should be installed and operated keeping the radiator at least approved for the transmitter by Industry Canada. To reduce potential radio interference to - JVC KW-V820BT | Instruction Manual - Page 4
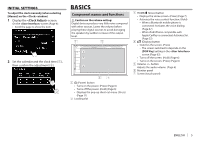
is displayed. Clock settings 1 Display the Home screen. On the monitor panel: 2 Display the screen. 4 [GPS-SYNC] [Manual] Synchronizes the clock time with the GPS. Sets the clock manually. (Page 5) • To close the window, touch [Close]. 5 Select the appropriate time zone for [Time Zone - JVC KW-V820BT | Instruction Manual - Page 5
INITIAL SETTINGS To adjust the clock manually (when selecting [Manual] on the window) 1 Display the - JVC KW-V820BT | Instruction Manual - Page 6
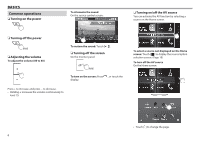
BASICS Common operations ❏❏Turning on the power To attenuate the sound On the source control screen: ❏❏Turning on/off the AV source You can activate the AV function by selecting a source on the Home screen. ❏❏Turning off the power (Hold) ❏❏Adjusting the volume To adjust the volume (00 to 40) To - JVC KW-V820BT | Instruction Manual - Page 7
Page 12) Forcibly ejects the disc. (Hold) (Page 12) 6 Displays the phone control screen. (Page 45) When connecting as Apple CarPlay, it works as a phone provided in Apple CarPlay. Gesture control on the source control screen: You can also control playback by moving your finger on the touch panel as - JVC KW-V820BT | Instruction Manual - Page 8
BASICS ❏❏Source/option selection screen descriptions You can display all playback sources and options on the source/option selection screen. • You can customize the source/option selection screen. (Page 11) 1 2 3 4 5 Common operation buttons and indications: 1 Changes the playback source or - JVC KW-V820BT | Instruction Manual - Page 9
BASICS ❏❏ screen descriptions You can change the detailed settings. (Page 62) 1 2 ❏❏List screen descriptions During audio/video source playback, you can select the desired item easily from the list. 1 2 3t ❏❏Playback operations during video playback 1 2 3 2 3 Common operation - JVC KW-V820BT | Instruction Manual - Page 10
] Switches to the Apple CarPlay screen from the connected iPod touch/iPhone. (Pages 22) [Tuner] Switches to the radio broadcast. (Page 24) [BT Audio] Plays a Bluetooth audio player. (Page 40) [DISC] Plays a disc. (Page 12) [USB] Plays files on a USB device. (Page 16) [iPod] Plays - JVC KW-V820BT | Instruction Manual - Page 11
BASICS Selecting the playback source on the source control screen Display source selection buttons by touching on the source control screen (Page 8), then select a playback source. ❏❏Customizing the source/option selection screen You can arrange the items to display on the source/ option selection - JVC KW-V820BT | Instruction Manual - Page 12
DISCS Playing a disc • If a disc does not have a disc menu, all tracks on it will be played repeatedly until you change the source or eject the disc. • For playable disc types/file types, see page 74. ❏❏Inserting a disc Insert a disc with the label side facing up. ❏❏Ejecting a disc On the source - JVC KW-V820BT | Instruction Manual - Page 13
DISCS Operation buttons • Available buttons on the screen and operations differ depending on the type of disc/file being played back. [Hide] Hides the indicators and buttons. [ ] Displays the other operation button window. • To hide the window, touch [ ]. [ ] [ ] Selects Repeat - JVC KW-V820BT | Instruction Manual - Page 14
DISCS ❏❏Selecting a folder/track on the list To search all folders/tracks in a disc 1 Display the folder/track list. To search in the folder containing the current track ❏❏Activating PBC (Playback Control) function (for VCD only) While playing a VCD with PBC... 2 Select an item. • Proceed until - JVC KW-V820BT | Instruction Manual - Page 15
DISCS ❏❏Video menu operations (except for VCD) You can display the video menu screen during video playback. • The operation buttons disappear when [Hide] is touched or when no operation is done for about 5 seconds. 1 Display the video menu screen. 2 • Available buttons on the screen and operations - JVC KW-V820BT | Instruction Manual - Page 16
to the USB input terminal. • For playable file types and notes on using USB devices, see page 75. 1 Connect the USB device to the unit with an USB cable. 2 Select "USB" as the source. (Page 10) ❏❏To disconnect the USB device 1 Select a source other than "USB". (Page 10) 2 Detach the USB device. 16 - JVC KW-V820BT | Instruction Manual - Page 17
Repeats the current track/ file. • : Repeats all tracks/files in the current folder or specified category. • ALL: Repeats all tracks/files in the USB device. Randomly plays all tracks in current folder.* ( indicator lights up.) Attenuate the sound. (Page 6) • To restore the sound, touch - JVC KW-V820BT | Instruction Manual - Page 18
❏❏Selecting a track in a list To search all folders/tracks in a USB device 1 Display the list. 3 Select the desired track. • Proceed until you select the desired track. • For details about the list operation, see page 9. From - JVC KW-V820BT | Instruction Manual - Page 19
to your purpose or the type of iPod/iPhone. Wired connection • To listen to music: -- For Lightning connector models: Use USB Audio cable for iPod/iPhone-KS-U62 (optional accessory). -- For 30-pin connector models: Use 30-pin to USB cable (accessory of iPod/iPhone). • To watch video and listen - JVC KW-V820BT | Instruction Manual - Page 20
iPod/iPhone Playback operations When the operation buttons are not displayed on the screen, touch the area shown on the illustration. • To change settings for video playback, see page 58. ❏❏Indications and buttons on the source control screen 12 3 4 Playback information 1 Playback mode (See the - JVC KW-V820BT | Instruction Manual - Page 21
iPod/iPhone ❏❏Selecting an audio track from the list To search all tracks in iPod/iPhone 1 Display the list. 2 Select the list type. 3 Select the desired track. • Proceed until you select the desired track. • For details about the list operation, see page 9. From : Select a category, - JVC KW-V820BT | Instruction Manual - Page 22
, CarPlay service is NOT available in some markets. Please check the latest information concerning availability in your region from the below website. http://www.apple.com/ios/featureavailability/ #applecarplay-applecarplay ❏❏Preparation To use the navigation function of the maps App, connect a GPS - JVC KW-V820BT | Instruction Manual - Page 23
of the connected iPhone. • The items displayed and the language used on the screen differ depending on the connected device. ❏❏Switching to the Apple CarPlay screen while listening to another source • This operation is available when [DISP Key] is set to [Apps] in the screen. (Page - JVC KW-V820BT | Instruction Manual - Page 24
] mode changes as follows: • AUTO1: Auto search • AUTO2: Tunes in stations in the memory one after another. • MANUAL: Manual search [ ] Displays the other operation button window. • To hide the window, touch [ ]. [ ] Displays the preset list. • To hide the list, touch [ ]. [AM - JVC KW-V820BT | Instruction Manual - Page 25
Tuner Manual presetting 1 Tune in to a station you want to preset. (Page 24) 2 Display the preset list. ❏❏Selecting a preset station from the list FM RBDS features ❏❏Searching - JVC KW-V820BT | Instruction Manual - Page 26
one place. Get over 140 channels, including commercial-free music plus the best sports, news, talk, comedy and entertainment. Welcome to the world Phone: Call SiriusXM Listener Care at 1-866-635-2349 • For users in Canada: -- Online: Visit www.siriusxm.ca/activatexm -- Phone: Call XM customer Care - JVC KW-V820BT | Instruction Manual - Page 27
SiriusXM® Satellite Radio 5 Text information • Touching [ - JVC KW-V820BT | Instruction Manual - Page 28
SiriusXM® Satellite Radio ❏❏Selecting a channel on the category/ channel list You can obtain information on channels or select a category and then a channel. 1 Display the screen. 2 Select a category (1), and then select a channel (2). Presetting channels ❏❏Storing channels in the - JVC KW-V820BT | Instruction Manual - Page 29
time bar Shows the remaining capacity (gray) and the amount of buffered content (blue). If the Replay buffer is full, the entire bar becomes blue. • Updated every second. 2 Time code Shows you the point in the Replay buffer you are listening to. • Example: -5:00 -- You are listening to audio that is - JVC KW-V820BT | Instruction Manual - Page 30
SiriusXM® Satellite Radio SmartFavorites User stored channels (P1 to P6) of current band are recognized as SmartFavorites channels. SiriusXM Connect Vehicle Tuner automatically buffers their broadcast content in the background. When you select a SmartFavorites channel, you can rewind and replay up - JVC KW-V820BT | Instruction Manual - Page 31
SiriusXM® Satellite Radio TuneMix™ TuneMix™ plays a unique blend of songs from your preset music channels from the current SiriusXM preset band, allowing you to build a custom channel from as few as 2 to as many as 6 music channels. You can even skip songs you do not want to hear. • TuneMix™ is - JVC KW-V820BT | Instruction Manual - Page 32
SiriusXM® Satellite Radio Receiving big play information of your favorite team-SportsFlash™ SportsFlash™ will notify you when a big play happens during a game with one of your favorite sports teams. Choose to tune in and hear the play unfold as though it was live. Continue listening to the game, or - JVC KW-V820BT | Instruction Manual - Page 33
SiriusXM® Satellite Radio Receiving alerts for desired content- Content Alert The unit informs you when receiving the content you are interested in such as music and information about a sports team. ❏❏Activating content alert 1 Display the screen. ❏❏Selecting the content for the - JVC KW-V820BT | Instruction Manual - Page 34
SiriusXM® Satellite Radio ❏❏Switching to registered content When receiving the contents registered for content alerts, an alert appears on the screen. Touch [Jump], then select the item to jump to on the screen. • To cancel the content alerts, touch [Ignore]. Setting reception - JVC KW-V820BT | Instruction Manual - Page 35
SiriusXM® Satellite Radio Activating/deactivating the parental control You can set the parental control feature to lock any SiriusXM channel(s) or automatically lock all channels classified as "mature" by SiriusXM®. 1 Display the screen. (Page 34) 2 Select a parental control mode. - JVC KW-V820BT | Instruction Manual - Page 36
the screen. 3 Select the desired category. 4 Select [ON] for channels you want to skip. ❏❏Resetting the SiriusXM Satellite Radio settings You can reset the SiriusXM Satellite Radio settings you set up and restore the default settings. 1 Display the screen - JVC KW-V820BT | Instruction Manual - Page 37
the right column.) * Selectable only when [Parking Guidelines] is set to [ON]. Adjusting the parking guidelines • Install the rear view camera in the appropriate position according to the instructions supplied with the rear view camera. • When adjusting the parking guidelines, make sure to use the - JVC KW-V820BT | Instruction Manual - Page 38
erase the operation buttons, touch the screen. Touching the screen again displays the operation buttons. To display the picture from the rear view camera manually 1 Display the pop-up short-cut menu. 2 To exit the rear view screen Using external audio/video players-AV‑IN When the operation buttons - JVC KW-V820BT | Instruction Manual - Page 39
such as the speedometer. [Gauges] Displays the gauges of the vehicle. [Climate] [Parking Assist] Displays information about the air conditioner of the vehicle. Displays the guides for parking the vehicle. ENGLISH 39 - JVC KW-V820BT | Instruction Manual - Page 40
can be connected without cables and communicate with each the device. • This unit may not work for some Bluetooth devices. • Connecting Access Profile (PBAP) If your mobile phone supports PBAP, you can display the phone book and "Bluetooth", "iPod", or "Apple CarPlay". If you want to register the - JVC KW-V820BT | Instruction Manual - Page 41
paired when connected via USB. (Page 49) Pairing a Bluetooth device from the target device 1 Search for the unit ("KW-V820BT") from your Bluetooth device with A2DP or SPP: Determine usage as an audio player or a device with Apps installed. • To use the device as an audio player, touch [Yes]. • When - JVC KW-V820BT | Instruction Manual - Page 42
connect and deselect to disconnect the device. • [TEL (HFP)1]/[TEL (HFP)2]: Mobile phone • [Audio (A2DP)/App (SPP)]: Audio player/ device with Apps installed • To close the window, touch [Close]. • Touch [ All] to select all devices. • Touch [ All] to deselect all selected devices. • Scroll the - JVC KW-V820BT | Instruction Manual - Page 43
BLUETOOTH ❏❏Changing the PIN code 1 Display the screen. (Page 42) 2 Display the PIN code input screen. ❏❏Change the device name of the unit displayed on the paired device 1 Display the screen. (Page 42) 2 Display the device name entry screen. Using a Bluetooth - JVC KW-V820BT | Instruction Manual - Page 44
BLUETOOTH ❏❏Ending a call While talking... 44 ❏❏Adjusting the volume during a call/ echo cancel level/noise reduction volume 1 Display the window. While talking... ❏❏Switching between handsfree mode and phone mode While talking... Each time you touch the button, the talking - JVC KW-V820BT | Instruction Manual - Page 45
BLUETOOTH ❏❏Switching between two connected devices When two devices are connected, you can change the device to use. While using a Bluetooth mobile phone, select the device you want to use. 1 Display the phone control screen. On the Home screen: ❏❏Sending dial tone during a call You can send dial - JVC KW-V820BT | Instruction Manual - Page 46
BLUETOOTH From the call history ( missed calls/ received calls/ dialed calls) Display the call history list (1), then select the target to make a call (2). • If the initial character is a number, touch [1] and then select the number. • Touch [ ] to delete the last entry. • Touch [ ] to hide the - JVC KW-V820BT | Instruction Manual - Page 47
BLUETOOTH Voice dialing • Available only when the connected mobile phone has a voice recognition system. 1 Activate voice dialing. ❏❏Presetting phone numbers You can preset up to 10 phone numbers. 1 Display the preset list. (Page 45) 2 4 Select a method to add a phone number to preset list, then - JVC KW-V820BT | Instruction Manual - Page 48
BLUETOOTH ❏❏Editing phonebook To transfer the phonebook If the connected Bluetooth mobile phone is compatible with Phone Book Access Profile (PBAP), you can transfer the phonebook of the mobile phone to the unit. 1 Display the phone book (1), then display the window (2). On the - JVC KW-V820BT | Instruction Manual - Page 49
The unit does not answer the calls automatically. Answer the calls manually. • ON (Initial): Establishes pairing automatically with the Bluetooth function is deactivated on the device. (Auto pairing may not work for some devices depending on the iOS version.) • OFF: Cancels. - JVC KW-V820BT | Instruction Manual - Page 50
BLUETOOTH Operation buttons • Available buttons on the screen and operations differ depending on the connected device. [ ] Displays the other operation button window. • To hide the window, touch [ ]. [ ] Selects Repeat playback mode. • : Repeats the current track/file. • : Repeats - JVC KW-V820BT | Instruction Manual - Page 51
> Select this to use Apps with iPod/iPhone connected using KS-U62 (optional accessory) or 30-pin to USB cable (accessory of iPod/iPhone). 6 Finish the procedure. • You can also display the screen by touching [ ] on the source/option selection screen. (Page 8) 5 Select the - JVC KW-V820BT | Instruction Manual - Page 52
on the screen (Page 55) • You cannot select iPod if it is connected via Bluetooth. • If you select USB, iPod, Disc, Bluetooth audio or Apple CarPlay as the Front Source, you cannot select USB or iPod as the Rear Source. * Selectable only when [Zone Select] is set to [Dual Zone]. 52 - JVC KW-V820BT | Instruction Manual - Page 53
SETTINGS Sound adjustment-Audio You can adjust the various audio settings on the screen. • You cannot change the settings screen in the following situations: -- When the AV source is turned off (Page 6) -- When the Bluetooth phone is used (making or receiving a call, during a call, - JVC KW-V820BT | Instruction Manual - Page 54
SETTINGS ❏❏Using the sound equalization • The adjustment is memorized for each source until you adjust the sound again. If the source is a disc, the adjustment is stored for each of the following categories. -- DVD-Video -- CD/VCD/Audio files/Video files (Page 73) • You cannot adjust the sound when - JVC KW-V820BT | Instruction Manual - Page 55
SETTINGS ❏❏Setting the listening position You can adjust the sound effects according to your listening position. 1 Display the screen. (Page 53) 2 Display the screen. Adjusting the Digital Time Alignment (DTA) Make fine adjustments to the delay time of the speaker output to - JVC KW-V820BT | Instruction Manual - Page 56
SETTINGS ❏❏Localizing the sound image-Front Focus You can localize the sound image in front of the selected seat. 1 Display the screen. (Page 55) 2 Touch [Front Focus] (1), then select the listening position to set as the front position (2). • When you are sitting on the [Front All] ( - JVC KW-V820BT | Instruction Manual - Page 57
SETTINGS ❏❏Adjusting the volume balance 1 Display the screen. (Page 53) 2 Display the screen. 3 Adjust the volume balance. ❏❏Adjusting the volume output according to different sources You can adjust and store the auto-adjustment volume level for each source. The volume level - JVC KW-V820BT | Instruction Manual - Page 58
(DSP) system. Select the enhance level. • OFF (Initial)/Small/ Medium/Large *1 You cannot change the setting when "Tuner" is selected as the source. *2 This function works only when "DISC"/"USB"/"iPod" is selected as the source. 58 - JVC KW-V820BT | Instruction Manual - Page 59
• Auto: Displays the picture by selecting the appropriate aspect ratio automatically. (DISC) Displays the picture fully in the original aspect ratio. (USB) • Adjustable items are different depending on the current source. • The image quality can be set for each source. Backlight and Black - JVC KW-V820BT | Instruction Manual - Page 60
JPEG file with a resolution of 800 x 480 pixels. • The color of the captured image may look different from that of the actual scene. 1 Connect the USB device on which the image is stored. (Page 70) 2 Display the screen. (See the left column.) 3 Select [User1 Select] or [User2 Select] to - JVC KW-V820BT | Instruction Manual - Page 61
the settings changed in the screen and recall the memorized settings any time. • The memorized settings are kept even when the unit is reset. • You cannot perform the operation when [SETUP Memory] is set to [Lock]. Unlock the setting beforehand. 1 Display the screen. On the Home - JVC KW-V820BT | Instruction Manual - Page 62
the screen. 4 Touch the center of the marks at the lower left and at the upper right as instructed. • To reset the touch position, press [Reset]. • To cancel the current operation, press [Cancel]. • You can also display the screen by touching [ ] on the source/option - JVC KW-V820BT | Instruction Manual - Page 63
the time zone to synchronize the clock with the GPS. (Page 4) [Clock Adjust]*2 Adjust the clock manually. (Page 5) [DISP Key] Select the source screen displayed when monitor panel is pressed. on the • Apps: Switches to the Apple CarPlay screen from the connected iPhone by pressing the button - JVC KW-V820BT | Instruction Manual - Page 64
the AUDIO SETUP Memory and the currently memorized audio setting. (Page 61) [Software Information] Display the version information of the software. You can update the software. [Open Source Licenses] Show the Open Source Licenses. [Initialize] Touch [Initialize] and then touch [Yes] to set all the - JVC KW-V820BT | Instruction Manual - Page 65
REMOTE CONTROLLER Preparation ❏❏Removing the battery sheet Pull the battery sheet out from the remote controller to activate the battery. ❏❏Changing the battery of the remote controller CR2025 (+side) ◊ Caution: • Keep the battery out of reach of children and in original package until ready to use. - JVC KW-V820BT | Instruction Manual - Page 66
/iPhone/Android. • Selects the band. • Selects a title/item/folder. • Tuner: -- Searches for stations automatically. -- Searches for stations manually. (Hold) • SiriusXM Satellite Radio: -- Selects a channel. -- Selects a channel rapidly. (Hold) • Selects a track. Adjusts the volume level. Selects - JVC KW-V820BT | Instruction Manual - Page 67
parts such as the heat sink and enclosure become hot. ❏❏Supplied accessories for installation 1 Wiring harness × 1 2 Flat head screws (M5 × 7 mm) × 6 3 Round head screws (M5 × 6 mm) × 6 4 USB extension cable (1.0 m) × 1 5 GPS antenna (3.5 m) × 1 6 Metal plate × 1 7 Microphone (3 m) × 1 ENGLISH 67 - JVC KW-V820BT | Instruction Manual - Page 68
. 2 Make the proper input and output wire connections for each unit. 3 Connect the speaker wires of the wiring harness. 4 Connect the wiring harness wires in the following order: ground, battery, ignition. 5 Connect the wiring harness connector to the unit. 6 Install the unit in your car. • Make - JVC KW-V820BT | Instruction Manual - Page 69
CONNECTION/INSTALLATION Connection ❏❏Connecting wires to terminals Page 71 VIDEO OUT Connect GPS antenna (5). (Page 72) REAR VIEW CAMERA Page 71 Page 71 If no connections are made, do not let the cable come out from the tab. Page 71 Page 71 Connect the antenna cord to the antenna terminal. 1 - JVC KW-V820BT | Instruction Manual - Page 70
CONNECTION/INSTALLATION ❏❏Connecting the USB extension cable Connect the USB extension cable (4) to connect a USB device/iPod/iPhone. USB device 1.0 m iPod/iPhone 4 ❏❏Connecting an iPod/iPhone • Connect the USB extension cable (4) beforehand. (See the left column.) iPod/iPhone (30-pin connector - JVC KW-V820BT | Instruction Manual - Page 71
driver. After installing, fix the microphone cable to the car with clamps (commercially available). -- Clean the installation surface beforehand. (commercially available) * When connecting an external amplifier, connect its ground wire to the chassis of the car; otherwise the unit may be damaged - JVC KW-V820BT | Instruction Manual - Page 72
plate (6) to conform to a curved surface, if necessary. 5 • Depending on the type of car, reception of the GPS satellite signals might not be possible with an internal installation. • Install this GPS antenna in an area away from any antennas that are used with CB radios or satellite televisions - JVC KW-V820BT | Instruction Manual - Page 73
REFERENCES Maintenance ❏❏Caution on cleaning the unit Do not use any solvent (for example, thinner, benzine, etc.), detergent, or insecticide. This may damage the monitor or the unit. Recommended cleaning method: Gently wipe the panel with a soft, dry cloth. ❏❏Moisture condensation Moisture may - JVC KW-V820BT | Instruction Manual - Page 74
: 8 kbps - 320 kbps WMA: 48 kbps - 192 kbps AAC: For discs: 16 kbps - 320 kbps For USB: 32 kbps - 320 kbps -- Sampling frequency: MP3: 8 kHz - 48 kHz WMA: For discs: 32 kHz - 48 kHz For USB: 8 kHz - 48 kHz WAV: 32 kHz/44.1 kHz/48 kHz AAC: 16 kHz - 48 kHz FLAC - JVC KW-V820BT | Instruction Manual - Page 75
recognize a memory card inserted into a USB card reader. • When connecting with a USB cable, use a USB 2.0 cable. • The maximum number of characters ( USB device then reset this unit and the USB device. • Operation and power supply may not work as intended for some USB devices. • Do not leave a USB - JVC KW-V820BT | Instruction Manual - Page 76
abnormal or unstable during operation. In this case, disconnect the iPod/iPhone device, then check its condition. If the performance is not improved or slow, reset your iPod/iPhone. • When you turn on this unit, the iPod/iPhone is charged through the unit. • The text information may not be displayed - JVC KW-V820BT | Instruction Manual - Page 77
Wire or insulate the speaker cord as appropriate. (Page 69) "Parking off": • No playback picture is shown when the parking brake is not engaged. "Unsupported Device": • The USB SiriusXM Satellite Radio antenna cable is bent or Updated - Press Enter to Continue": • Your subscription has been updated - JVC KW-V820BT | Instruction Manual - Page 78
another source, then reselect "iPod". The iPod/iPhone does not turn on or does not work. • Check the connecting cable and its connection. • Update the firmware version. • Charge the battery. • Reset the iPod/iPhone. Sound is distorted. • Deactivate the equalizer either on this unit or the iPod - JVC KW-V820BT | Instruction Manual - Page 79
cables cannot be used. ❏❏Tuner SSM automatic presetting does not work. • Store stations manually CarPlay. • When iPhone compatible with CarPlay is connected, check the [Automotive Mirroring] setting. (Page 22) Navigation does not work for "Apple CarPlay". • Connect the GPS supports its instructions, - JVC KW-V820BT | Instruction Manual - Page 80
48 kHz/96 kHz Quantifying Bit Number 16/20/24 bit ❏❏USB interface section USB Standard USB 2.0 Full Speed/High Speed × 2 Compatible Devices Mass storage Generic Access Profile) PBAP (Phone Book Access Profile) 1.2 SDP (Service Discovery Profile) SPP (Serial Port Profile) 1.2 HID (Human - JVC KW-V820BT | Instruction Manual - Page 81
12/-18/-24 dB/Oct. Gain -8/-7/-6/-5/-4/-3/-2/-1/0 dB ❏❏General Operating Voltage 14.4 V (10.5 V to 16 V allowable) Maximum Current Consumption 15 A Installation Dimensions (W × H × D) 178 mm × 100 mm × 155 mm (7-1/16" × 3-15/16" × 6-1/8") Operational Temperature Range -10°C to +60°C Weight - JVC KW-V820BT | Instruction Manual - Page 82
Apple Inc., registered in the U.S. and other countries. • Lightning is a trademark of Apple Inc. • Apple, Siri, Apple CarPlay and Apple CarPlay logo are trademarks of Apple Bluetooth SIG, Inc. and any use of such marks by JVC KENWOOD Corporation is under license. Other trademarks and trade names are - JVC KW-V820BT | Instruction Manual - Page 83
LIABLE FOR ANY DIRECT, INDIRECT, INCIDENTAL, SPECIAL, EXEMPLARY, OR CONSEQUENTIAL DAMAGES (INCLUDING, BUT NOT LIMITED TO, PROCUREMENT OF SUBSTITUTE GOODS OR SERVICES; LOSS OF USE, DATA, OR PROFITS; OR BUSINESS INTERRUPTION) HOWEVER CAUSED AND ON ANY THEORY OF LIABILITY, WHETHER IN CONTRACT, STRICT - JVC KW-V820BT | Instruction Manual - Page 84
0516EHHMDWJEIN - JVC KW-V820BT | Instruction Manual - Page 85
Spotify With Spotify, your music is everywhere. Working out, partying or relaxing, the right music Spotify surprise you. You can stream Spotify from connected iPod touch/iPhone or Android devices. • Install the latest version of the Spotify application on your iPod touch/iPhone/Android and create an - JVC KW-V820BT | Instruction Manual - Page 86
Apple App Store to find and install the most recent version.) • Connect iPod touch/iPhone to this unit with a cable or via Bluetooth. -- When connecting with a cable: Use KS-U62 (optional accessory) or USB 2.0 cable impaired or some or all of the services may become unavailable. • Some functions of - JVC KW-V820BT | Instruction Manual - Page 87
Pandora® You can stream Pandora from iPod touch/iPhone , Android or BlackBerry devices. • Install the latest version of the Pandora application on your iPod touch/iPhone/Android/ BlackBerry. Preparation 1 Connect the device. • For Android/BlackBerry: Pair the Android/ BlackBerry - JVC KW-V820BT | Instruction Manual - Page 88
Pandora® ❏❏Selecting a station from the list 1 Display the station list screen. ❏❏Creates a new station 1 Display the station list screen. Genre list screen 1 2 Select a station from the list. 2 Select the type. 2 Select a genre, then a station. [ Shuffle] Plays all the songs in the - JVC KW-V820BT | Instruction Manual - Page 89
iPod touch. (Search for "Pandora" in the Apple App Store to find and install the most recent version.) • Connect iPod touch/iPhone to this unit with a cable or via Bluetooth. -- When connecting with a cable: Use KS- U62 (optional accessory) or a USB 2.0 cable (accessory of the iPod/iPhone). Android
-
 1
1 -
 2
2 -
 3
3 -
 4
4 -
 5
5 -
 6
6 -
 7
7 -
8
-
9
-
10
-
11
-
12
-
13
-
14
-
15
-
16
-
17
-
18
-
19
-
20
-
21
-
22
-
23
-
24
-
25
-
26
-
27
-
28
-
29
-
30
-
31
-
32
-
33
-
34
-
35
-
36
-
37
-
38
-
39
-
40
-
41
-
42
-
43
-
44
-
45
-
46
-
47
-
48
-
49
-
50
-
51
-
52
-
53
-
54
-
55
-
56
-
57
-
58
-
59
-
60
-
61
-
62
-
63
-
64
-
65
-
66
-
67
-
68
-
69
-
70
-
71
-
72
-
73
-
74
-
75
-
76
-
77
-
78
-
79
-
80
-
81
-
82
-
83
-
84
-
85
-
86
-
87
-
88
-
89
 |
 |

B5A-1051-00 c (KN)
© 2016 JVC KENWOOD Corporation
MONITOR WITH DVD RECEIVER
INSTRUCTION MANUAL
KW-V820BT