JVC KW-V820BT Instruction Manual - Page 4
Initial Settings - gps
 |
View all JVC KW-V820BT manuals
Add to My Manuals
Save this manual to your list of manuals |
Page 4 highlights
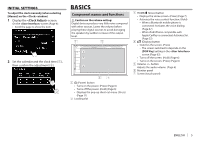
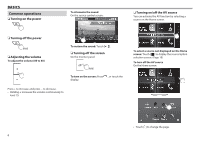
INITIAL SETTINGS Initial setup When you power on the unit for the first time, the initial setting screen appears. • You can also change the settings on the screen. (Page 62) 1 Perform the initial settings. Touch the desired item to configure the setting. • You can scroll the screen by touching [J]/[K] to show more items. • If another setting screen is displayed, set the item, then touch [ ] to return to previous screen. [Camera] [OEM SETUP] [DEMO] Configure settings for the connected rear view camera. (Page 37) Configure settings for the connected ADS adapter. (Page 63) Activate ([ON]) or deactivate ([OFF]) the display demonstration. (Page 64) 2 Finish the procedure. 3 Display the screen. 4 Select the method to set the clock. • Scroll the page to show the item. [Language] [Clock] [Color] Select the text language used for on-screen information. (Page 63) • Touch [Language Select], then select the desired language. Adjust the clock. (See the right column.) Select the color of the buttons on the monitor panel. (Page 59) • Touch [Panel Color Coordinate], then select the desired color. The Home screen is displayed. Clock settings 1 Display the Home screen. On the monitor panel: 2 Display the screen. 4 [GPS-SYNC] [Manual] Synchronizes the clock time with the GPS. Sets the clock manually. (Page 5) • To close the window, touch [Close]. 5 Select the appropriate time zone for [Time Zone]. • To return to the Home screen, press HOME on the monitor panel, or touch [ ] to return to the previous screen.
-
 1
1 -
 2
2 -
 3
3 -
 4
4 -
 5
5 -
 6
6 -
 7
7 -
 8
8 -
 9
9 -
 10
10 -
11
-
12
-
13
-
14
-
15
-
16
-
17
-
18
-
19
-
20
-
21
-
22
-
23
-
24
-
25
-
26
-
27
-
28
-
29
-
30
-
31
-
32
-
33
-
34
-
35
-
36
-
37
-
38
-
39
-
40
-
41
-
42
-
43
-
44
-
45
-
46
-
47
-
48
-
49
-
50
-
51
-
52
-
53
-
54
-
55
-
56
-
57
-
58
-
59
-
60
-
61
-
62
-
63
-
64
-
65
-
66
-
67
-
68
-
69
-
70
-
71
-
72
-
73
-
74
-
75
-
76
-
77
-
78
-
79
-
80
-
81
-
82
-
83
-
84
-
85
-
86
-
87
-
88
-
89
 |
 |
