Kenwood DNN770HD User Manual - Page 64
Voice Control (DNN990HD), Voice Control, Camera Control, Switching the View Camera
 |
View all Kenwood DNN770HD manuals
Add to My Manuals
Save this manual to your list of manuals |
Page 64 highlights
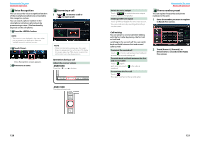
Return to the Top page Voice Control ññ Voice Control (DNN990HD) The navigation system is equipped with Advanced Voice Recognition function which allows you to operate it with your voice. The supported languages are US English, UK English, French, German, Dutch, Italian, and Spanish. For information on the voice commands, refer to (separate volume). 2 Speak the command. (Ex: Speak "HD RADIO".) NOTE • ASR on the Language Setting screen should be set to "Enabled". See Language setup (P.130). Voice Control 1 Press the Push-To-Talk switch to enter the Voice control mode. The screen has changed to the HD Radio Control screen. You will hear a beep again. 3 Repeat the same procedure as step 2. For information on the voice commands, refer to (separate volume). 4 Press the Push-To-Talk switch to end the voice control mode. ÑÑDisplaying Voice Commands To display the list of operable voice commands. 1 Press and hold the Push-To-Talk switch. The buttons enclosed in a green square support the voice control. The list of operable voice commands appears. Pronounce a command. NOTE • To cancel the commands list display, press Push- To-Talk switch or touch the screen. Return to the Top page Camera Control ññ Camera Control (DNN990HD) When a CMOS-310/CMOS-300 (optional accessory) is connected, the camera can be controlled from this navigation system. Switching the View Camera Switching between the front view camera and the rear view camera. Camera Control 1 Press the button for 1 second. You can adjust the camera angle of the camera system and display of the guideline. H 1 Press the button for 1 second. Camera view screen appears. 2 Adjust each item as follows. Camera view screen appears. HOME 6 2 Touch illustrated area during Camera view screen. 1 2 3 1 Guideline Pressing each time turns on or off the guideline display alternately. 2 ANGLE Pressing each time changes camera angles in the following order: Super wide view/ Wide view/ Overhead view/ Wide view + Top view/ Corner view 3 Clearing the Camera View display. Switches between the front view camera and rear view camera each time you touch the illustrated area. 126 127
-
 1
1 -
2
-
3
-
4
-
5
-
6
-
7
-
8
-
9
-
10
-
11
-
12
-
13
-
14
-
15
-
16
-
17
-
18
-
19
-
20
-
21
-
22
-
23
-
24
-
25
-
26
-
27
-
28
-
29
-
30
-
31
-
32
-
33
-
34
-
35
-
36
-
37
-
38
-
39
-
40
-
41
-
42
-
43
-
44
-
45
-
46
-
47
-
48
-
49
-
50
-
51
-
52
-
53
-
54
-
55
-
56
-
57
-
58
-
 59
59 -
 60
60 -
 61
61 -
 62
62 -
 63
63 -
 64
64 -
 65
65 -
 66
66 -
 67
67 -
 68
68 -
 69
69 -
70
-
71
-
72
-
73
-
74
-
75
-
76
-
77
-
78
-
79
-
80
-
81
-
82
-
83
-
84
-
85
-
86
-
87
 |
 |
