Kenwood DNN770HD User Manual - Page 9
Initial setup, Touch [Next]., Set each item as follows. - wifi connection
 |
View all Kenwood DNN770HD manuals
Add to My Manuals
Save this manual to your list of manuals |
Page 9 highlights
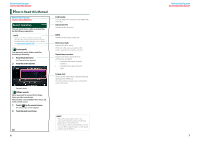
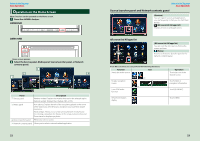
Return to the Top page Basic Operations Initial setup Perform this setup when you use this navigation system for the first time or when you reset the unit. See Resetting the Navigation System (P.157). 1 Set each item as follows. 2 Touch [Next]. 3 Set each item as follows. Return to the Top page Basic Operations Language Setup Select the language used for the GUI and input methods. Default is "English (United States)". 1 Touch [Language Setup]. 2 Select a language from the list. 3 After setting, press the < 6 > button twice. WiFi Setup Configure settings for connection to Wi-Fi. 1 Touch [WiFi Setup]. 2 Slide Wi-Fi to ON. 3 Select the Wi-Fi access point to register from the list. 4 Input the Password. 5 Touch [Connect]. 6 After setting, press the < 6 > button. For details on operation, see Wi-Fi Setup (P.32). Date Setup Set the date and time. 1 Touch [Date Setup]. 2 Touch [Select time zone]. 3 Select a time zone. 4 After setting, press the < 6 > button. For details on operation, see Clock and Date Setup (P.34). Account Setup Set the information about the user of this navigation system. 1 Touch [Account Setup]. For details on operation, see About Account (P.36). 16 Language Select the language used for the control screen and setting items. Default is "American English (en)". 1 Touch [SET]. 2 Touch [C] or [D] to select the desired language. 3 Touch [Enter]. For details on operation, see Language setup (P.130). Angle (DNN990HD only) Adjust the position of the monitor. Default is "0". 1 Touch [SET]. 2 Touch desired angle number and [ ]. For details on operation, see Monitor angle control (P.132). iPod AV Interface Use Set the terminal which your iPod is connected to. Default is "iPod". 1 Touch [iPod] or [AV-IN2]. Continued 17
-
 1
1 -
2
-
3
-
 4
4 -
 5
5 -
 6
6 -
 7
7 -
 8
8 -
 9
9 -
 10
10 -
 11
11 -
 12
12 -
 13
13 -
 14
14 -
15
-
16
-
17
-
18
-
19
-
20
-
21
-
22
-
23
-
24
-
25
-
26
-
27
-
28
-
29
-
30
-
31
-
32
-
33
-
34
-
35
-
36
-
37
-
38
-
39
-
40
-
41
-
42
-
43
-
44
-
45
-
46
-
47
-
48
-
49
-
50
-
51
-
52
-
53
-
54
-
55
-
56
-
57
-
58
-
59
-
60
-
61
-
62
-
63
-
64
-
65
-
66
-
67
-
68
-
69
-
70
-
71
-
72
-
73
-
74
-
75
-
76
-
77
-
78
-
79
-
80
-
81
-
82
-
83
-
84
-
85
-
86
-
87
 |
 |
