Konica Minolta bizhub 42 bizhub 36/42 Copy Operations User Guide - Page 83
Troubleshooting table
 |
View all Konica Minolta bizhub 42 manuals
Add to My Manuals
Save this manual to your list of manuals |
Page 83 highlights
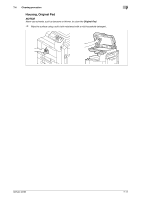
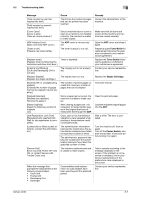
8.2 Troubleshooting table 8 8.2 Troubleshooting table Simple troubleshooting The following explains simple troubleshooting procedures. If the problem is not corrected after the described operation is performed, contact your service representative. Description of problem The machine does not start up when the Power Switch is turned on Copying does not start The image is light. The image is dark. The image is partially obscured or blurry. There are dark specks or spots throughout the printed output There are streaks in the printed output Check points Is power being supplied from the electrical outlet? Remedy Correctly insert the power supply plug into the electrical outlet. Is the Top Right Door of the machine open? Is there any paper that matches the original? Is the copy density set to [-]? Is the paper damp? Is the copy density set to [+]? Was the original not pressed close enough against the Original Glass? Is the paper damp? Was the original not pressed close enough against the Original Glass? Is the Original Glass dirty? Is the Slit Scan Glass dirty? Is the Original Pad dirty? Was the original printed on highly translucent material, such as diazo photosensitive paper or OHP transparencies? Is a 2-sided original being copied? Securely close the Top Right Door of the machine. Load paper of the appropriate size into the paper tray. Press [+] in the Density screen to copy at the desired copy density. (p. 5-9) If the above does not resolve the problem, make settings in [Maintenance Menu] available from Admin Settings. For details, refer to the [User's Guide Administrator Operations]. Replace with new paper. (p. 7-3) Press [-] in the Density screen to copy at the desired copy density. (p. 5-9) If the above does not resolve the problem, make settings in [Maintenance Menu] available from Admin Settings. For details, refer to the [User's Guide Administrator Operations]. Position the original so that it is pressed closely against the Original Glass. (p. 3-4) Replace with new paper. (p. 7-3) Position the original so that it is pressed closely against the Original Glass. (p. 3-4) Wipe the Original Glass with a soft, dry cloth. (p. 7-10) Clean the Slit Scan Glass with a dry cloth. (p. 7-10) Clean the Original Pad with a soft cloth dampened with a mild detergent. (p. 7-11) Place a blank sheet of paper on top of the original. (p. 3-4) If a thin 2-sided original is being copied, the print on the back side may be reproduced on the front side of the copy. In the Background Removal screen, select a lighter background density. (p. 5-18) bizhub 42/36 8-3
-
 1
1 -
2
-
3
-
4
-
5
-
6
-
7
-
8
-
9
-
10
-
11
-
12
-
13
-
14
-
15
-
16
-
17
-
18
-
19
-
20
-
21
-
22
-
23
-
24
-
25
-
26
-
27
-
28
-
29
-
30
-
31
-
32
-
33
-
34
-
35
-
36
-
37
-
38
-
39
-
40
-
41
-
42
-
43
-
44
-
45
-
46
-
47
-
48
-
49
-
50
-
51
-
52
-
53
-
54
-
55
-
56
-
57
-
58
-
59
-
60
-
61
-
62
-
63
-
64
-
65
-
66
-
67
-
68
-
69
-
70
-
71
-
72
-
73
-
74
-
75
-
76
-
77
-
 78
78 -
 79
79 -
 80
80 -
 81
81 -
 82
82 -
 83
83 -
 84
84 -
 85
85 -
 86
86 -
 87
87 -
 88
88 -
89
-
90
-
91
-
92
-
93
-
94
-
95
-
96
-
97
-
98
-
99
-
100
-
101
-
102
-
103
-
104
-
105
-
106
-
107
-
108
-
109
 |
 |
