Konica Minolta bizhub C3350 bizhub C3850/C3350 Maintenance/Troubleshooting Use
Konica Minolta bizhub C3350 Manual
 |
View all Konica Minolta bizhub C3350 manuals
Add to My Manuals
Save this manual to your list of manuals |
Konica Minolta bizhub C3350 manual content summary:
- Konica Minolta bizhub C3350 | bizhub C3850/C3350 Maintenance/Troubleshooting Use - Page 1
User's Guide Maintenance/Troubleshooting - Konica Minolta bizhub C3350 | bizhub C3850/C3350 Maintenance/Troubleshooting Use - Page 2
Cartridge...2-3 Storing Toner Cartridges...2-3 Replacement procedure ...2-3 Replacing an Imaging Unit...2-7 Replacing a Waste Toner Bottle ...2-12 Replacing the Transfer Roller...2-13 Replacing the Transfer Belt Unit ...2-15 Replacing a Toner Filter ...2-20 Replacing a Fusing Unit ...2-22 Replacing - Konica Minolta bizhub C3350 | bizhub C3850/C3350 Maintenance/Troubleshooting Use - Page 3
Cannot print ...4-4 Problems on print quality ...4-7 When the bit count does not match between the server and the client 4-8 Cannot perform network scanning 4-10 Cannot perform fax/internet fax 4-11 Cannot perform Fax TX...4-11 Cannot perform Fax RX ...4-12 Cannot perform copy...4-13 Trouble in - Konica Minolta bizhub C3350 | bizhub C3850/C3350 Maintenance/Troubleshooting Use - Page 4
1 Cleaning This Machine - Konica Minolta bizhub C3350 | bizhub C3850/C3350 Maintenance/Troubleshooting Use - Page 5
and be sure to follow their instructions. These labels are provided inside , in bright light, Imaging Unit may be damaged. - Do not open any door of this machine during printing. - Do not align toner from spilling, keep this machine horizontal when carrying it. [Maintenance/Troubleshooting] 1-2 - Konica Minolta bizhub C3350 | bizhub C3850/C3350 Maintenance/Troubleshooting Use - Page 6
so may cause a damage of this machine or an electric shock. 7CAUTION - If any toner enters your eyes, immediately wash them with cool water, then contact your doctor. - The Fusing Unit is heated. The temperature of the Fusing Unit slowly reduces (wait for 1 hour). [Maintenance/Troubleshooting] 1-3 - Konica Minolta bizhub C3350 | bizhub C3850/C3350 Maintenance/Troubleshooting Use - Page 7
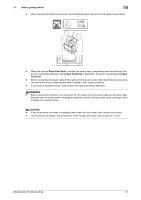
so may cause a damage of this machine or an electric shock. 1.2.1 Cleaning the outside of this machine Control Panel Exhaust Air Duct Outer Covers [Maintenance/Troubleshooting] 1-4 - Konica Minolta bizhub C3350 | bizhub C3850/C3350 Maintenance/Troubleshooting Use - Page 8
stained with paper powders or dust, a paper feeding failure may occur. Cleaning the Paper Feed Rollers of the Manual Feed Tray 1 Open the Manual Feed Tray. 2 Press up the center of the flip-top plate until the lock latches (white) at the right and left are locked. [Maintenance/Troubleshooting] 1-5 - Konica Minolta bizhub C3350 | bizhub C3850/C3350 Maintenance/Troubleshooting Use - Page 9
. 3 Close the Tray. Cleaning the Transport Roller of Tray 2/3 0 Tray 2/3 is available when the optional Paper Feed Unit is installed. 1 Open the Right Door of Tray 2/3. % When opening the Right Door of Tray 2/3, be sure to fold the Manual Feed Tray in advance. [Maintenance/Troubleshooting] 1-6 - Konica Minolta bizhub C3350 | bizhub C3850/C3350 Maintenance/Troubleshooting Use - Page 10
the Transport Roller with a soft and dry cloth. 3 Close the Right Door of Tray 2/3. Cleaning the Paper Feed Roller of the ADF 1 Open the ADF Cover. 2 Wipe off the Paper Feed Roller at the rear side of the cover with a soft and dry cloth. 3 Close the ADF Cover. [Maintenance/Troubleshooting] 1-7 - Konica Minolta bizhub C3350 | bizhub C3850/C3350 Maintenance/Troubleshooting Use - Page 11
to remove a Waste Toner Bottle, refer to page 2-12. Inclining the Waste Toner Bottle may cause toner to spill. % For information on how to remove an Imaging Unit, refer to page 2-7. Cover the removed Imaging Unit with a cloth to keep from being affected by light. [Maintenance/Troubleshooting] 1-8 - Konica Minolta bizhub C3350 | bizhub C3850/C3350 Maintenance/Troubleshooting Use - Page 12
an Imaging Unit, refer to page 2-7. 6 Return the Laser Lens Cleaning Tool to the holder. % The Laser Lens Cleaning Tool is an accessory of this machine. Return the Laser Lens Cleaner to the laser lens cleaner holder so that you do not lose it. 7 Close the Front Cover. [Maintenance/Troubleshooting - Konica Minolta bizhub C3350 | bizhub C3850/C3350 Maintenance/Troubleshooting Use - Page 13
2 Checking and Replacing Consumables - Konica Minolta bizhub C3350 | bizhub C3850/C3350 Maintenance/Troubleshooting Use - Page 14
on the screen. Message [Toner is low.] [Replace toner] [Replace imaging unit] [Replace Image Transfer Belt Unit] [Replace Toner Filter] [Replace Fusing Unit] [Waste Toner Box will require replacement soon.] [Waste Toner Box Full] [Replace Transfer Roller Unit] Description The toner is about to run - Konica Minolta bizhub C3350 | bizhub C3850/C3350 Maintenance/Troubleshooting Use - Page 15
that affects printing quality and that was caused due to use of a recycled Toner Cartridge is not covered by the warranty. Such a failure or problem is not subject to technical support. 1 Check the color of the exhausted toner in the message window of the Control Panel. [Maintenance/Troubleshooting - Konica Minolta bizhub C3350 | bizhub C3850/C3350 Maintenance/Troubleshooting Use - Page 16
If toner has spilled, immediately wipe it off using a soft and dry cloth. 5 Check the color of the new Toner Cartridge. % To prevent toner from spilling, do not take the Toner Cartridge out of the bag until Step 4 is executed. 6 Take the Toner Cartridge out of the bag. [Maintenance/Troubleshooting - Konica Minolta bizhub C3350 | bizhub C3850/C3350 Maintenance/Troubleshooting Use - Page 17
the lever to the right to lock it. % Carefully return the lever at the front to its original position. If the lever is not returned to its original position, the Front Cover is not closed. % If it is difficult to operate the lever, push the lever unit to the back. [Maintenance/Troubleshooting] 2-5 - Konica Minolta bizhub C3350 | bizhub C3850/C3350 Maintenance/Troubleshooting Use - Page 18
2.2 Replacing consumables 2 10 Close the Front Cover. [Maintenance/Troubleshooting] 2-6 - Konica Minolta bizhub C3350 | bizhub C3850/C3350 Maintenance/Troubleshooting Use - Page 19
replace a black Imaging Unit. NOTICE Do not touch the surface of the OPC drum. Doing so may cause reduce printing quality. 1 Check the color of the Imaging Unit to be replaced in the message window of the Control Panel. 2 Open the Front Cover. 3 Pull the lever at the front of the Toner Cartridge to - Konica Minolta bizhub C3350 | bizhub C3850/C3350 Maintenance/Troubleshooting Use - Page 20
cause toner to spill. 7 While holding down the tab of the Imaging Unit to be replaced, pull out the Imaging Unit. % To dispose of the used Imaging Unit, use the recovery service or follow the regulations in your region. 8 Check the color of the new Imaging Unit. [Maintenance/Troubleshooting] 2-8 - Konica Minolta bizhub C3350 | bizhub C3850/C3350 Maintenance/Troubleshooting Use - Page 21
, then shake it several times as shown in the figure. % Do not touch the bottom of the Imaging Unit. Doing so may damage it and subsequently reduce printing quality. 11 Remove the protection tape from the Imaging Unit, then take off the protection paper (black). [Maintenance/Troubleshooting] 2-9 - Konica Minolta bizhub C3350 | bizhub C3850/C3350 Maintenance/Troubleshooting Use - Page 22
the holding sheet and protection materials from the Imaging Unit. 14 Check that the color of the new Imaging Unit matches that of the insertion slot in the main unit, then push the Imaging Unit to the back. 15 Push the Waste Toner Bottle to the back to lock it. [Maintenance/Troubleshooting] 2-10 - Konica Minolta bizhub C3350 | bizhub C3850/C3350 Maintenance/Troubleshooting Use - Page 23
Push the Toner Cartridge to the back. 17 Pull the lever to the right to lock it. % Carefully return the lever at the front to its original position. If the lever is not returned to its original position, the Front Cover is not closed. 18 Close the Front Cover. [Maintenance/Troubleshooting] 2-11 - Konica Minolta bizhub C3350 | bizhub C3850/C3350 Maintenance/Troubleshooting Use - Page 24
Waste Toner Bottle in the plastic bag included in the package, then store it in the package box. % To dispose of the used Waste Toner Bottle, use the recovery service or follow the regulations in your region. 5 Push the Waste Toner Bottle to the back to lock it. [Maintenance/Troubleshooting] 2-12 - Konica Minolta bizhub C3350 | bizhub C3850/C3350 Maintenance/Troubleshooting Use - Page 25
reduces. Immediately replace the Transfer Roller. 1 Pull the lever (1), then open the Right Door (2). % When opening the Right Door, be sure to fold the Manual Feed Tray in advance. 2 Press two tabs at the right and left of the Transfer Roller up to unlock. [Maintenance/Troubleshooting] 2-13 - Konica Minolta bizhub C3350 | bizhub C3850/C3350 Maintenance/Troubleshooting Use - Page 26
new Transfer Roller out of the package box. 5 Insert the shaft of the Transfer Roller into the bearing in the machine. 6 Press down two tabs at the right and left of the Transfer Roller to lock it. 7 While holding down the roller, press it inward until it clicks. [Maintenance/Troubleshooting] 2-14 - Konica Minolta bizhub C3350 | bizhub C3850/C3350 Maintenance/Troubleshooting Use - Page 27
] - [Life] - [New Release] - [Transfer Roller Unit], then reset the counter. 2.2.5 Replacing the Transfer Belt Unit After the Transfer Belt Unit replacement message has appeared, printing is possible, but the printing quality reduces. Immediately replace the Transfer Belt. 1 Turn the power of this - Konica Minolta bizhub C3350 | bizhub C3850/C3350 Maintenance/Troubleshooting Use - Page 28
the lever (1), then open the Right Door (2). % When opening the Right Door, be sure to fold the Manual Feed Tray in advance. 5 Insert the protection sheet under the Transfer Belt Unit. % Insert the protection sheet until it stops. 6 Lower the Transfer Belt Unit guide. [Maintenance/Troubleshooting - Konica Minolta bizhub C3350 | bizhub C3850/C3350 Maintenance/Troubleshooting Use - Page 29
damage the surface. 8 Take a new Transfer Belt Unit out of the package box. 9 Remove the protection paper. % Do not touch the surface of the Transfer Belt Unit. Also, do not remove the blue lever. 10 Remove the protection materials of the new Transfer Belt Unit. [Maintenance/Troubleshooting] 2-17 - Konica Minolta bizhub C3350 | bizhub C3850/C3350 Maintenance/Troubleshooting Use - Page 30
the new Transfer Belt Unit along the guides at the right and left. % Insert the Transfer Belt Unit horizontally. Not doing so may damage the surface. % Insert the Transfer Belt to the back. 12 Lift the Transfer Belt Unit guide. 13 Pull out the protection sheet. [Maintenance/Troubleshooting] 2-18 - Konica Minolta bizhub C3350 | bizhub C3850/C3350 Maintenance/Troubleshooting Use - Page 31
Toner Cartridge, Waste Toner Bottle, and Imaging Unit. % For information on how to install a Toner Cartridge, refer to page 2-3. % For information on how to install a Waste Toner ] - [Life] - [New Release] - [Image Transfer Belt Unit], then reset the counter. [Maintenance/Troubleshooting] 2-19 - Konica Minolta bizhub C3350 | bizhub C3850/C3350 Maintenance/Troubleshooting Use - Page 32
a Toner Filter 0 The Transfer Belt Unit contains Toner Filter. 1 Pull the Filter Case out of the main unit. 2 Push the Toner Filter from the bottom and take it out of the case. 3 Take a new Toner Filter out of the plastic bag. % Place the used Toner Filter in the plastic bag the new Toner Filter - Konica Minolta bizhub C3350 | bizhub C3850/C3350 Maintenance/Troubleshooting Use - Page 33
2.2 Replacing consumables 2 5 Attach the Filter Case to the main unit. 6 Select [Utility] - [Administrator Settings] - [System Settings] - [Expert Adjustment] - [Life] - [New Release] - [Toner Filter], then reset the counter. [Maintenance/Troubleshooting] 2-21 - Konica Minolta bizhub C3350 | bizhub C3850/C3350 Maintenance/Troubleshooting Use - Page 34
after turning the power off. Then, replace the Fusing Unit. 1 Turn off the power of this machine. 2 Pull the lever (1), then open the Right Door (2). % When opening the Right Door, be sure to fold the Manual Feed Tray in advance. 3 Open the Fusing Cover. [Maintenance/Troubleshooting] 2-22 - Konica Minolta bizhub C3350 | bizhub C3850/C3350 Maintenance/Troubleshooting Use - Page 35
2.2 Replacing consumables 2 4 Lower the levers at the right and left. 5 Remove the Fusing Unit. 6 Take a new Fusing Unit out of the package box. % Do not touch the surface of the Fusing Roller. [Maintenance/Troubleshooting] 2-23 - Konica Minolta bizhub C3350 | bizhub C3850/C3350 Maintenance/Troubleshooting Use - Page 36
2.2 Replacing consumables 7 Lift the levers at the right and left. 8 Remove protection materials. 9 Lower the levers at the right and left. 10 Lower the lever at the bottom. [Maintenance/Troubleshooting] 2 2-24 - Konica Minolta bizhub C3350 | bizhub C3850/C3350 Maintenance/Troubleshooting Use - Page 37
2.2 Replacing consumables 2 11 Insert a new Fusing Unit to the back until it is fixed. 12 Lift the lever at the bottom. 13 Close the Fusing Cover. [Maintenance/Troubleshooting] 2-25 - Konica Minolta bizhub C3350 | bizhub C3850/C3350 Maintenance/Troubleshooting Use - Page 38
correctly. 15 Select [Utility] - [Administrator Settings] - [System Settings] - [Expert Adjustment] - [Life] - [New Release] - [Fusing Unit], then reset the counter. 2.2.8 Replacing a Staple Kit 1 Rotate the Finisher 90 degrees. 2 Open the Finisher Cover. [Maintenance/Troubleshooting] 2-26 - Konica Minolta bizhub C3350 | bizhub C3850/C3350 Maintenance/Troubleshooting Use - Page 39
take it out of the Staple Cartridge. 5 Insert a new Staple Case in to the Staple Cartridge. 6 Insert the Staple Cartridge until you hear a click. [Maintenance/Troubleshooting] 2-27 - Konica Minolta bizhub C3350 | bizhub C3850/C3350 Maintenance/Troubleshooting Use - Page 40
2.2 Replacing consumables 2 7 Close the Finisher Cover. 8 Rotate the Finisher 90 degrees to the original position. [Maintenance/Troubleshooting] 2-28 - Konica Minolta bizhub C3350 | bizhub C3850/C3350 Maintenance/Troubleshooting Use - Page 41
3 Clearing a Paper Jam - Konica Minolta bizhub C3350 | bizhub C3850/C3350 Maintenance/Troubleshooting Use - Page 42
humid conditions? - Do you always align the paper guide to the paper size after loading paper into a tray? (If the paper guide is not aligned to the paper size, it may reduce printing quality, cause a paper jam, or damage the the tray, it will cause a paper jam.) [Maintenance/Troubleshooting] 3-2 - Konica Minolta bizhub C3350 | bizhub C3850/C3350 Maintenance/Troubleshooting Use - Page 43
unit. If you touch the print side, your hand may become stained with toner. When removing jammed paper, be careful not to touch the print side. Also, do not spill toner inside this machine. - Toner jam in the Manual Feed Tray or Transfer Roller 7CAUTION - The area around the fusing unit is hot. To - Konica Minolta bizhub C3350 | bizhub C3850/C3350 Maintenance/Troubleshooting Use - Page 44
the Manual Feed Tray in advance. 2 Carefully pull out the jammed paper. NOTICE If you touch the surface of the Transfer Belt Unit or Transfer Roller, it may reduce printing quality. Be careful not to touch the surface of the Transfer Belt Unit or Transfer Roller. [Maintenance/Troubleshooting] 3-4 - Konica Minolta bizhub C3350 | bizhub C3850/C3350 Maintenance/Troubleshooting Use - Page 45
3.2.3 Clearing a paper jam in Tray 1 7CAUTION - The area around the fusing unit is hot. To avoid a burn injury, be careful not to touch any parts lever (1), then open the Right Door (2). % When opening the Right Door, be sure to fold the Manual Feed Tray in advance. [Maintenance/Troubleshooting] - Konica Minolta bizhub C3350 | bizhub C3850/C3350 Maintenance/Troubleshooting Use - Page 46
touch the surface of the Transfer Belt Unit or Transfer Roller, it may reduce printing quality. Be careful not to touch the surface of the Transfer Belt Unit or Transfer Roller. 3 Close the Right Door. 4 Pull out Tray 1, then remove any paper left in the tray. [Maintenance/Troubleshooting] 3-6 - Konica Minolta bizhub C3350 | bizhub C3850/C3350 Maintenance/Troubleshooting Use - Page 47
Clearing a paper jam in Tray 2/3 0 Tray 2/3 is available when the optional Paper Feed Unit is installed. 1 Open the Right Door of Tray 2/3. % When opening the Right Door of Tray 2/3, be sure to fold the Manual Feed Tray in advance. 2 Carefully pull out the jammed paper. 3 Close the Right Door - Konica Minolta bizhub C3350 | bizhub C3850/C3350 Maintenance/Troubleshooting Use - Page 48
Tray 2/3, then close the tray. 3.2.5 Clearing a paper jam in ADF 1 Open the ADF Feed Cover. 2 Remove the remaining original from the Document Feed Tray. [Maintenance/Troubleshooting] 3-8 - Konica Minolta bizhub C3350 | bizhub C3850/C3350 Maintenance/Troubleshooting Use - Page 49
ADF. 4 Remove the jammed original. 5 Close the ADF. 6 Close the ADF Feed Cover. 3.2.6 Clearing a paper jam in the Duplex Option 1 Pull the lever (1), then open the Right Door (2). % When opening the Right Door, be sure to fold the Manual Feed Tray in advance. [Maintenance/Troubleshooting] 3-9 - Konica Minolta bizhub C3350 | bizhub C3850/C3350 Maintenance/Troubleshooting Use - Page 50
unit is hot. To avoid a burn injury, be careful not to touch any parts except for the specified knob and dial. In case your hand or any other part of your body comes in contact with the heated section, immediately run it under cold water and seek medical assistance. [Maintenance/Troubleshooting - Konica Minolta bizhub C3350 | bizhub C3850/C3350 Maintenance/Troubleshooting Use - Page 51
3.2 When a paper jam has occurred 3 Clear procedure 1 Pull the lever (1), then open the Right Door (2). % When opening the Right Door, be sure to fold the Manual Feed Tray in advance. 2 Press up the levers (2 places). 3 Open the Fusing Cover. [Maintenance/Troubleshooting] 3-11 - Konica Minolta bizhub C3350 | bizhub C3850/C3350 Maintenance/Troubleshooting Use - Page 52
it from the upper side of the Fusing Unit. NOTICE If you touch the surface of the Transfer Belt Unit or Transfer Roller, it may reduce printing quality. Be careful not to touch the surface of the Transfer Belt Unit or Transfer Roller. 5 Close the Fusing Cover. [Maintenance/Troubleshooting] 3-12 - Konica Minolta bizhub C3350 | bizhub C3850/C3350 Maintenance/Troubleshooting Use - Page 53
3.2 When a paper jam has occurred 3 6 Press down the levers (2 places). 7 Close the Right Door. [Maintenance/Troubleshooting] 3-13 - Konica Minolta bizhub C3350 | bizhub C3850/C3350 Maintenance/Troubleshooting Use - Page 54
using the printer driver. For information on the available paper, refer to Chapter 6 "Loading Paper" in [User's Guide Introduction]. Do not load sheets of different types together. Do not use an envelope, label sheet, letterhead, postcard, glossy paper, or single side only paper for 2-sided printing - Konica Minolta bizhub C3350 | bizhub C3850/C3350 Maintenance/Troubleshooting Use - Page 55
, refer to Chapter 6 "Loading Paper" in [User's Guide Introduction]. Clean the Paper Feed Rollers. For details, refer to page 1-5. Tips If a paper jam frequently occurs in a specific place, carry out checks, repairs, or cleaning focusing on the jam location. [Maintenance/Troubleshooting] 3-15 - Konica Minolta bizhub C3350 | bizhub C3850/C3350 Maintenance/Troubleshooting Use - Page 56
3.4 Clearing a Staple Jam 3 3.4 Clearing a Staple Jam 1 Rotate the Finisher 90 degrees. 2 Open the Finisher Cover. 3 Take the Staple Cartridge out of the Finisher. 4 Pull the Face Plate up and remove jammed or scattered staples. [Maintenance/Troubleshooting] 3-16 - Konica Minolta bizhub C3350 | bizhub C3850/C3350 Maintenance/Troubleshooting Use - Page 57
hear a click. 7 Close the Finisher Cover. 8 Rotate the Finisher 90 degrees to the original position. Tips After clearing a staple jam, run test stapling twice. [Maintenance/Troubleshooting] 3-17 - Konica Minolta bizhub C3350 | bizhub C3850/C3350 Maintenance/Troubleshooting Use - Page 58
4 Troubleshooting - Konica Minolta bizhub C3350 | bizhub C3850/C3350 Maintenance/Troubleshooting Use - Page 59
4.1 The power is not turned on 4 4 Troubleshooting 4.1 The power is not turned on Check the Power Switch for the status. - Check whether the power plug of this machine is firmly plugged into - Konica Minolta bizhub C3350 | bizhub C3850/C3350 Maintenance/Troubleshooting Use - Page 60
Auto Power Off mode, press the Power key to display the Touch Panel. To use it outside the preset operating hours, follow the on-screen instructions. - Check that the Power Switch is turned ON. [Maintenance/Troubleshooting] 4-3 - Konica Minolta bizhub C3350 | bizhub C3850/C3350 Maintenance/Troubleshooting Use - Page 61
the cause of memory shortage. If test printing fails, resolve any problems that may be occurring in the machine or with the printer driver. Refer to the user's manual of the application software to check the settings. Change the settings and try to print again. [Maintenance/Troubleshooting] 4-4 - Konica Minolta bizhub C3350 | bizhub C3850/C3350 Maintenance/Troubleshooting Use - Page 62
user name or password. Perform a test printing to check whether printing is possible. If test printing is successful, this indicates there are no problems on this machine or with the printer driver. In this case, remove the cause of memory shortage. If test printing fails, resolve any problems - Konica Minolta bizhub C3350 | bizhub C3850/C3350 Maintenance/Troubleshooting Use - Page 63
4.3 Cannot print 4 Description of problem Printing in user authentication or account track mode is not available. Printing is not available when you have selected [Public User] in user authentication. Selection of items failed in the printer driver. A "conflict" message saying "unable to configure - Konica Minolta bizhub C3350 | bizhub C3850/C3350 Maintenance/Troubleshooting Use - Page 64
Cannot print 4 4.3.2 Problems on print quality Description of problem No data is printed. Printed in jet black or all over in color. A print is faint. A print is dark. Cause A Toner Cartridge is damaged. One or more Imaging Unit are damaged. Paper is damp. The paper setting of the printer driver - Konica Minolta bizhub C3350 | bizhub C3850/C3350 Maintenance/Troubleshooting Use - Page 65
4.3 Cannot print 4 Description of problem Image colors run. The background is dirty. The degree of gloss is uneven. The density is uneven. Cause A Toner Cartridge is damaged. One or more Imaging Unit are damaged. The Original Cover Pad is dirty. The Original Glass is dirty. A Toner Cartridge is - Konica Minolta bizhub C3350 | bizhub C3850/C3350 Maintenance/Troubleshooting Use - Page 66
Windows\System32\DriverStore\FileRepository\ntprint.inf_xxx] In the path above, "z" represents the assigned network drive. "_xxx" at the end of this path varies depending on the driver Additional installation of the 64-bit operating system driver is then completed. [Maintenance/Troubleshooting] 4-9 - Konica Minolta bizhub C3350 | bizhub C3850/C3350 Maintenance/Troubleshooting Use - Page 67
Check the transmission procedure, then resend the fax. Check the network settings and connection. user, create a domain user name that is different from the local user name. If your domain user name is the same as the local user name, use the same password for both. [Maintenance/Troubleshooting - Konica Minolta bizhub C3350 | bizhub C3850/C3350 Maintenance/Troubleshooting Use - Page 68
the fax. If you are using a destination in the Address Book or Program, the registered fax number may be incorrect. Print the Speed problem? Call the recipient to determine whether there is a problem. Check the recipient's password then resend the fax using a correct password. Check that the fax - Konica Minolta bizhub C3350 | bizhub C3850/C3350 Maintenance/Troubleshooting Use - Page 69
the fax from the Memory RX folder. Check forwarding destinations for TSI Distribution. If Memory RX is enabled, print the fax from the Memory RX folder. Add paper. Clear the jammed paper. No fax can be received if the toner is exhausted. Replace the Toner Cartridge. [Maintenance/Troubleshooting - Konica Minolta bizhub C3350 | bizhub C3850/C3350 Maintenance/Troubleshooting Use - Page 70
problem Copying does not start. The original does not feed. The image is light. The image is dark. The image is partially obscured or blurry. The entire area of a copy gets smudged. Images printed lateral guide of being copied, the print on the back side Guide Guide with the edges of the paper. Manually - Konica Minolta bizhub C3350 | bizhub C3850/C3350 Maintenance/Troubleshooting Use - Page 71
Cannot perform copy 4 Description of problem The area around an image gets smudged. Cannot switch to paper size? (When the reduced copying zoom ratio has been selected manually) Have settings been selected that cannot be combined? Remedy Clean the Original . [Maintenance/Troubleshooting] 4-14 - Konica Minolta bizhub C3350 | bizhub C3850/C3350 Maintenance/Troubleshooting Use - Page 72
in use of Finisher FS-P03 4 4.7 Trouble in use of Finisher FS-P03 Description of problem The Finisher does not function. Check points - Have you loaded paper on which an image without margins has been printed? Remedy Turn the power of this machine off and on to reset the Finisher. Paper on - Konica Minolta bizhub C3350 | bizhub C3850/C3350 Maintenance/Troubleshooting Use - Page 73
.] [Replenish Toner] [Replace imaging unit] [Replace Image Transfer Belt Unit] [Replace Fusing Unit] [Replace Toner Filter] [Waste Toner Box will require replacement soon.] [Replace Transfer Roller Unit] [Incorrect toner cartridge] [Incorrect imaging unit] [Incorrect HDD] [USB hub is not supported - Konica Minolta bizhub C3350 | bizhub C3850/C3350 Maintenance/Troubleshooting Use - Page 74
Bottle has become full. The operating life of the Imaging Unit has expired. Toner is depleted. Paper of the specified size is not loaded into a tray. No paper is loaded in the tray. A print job was executed by specifying the Manual Feed Tray from the printer driver, but no paper was loaded in the - Konica Minolta bizhub C3350 | bizhub C3850/C3350 Maintenance/Troubleshooting Use - Page 75
Scanner Lock Lever] [Job Registration Limit Over] [Connection Failed] [Writing Error] [Matching paper size not available.] [Out of the Range of Auto Zoom] [Place Original on Glass] [Place Original on ADF] [Duplex Copy Disabled] [Scan TX Failed] [Off-Hook] [Fax TX Failed] [Fax RX Failed] [I-Fax TX - Konica Minolta bizhub C3350 | bizhub C3850/C3350 Maintenance/Troubleshooting Use - Page 76
the HDD is full. Failed to scan the IC card at the Service call If a service call has appeared, restart this machine. If the problem is not resolved after this machine has been restarted, check the displayed trouble code number, then contact your service representative. [Maintenance/Troubleshooting - Konica Minolta bizhub C3350 | bizhub C3850/C3350 Maintenance/Troubleshooting Use - Page 77
5 Checking Counters - Konica Minolta bizhub C3350 | bizhub C3850/C3350 Maintenance/Troubleshooting Use - Page 78
the usage status of this machine. 1 Tap [Counter]. 2 Check the total number of pages printed after the count starting date. Item [Total] [Copy] [Print] [Scan] [Fax] Description Check the total number of pages printed on this machine. Allows you to check the total number of pages copied. Check the - Konica Minolta bizhub C3350 | bizhub C3850/C3350 Maintenance/Troubleshooting Use - Page 79
6 Index - Konica Minolta bizhub C3350 | bizhub C3850/C3350 Maintenance/Troubleshooting Use - Page 80
Fusing Unit 3-10 Manual Feed Tray 3-3 Paper Feed Unit 3-7 Transfer Roller 3-3 Tray 1 3-5 S Service Call 4-19 T Toner Cartridge 2-3 Handle 2-3 Replace 2-3 Store 2-3 Transfer Belt Replace 2-15 Transfer Roller Replace 2-13 Troubleshooting Copy 4-13 Fax RX 4-12 Fax TX 4-11 Internet Fax RX - Konica Minolta bizhub C3350 | bizhub C3850/C3350 Maintenance/Troubleshooting Use - Page 81
http://konicaminolta.com A3GN-9567-00A © 2013 2013. 8
-
 1
1 -
 2
2 -
 3
3 -
 4
4 -
 5
5 -
 6
6 -
 7
7 -
8
-
9
-
10
-
11
-
12
-
13
-
14
-
15
-
16
-
17
-
18
-
19
-
20
-
21
-
22
-
23
-
24
-
25
-
26
-
27
-
28
-
29
-
30
-
31
-
32
-
33
-
34
-
35
-
36
-
37
-
38
-
39
-
40
-
41
-
42
-
43
-
44
-
45
-
46
-
47
-
48
-
49
-
50
-
51
-
52
-
53
-
54
-
55
-
56
-
57
-
58
-
59
-
60
-
61
-
62
-
63
-
64
-
65
-
66
-
67
-
68
-
69
-
70
-
71
-
72
-
73
-
74
-
75
-
76
-
77
-
78
-
79
-
80
-
81
 |
 |
User's Guide Maintenance/Troubleshooting