Konica Minolta bizhub C650 bizhub C650 Network Fax Operations User Guide - Page 26
Screen displayed by Network Fax function - toner
 |
View all Konica Minolta bizhub C650 manuals
Add to My Manuals
Save this manual to your list of manuals |
Page 26 highlights
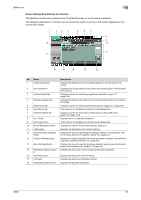
Before use 1 Screen displayed by Network Fax function The Fax/Scan mode screen appears when the [Fax/Scan] key on control panel is pressed. The displayed destination or function can be selected by lightly touching on the button displayed on the screen with a finger. 1 23 4 5 6 7 8 9 18 10 11 17 16 15 14 13 12 No. Name Description 1 [Check Job] button Displays the destination list that is being selected in the left panel of the screen. 2 [Job List] button Displays a list of jobs being executed and a list of pending jobs in the left panel of the screen. 3 [Address Book] tab Displays a screen for selecting a registered destination. (page 2-17, page 2-26) 4 Message Display Area Displays the status of this machine and the operating procedures that should be carried. 5 [Direct Input] tab Displays a screen for entering destinations directly. (page 2-21, page 2-26) 6 [Job History] tab This button is not available for Internet Fax/IP Address Fax. 7 [Address Search] tab Displays a screen for searching for destinations on the LDAP server. (page 2-23, page 2-26) 8 No. of Dest. Displays the no. of specified recipients. 9 [Off-hook] button This button is not available for Internet Fax/IP Address Fax. 10 [E-mail Reception] button Acquires the Internet Fax (E-mail) manually. (page 3-2) 11 Setting Area Specifies the destination and function settings. 12 [Communication Settings] Displays the menu for specifying the settings related to communication. Set button the E-mail at the time of using the Internet Fax. (page 6-4) 13 [Original Settings] button Displays the menu for specifying the settings related to original, such as Mixed Originals and Binding Position, etc. (page 6-3) 14 [Scan Settings] button Displays the menu for specifying settings related to scanning such as Original quality and Resolution, etc. (page 2-14, page 6-2) 15 Remaining memory capaci- Displays the amount of memory remaining during the operation. ty 16 Remaining toner Displays the amount of toner remaining. 17 Left panel Displays the job list and destination list etc. 18 Destination display section Displays the specified destination. C650 1-8
-
 1
1 -
2
-
3
-
4
-
5
-
6
-
7
-
8
-
9
-
10
-
11
-
12
-
13
-
14
-
15
-
16
-
17
-
18
-
19
-
20
-
 21
21 -
 22
22 -
 23
23 -
 24
24 -
 25
25 -
 26
26 -
 27
27 -
 28
28 -
 29
29 -
 30
30 -
 31
31 -
32
-
33
-
34
-
35
-
36
-
37
-
38
-
39
-
40
-
41
-
42
-
43
-
44
-
45
-
46
-
47
-
48
-
49
-
50
-
51
-
52
-
53
-
54
-
55
-
56
-
57
-
58
-
59
-
60
-
61
-
62
-
63
-
64
-
65
-
66
-
67
-
68
-
69
-
70
-
71
-
72
-
73
-
74
-
75
-
76
-
77
-
78
-
79
-
80
-
81
-
82
-
83
-
84
-
85
-
86
-
87
-
88
-
89
-
90
-
91
-
92
-
93
-
94
-
95
-
96
-
97
-
98
-
99
-
100
-
101
-
102
-
103
-
104
-
105
-
106
-
107
-
108
-
109
-
110
-
111
-
112
-
113
-
114
-
115
-
116
-
117
-
118
-
119
-
120
-
121
-
122
-
123
-
124
-
125
-
126
-
127
-
128
-
129
-
130
-
131
-
132
-
133
-
134
-
135
-
136
-
137
-
138
-
139
-
140
-
141
-
142
-
143
-
144
-
145
-
146
-
147
-
148
-
149
-
150
-
151
-
152
-
153
-
154
-
155
-
156
-
157
-
158
-
159
-
160
-
161
-
162
-
163
-
164
-
165
-
166
-
167
-
168
-
169
-
170
-
171
-
172
-
173
-
174
-
175
-
176
-
177
-
178
-
179
-
180
-
181
-
182
-
183
-
184
-
185
-
186
-
187
-
188
-
189
-
190
-
191
-
192
-
193
-
194
-
195
-
196
-
197
-
198
-
199
-
200
-
201
-
202
-
203
-
204
-
205
-
206
-
207
-
208
-
209
-
210
-
211
-
212
-
213
-
214
-
215
-
216
-
217
-
218
-
219
-
220
-
221
-
222
-
223
-
224
-
225
-
226
-
227
-
228
-
229
-
230
-
231
-
232
-
233
-
234
-
235
-
236
-
237
-
238
-
239
-
240
-
241
-
242
-
243
-
244
-
245
-
246
-
247
-
248
-
249
-
250
-
251
-
252
-
253
-
254
-
255
-
256
-
257
-
258
-
259
-
260
-
261
-
262
-
263
-
264
-
265
-
266
-
267
-
268
-
269
-
270
-
271
-
272
-
273
-
274
-
275
-
276
-
277
-
278
-
279
-
280
-
281
-
282
-
283
-
284
-
285
-
286
-
287
-
288
-
289
-
290
-
291
-
292
-
293
-
294
-
295
 |
 |
