Konica Minolta bizhub C650 bizhub C650 Network Fax Operations User Guide - Page 40
If Manual Destination Input in Utility mode is set to Restrict or if Manual Destination Input
 |
View all Konica Minolta bizhub C650 manuals
Add to My Manuals
Save this manual to your list of manuals |
Page 40 highlights
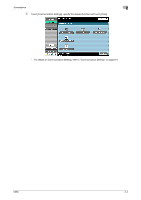
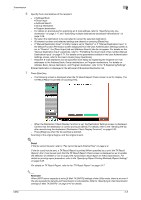
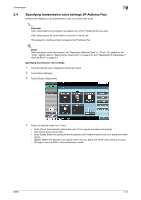
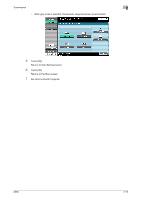
Transmission 2 6 Specify the IP Address of the recipient. - - Address Book - Direct Input - Address Search - Group destination - Program destination - For details of procedure for specifying the IP address, refer to the "Specifying only one destination" on page 2-17 and "Specifying multiple destinations (broadcast transmission)" on page 2-26. - Re-select the destination to be cancelled to cancel the selected destination. - All entered numbers and selected settings are cleared on pressing [Reset] key. - If "Manual Destination Input" in Utility mode is set to "Restrict" or if "Manual Destination Input" in the Default Function Permission screen (displayed from the User Authentication Settings screen) is set to "Restrict", the [Direct Input] tab and [Address Search] tab do not appear. For details on the "Manual Destination Input" parameter, refer to "Prohibiting the direct input of fax number (Manual Destination Input)" on page 9-71. For details on the parameters available in the User Authentication Settings screen, refer to the User's Guide [Copy Operations]. - Touch [Color] on the IP Address Fax screen to send a color fax. - IP Address of recipient can be easily specified on registering the IP Address of recipient to the Address Book, Group destination, and Program destination. For details on Address Book, Group destination, and Program destination, refer to the "8 Registering/Settings". Entered destination is displayed in the left panel of broadcast destination list. 7 Press [Start] key. - When the Destination Check Display Function is set, the Destination Settings screen is displayed. Confirm that the destination is correct and touch [Send]. For details, refer to the "Sending the fax after reconfirming the destination (Destination Check Display Function)" on page 6-33. - Press [Stop] key when the fax sending is aborted. Scanning of the original begins, and the original is sent. ! Detail If the fax cannot be sent, refer to "Fax cannot be sent (IP Address Fax)" on page 4-3. If the fax could not be sent, a TX Result Report is printed (when specified as to print the TX Result Report). For details on printing report procedure, refer to the "Specifying Report Printing Methods (Report Setting)" on page 9-65. For details on TX Result Report, refer to the "TX Result Report" on page 10-7. C650 2-8
-
 1
1 -
2
-
3
-
4
-
5
-
6
-
7
-
8
-
9
-
10
-
11
-
12
-
13
-
14
-
15
-
16
-
17
-
18
-
19
-
20
-
21
-
22
-
23
-
24
-
25
-
26
-
27
-
28
-
29
-
30
-
31
-
32
-
33
-
34
-
 35
35 -
 36
36 -
 37
37 -
 38
38 -
 39
39 -
 40
40 -
 41
41 -
 42
42 -
 43
43 -
 44
44 -
 45
45 -
46
-
47
-
48
-
49
-
50
-
51
-
52
-
53
-
54
-
55
-
56
-
57
-
58
-
59
-
60
-
61
-
62
-
63
-
64
-
65
-
66
-
67
-
68
-
69
-
70
-
71
-
72
-
73
-
74
-
75
-
76
-
77
-
78
-
79
-
80
-
81
-
82
-
83
-
84
-
85
-
86
-
87
-
88
-
89
-
90
-
91
-
92
-
93
-
94
-
95
-
96
-
97
-
98
-
99
-
100
-
101
-
102
-
103
-
104
-
105
-
106
-
107
-
108
-
109
-
110
-
111
-
112
-
113
-
114
-
115
-
116
-
117
-
118
-
119
-
120
-
121
-
122
-
123
-
124
-
125
-
126
-
127
-
128
-
129
-
130
-
131
-
132
-
133
-
134
-
135
-
136
-
137
-
138
-
139
-
140
-
141
-
142
-
143
-
144
-
145
-
146
-
147
-
148
-
149
-
150
-
151
-
152
-
153
-
154
-
155
-
156
-
157
-
158
-
159
-
160
-
161
-
162
-
163
-
164
-
165
-
166
-
167
-
168
-
169
-
170
-
171
-
172
-
173
-
174
-
175
-
176
-
177
-
178
-
179
-
180
-
181
-
182
-
183
-
184
-
185
-
186
-
187
-
188
-
189
-
190
-
191
-
192
-
193
-
194
-
195
-
196
-
197
-
198
-
199
-
200
-
201
-
202
-
203
-
204
-
205
-
206
-
207
-
208
-
209
-
210
-
211
-
212
-
213
-
214
-
215
-
216
-
217
-
218
-
219
-
220
-
221
-
222
-
223
-
224
-
225
-
226
-
227
-
228
-
229
-
230
-
231
-
232
-
233
-
234
-
235
-
236
-
237
-
238
-
239
-
240
-
241
-
242
-
243
-
244
-
245
-
246
-
247
-
248
-
249
-
250
-
251
-
252
-
253
-
254
-
255
-
256
-
257
-
258
-
259
-
260
-
261
-
262
-
263
-
264
-
265
-
266
-
267
-
268
-
269
-
270
-
271
-
272
-
273
-
274
-
275
-
276
-
277
-
278
-
279
-
280
-
281
-
282
-
283
-
284
-
285
-
286
-
287
-
288
-
289
-
290
-
291
-
292
-
293
-
294
-
295
 |
 |