Kyocera FS-6525MFP FS-6525MFP/6530MFP Operation Guide - Page 318
Solving Malfunctions
 |
View all Kyocera FS-6525MFP manuals
Add to My Manuals
Save this manual to your list of manuals |
Page 318 highlights
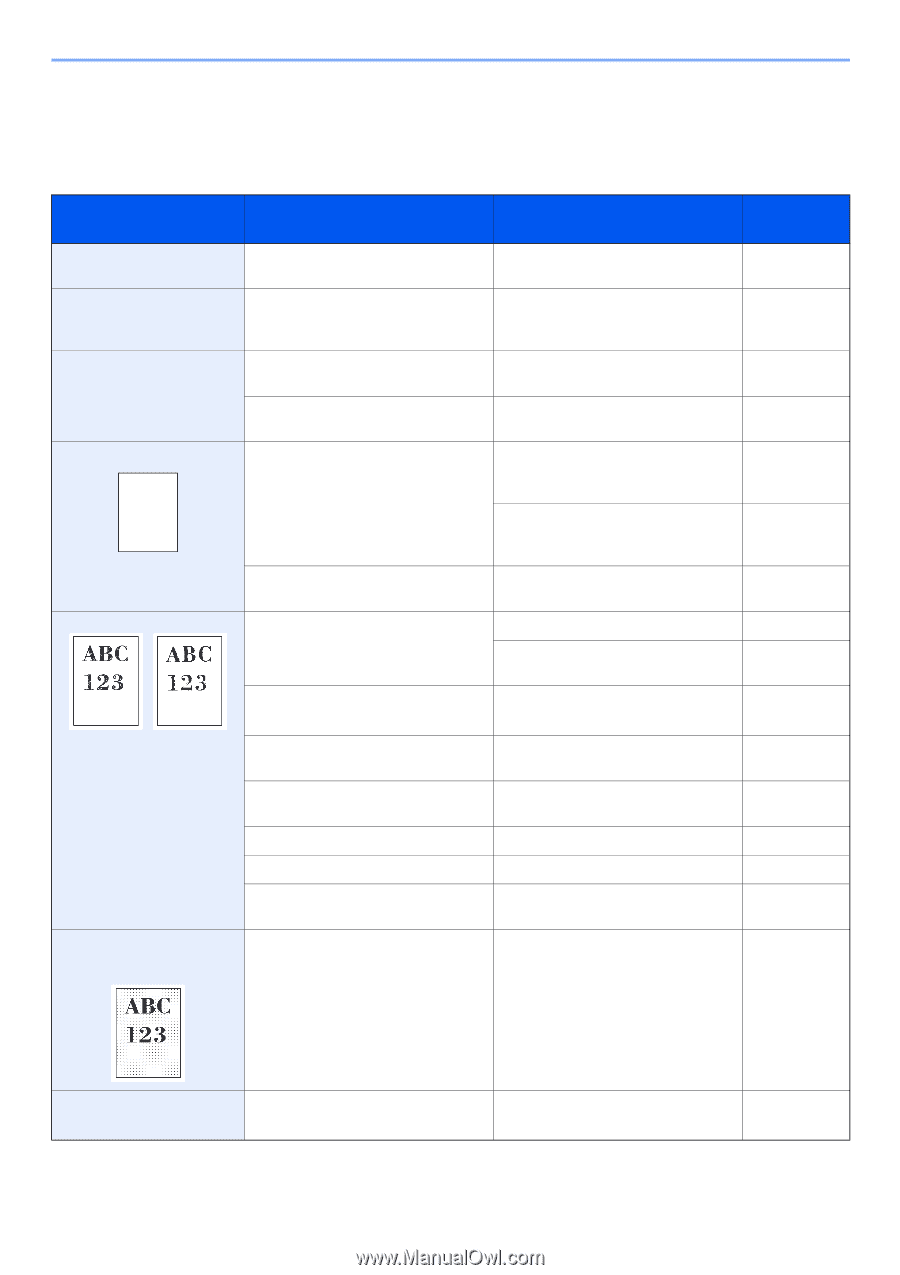
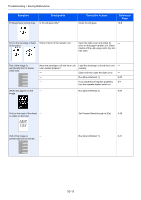
Troubleshooting > Solving Malfunctions Solving Malfunctions The table below provides general guidelines for problem solving. If a problem occurs with your machine, look into the checkpoints and perform procedures indicated on the following pages. If the problem persists, contact your Service Representative. Symptom Checkpoints Corrective Actions Reference Page An application does not start. Is the Auto Panel Reset time short? Set the Auto Panel Reset time to 30 seconds or more. 9-24 The screen does not respond when the main power switch is turned on. Is the machine plugged in? Plug the power cord into an AC outlet. 2-11 Pressing the Start key does Is there a message on the screen? not produce printouts. Determine appropriate response to the 10-13 message and respond accordingly. Is the machine in Sleep mode? Press the Power key to recover the machine from Sleep mode. 2-23 Blank sheets are ejected. Are the originals loaded correctly? When placing originals on the platen, 3-7 place them face-down and align them with the original size indicator plates. When placing originals in the 3-9 document processor, place them face- up. - Check that the settings of the - application software. Printouts are totally too light. Is the paper damp? Replace the paper with new paper. 3-2 If you experience frequent problems, 2-4 turn the cassette heater switch on. Have you changed the density? Select appropriate density level. 3-51 9-26 Is the toner distributed evenly within the toner container? Shake the toner container from side to 10-2 side about several times. Is there a message indicating the addition of toner? Replace the toner container. 10-2 Is EcoPrint mode enabled? Disable EcoPrint mode. 4-15 - Run [Drum Refresh 1]. 9-27 - Make sure the paper type setting is 9-8 correct the paper being used. Printouts are too dark even though the background of the scanned original is white. Have you changed the density? Select appropriate density level. 3-51 9-26 The background density is - obtrusive. Run [Background Density Adjustment]. 3-55 9-26 10-8
-
 1
1 -
2
-
3
-
4
-
5
-
6
-
7
-
8
-
9
-
10
-
11
-
12
-
13
-
14
-
15
-
16
-
17
-
18
-
19
-
20
-
21
-
22
-
23
-
24
-
25
-
26
-
27
-
28
-
29
-
30
-
31
-
32
-
33
-
34
-
35
-
36
-
37
-
38
-
39
-
40
-
41
-
42
-
43
-
44
-
45
-
46
-
47
-
48
-
49
-
50
-
51
-
52
-
53
-
54
-
55
-
56
-
57
-
58
-
59
-
60
-
61
-
62
-
63
-
64
-
65
-
66
-
67
-
68
-
69
-
70
-
71
-
72
-
73
-
74
-
75
-
76
-
77
-
78
-
79
-
80
-
81
-
82
-
83
-
84
-
85
-
86
-
87
-
88
-
89
-
90
-
91
-
92
-
93
-
94
-
95
-
96
-
97
-
98
-
99
-
100
-
101
-
102
-
103
-
104
-
105
-
106
-
107
-
108
-
109
-
110
-
111
-
112
-
113
-
114
-
115
-
116
-
117
-
118
-
119
-
120
-
121
-
122
-
123
-
124
-
125
-
126
-
127
-
128
-
129
-
130
-
131
-
132
-
133
-
134
-
135
-
136
-
137
-
138
-
139
-
140
-
141
-
142
-
143
-
144
-
145
-
146
-
147
-
148
-
149
-
150
-
151
-
152
-
153
-
154
-
155
-
156
-
157
-
158
-
159
-
160
-
161
-
162
-
163
-
164
-
165
-
166
-
167
-
168
-
169
-
170
-
171
-
172
-
173
-
174
-
175
-
176
-
177
-
178
-
179
-
180
-
181
-
182
-
183
-
184
-
185
-
186
-
187
-
188
-
189
-
190
-
191
-
192
-
193
-
194
-
195
-
196
-
197
-
198
-
199
-
200
-
201
-
202
-
203
-
204
-
205
-
206
-
207
-
208
-
209
-
210
-
211
-
212
-
213
-
214
-
215
-
216
-
217
-
218
-
219
-
220
-
221
-
222
-
223
-
224
-
225
-
226
-
227
-
228
-
229
-
230
-
231
-
232
-
233
-
234
-
235
-
236
-
237
-
238
-
239
-
240
-
241
-
242
-
243
-
244
-
245
-
246
-
247
-
248
-
249
-
250
-
251
-
252
-
253
-
254
-
255
-
256
-
257
-
258
-
259
-
260
-
261
-
262
-
263
-
264
-
265
-
266
-
267
-
268
-
269
-
270
-
271
-
272
-
273
-
274
-
275
-
276
-
277
-
278
-
279
-
280
-
281
-
282
-
283
-
284
-
285
-
286
-
287
-
288
-
289
-
290
-
291
-
292
-
293
-
294
-
295
-
296
-
297
-
298
-
299
-
300
-
301
-
302
-
303
-
304
-
305
-
306
-
307
-
308
-
309
-
310
-
311
-
312
-
 313
313 -
 314
314 -
 315
315 -
 316
316 -
 317
317 -
 318
318 -
 319
319 -
 320
320 -
 321
321 -
 322
322 -
 323
323 -
324
-
325
-
326
-
327
-
328
-
329
-
330
-
331
-
332
-
333
-
334
-
335
-
336
-
337
-
338
-
339
-
340
-
341
-
342
-
343
-
344
-
345
-
346
-
347
-
348
-
349
-
350
-
351
-
352
-
353
-
354
-
355
-
356
-
357
-
358
-
359
-
360
-
361
-
362
-
363
-
364
-
365
-
366
-
367
-
368
-
369
-
370
-
371
-
372
-
373
-
374
-
375
-
376
 |
 |