Kyocera TASKalfa 4551ci Printing System (11),(12),(13),(14) Color Printing Gu - Page 44
Managing calibration sets, For Restore Measurements, press Next.
 |
View all Kyocera TASKalfa 4551ci manuals
Add to My Manuals
Save this manual to your list of manuals |
Page 44 highlights
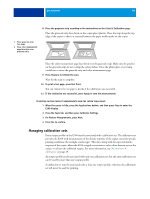
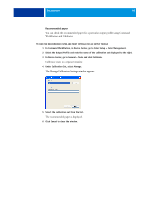
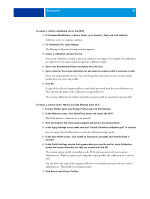
CALIBRATION 44 1 Place grayscale strip face down 2 Place color measurement page face down over grayscale strip 8 Place the grayscale strip according to the instructions on the ColorCal Calibration page. Place the grayscale strip face-down on the copier glass (platen). Place the strip along the top edge of the copier so that it is centered between the paper width marks on the copier. 1 2 Place the color measurement page face-down over the grayscale strip. Make sure the patches on the grayscale strip do not overlap the color patches. Close the platen glass cover, being careful not to move the grayscale strip and color measurement page. 9 Press Measure to initiate the scan. Wait for the scan to complete. 10 To print a test page, press Test Print. You can examine the test page to decide if the calibration was successful. 11 If the calibration was successful, press Apply to save the measurements. TO RESTORE FACTORY DEFAULT MEASUREMENTS FROM THE COPIER TOUCH PANEL 1 When the copier is Idle, press the Applications button, and then press Fiery to enter the E100 display. 2 Press the Tools tab, and then press Calibrator Settings. 3 For Restore Measurements, press Next. 4 Press Yes to confirm. Managing calibration sets Every output profile on the E100 must be associated with a calibration set. The calibration set provides the E100 with measurements of the density response of the copier toners for specific printing conditions (for example, media type). This data, along with the expected density response of the copier, allows the E100 to apply corrections to color values that are sent to the copier, to achieve the calibrated output. For more information, see "An overview of calibration" on page 49. An output profile can be associated with only one calibration set, but the same calibration set can be used by more than one output profile. A calibration set must be associated with at least one output profile, otherwise the calibration set will never be used for printing.
-
 1
1 -
2
-
3
-
4
-
5
-
6
-
7
-
8
-
9
-
10
-
11
-
12
-
13
-
14
-
15
-
16
-
17
-
18
-
19
-
20
-
21
-
22
-
23
-
24
-
25
-
26
-
27
-
28
-
29
-
30
-
31
-
32
-
33
-
34
-
35
-
36
-
37
-
38
-
 39
39 -
 40
40 -
 41
41 -
 42
42 -
 43
43 -
 44
44 -
 45
45 -
 46
46 -
 47
47 -
 48
48 -
 49
49 -
50
-
51
-
52
-
53
-
54
-
55
-
56
-
57
-
58
-
59
-
60
-
61
-
62
-
63
-
64
-
65
-
66
-
67
-
68
-
69
-
70
-
71
-
72
-
73
-
74
-
75
-
76
-
77
-
78
-
79
-
80
-
81
-
82
-
83
 |
 |
