Lenovo 9935B3U User Manual - Page 43
Completing
 |
UPC - 884343247403
View all Lenovo 9935B3U manuals
Add to My Manuals
Save this manual to your list of manuals |
Page 43 highlights
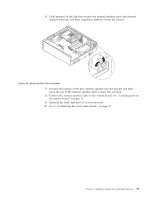
6. Push upward on the clip that secures the internal speaker, pivot the internal speaker outward, and then completely remove it from the chassis. Figure 34. Removing the internal speaker 7. Position the bottom of the new internal speaker into the bracket and then pivot the top of the internal speaker until it snaps into position. 8. Connect the internal speaker cable to the system board. See "Locating parts on the system board" on page 11. 9. Reinstall the hard disk drive if it was removed. 10. Go to "Completing the parts replacement" on page 37. Chapter 2. Installing options and replacing hardware 35
-
 1
1 -
2
-
3
-
4
-
5
-
6
-
7
-
8
-
9
-
10
-
11
-
12
-
13
-
14
-
15
-
16
-
17
-
18
-
19
-
20
-
21
-
22
-
23
-
24
-
25
-
26
-
27
-
28
-
29
-
30
-
31
-
32
-
33
-
34
-
35
-
36
-
37
-
 38
38 -
 39
39 -
 40
40 -
 41
41 -
 42
42 -
 43
43 -
 44
44 -
 45
45 -
 46
46 -
 47
47 -
 48
48 -
49
-
50
-
51
-
52
-
53
-
54
-
55
-
56
-
57
-
58
-
59
-
60
-
61
-
62
-
63
-
64
-
65
-
66
-
67
-
68
-
69
-
70
-
71
-
72
-
73
-
74
-
75
-
76
-
77
-
78
-
79
-
80
-
81
-
82
-
83
-
84
 |
 |

6.
Push
upward
on
the
clip
that
secures
the
internal
speaker,
pivot
the
internal
speaker
outward,
and
then
completely
remove
it
from
the
chassis.
7.
Position
the
bottom
of
the
new
internal
speaker
into
the
bracket
and
then
pivot
the
top
of
the
internal
speaker
until
it
snaps
into
position.
8.
Connect
the
internal
speaker
cable
to
the
system
board.
See
“Locating
parts
on
the
system
board”
on
page
11.
9.
Reinstall
the
hard
disk
drive
if
it
was
removed.
10.
Go
to
“Completing
the
parts
replacement”
on
page
37.
Figure
34.
Removing
the
internal
speaker
Chapter
2.
Installing
options
and
replacing
hardware
35