Lenovo ThinkPad X60 (English) Rescue and Recovery 4.5 Deployment Guide - Page 54
Scenario 2 - Installing with WIM files and Windows 7, Run BMGR32.EXE /Fbootmgr.bin /M1 /IBM /THINK
 |
View all Lenovo ThinkPad X60 manuals
Add to My Manuals
Save this manual to your list of manuals |
Page 54 highlights
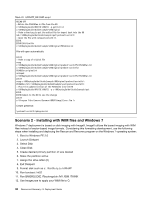
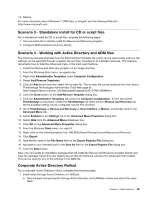
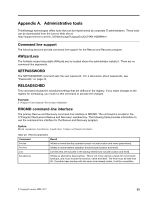
Table 22. UPDATE_RR.CMD script @ECHO OFF ::Obtain the PDAGUIen.ini file from the RR c:\RRDeployGuide\RRUTIL\RRUTIL -g getlist.txt c:\RRDeployGuide\GuideExample\RROriginal :: Make a directory to put the edited file for import back into the RR md c:\RRDeployGuide\GuideExample\put\preboot\usrintfc :: Open the file with notepad and edit it. ECHO. ECHO Edit the file c:\RRDeployGuide\GuideExample\RROriginal\PDAGUIen.ini File will open automatically pause :: Make a copy of original file copy c:\RRDeployGuide\GuideExample\RROriginal\preboot\usrintfc\PDAGUIen.ini c:\RRDeployGuide\GuideExample\RROriginal\preboot\usrintfc\ PDAGUIen.original.ini notepad c:\RRDeployGuide\GuideExample\RROriginal\preboot\usrintfc\PDAGUIen.ini pause copy c:\RRDeployGuide\GuideExample\RROriginal\preboot\usrintfc\ PDAGUIen.ini c:\RRDeployGuide\GuideExample\put\preboot\usrintfc :: Place the updated version of the PDAGUIen into the RR c:\RRDeployGuide\RRUTIL\RRUTIL -p c:\RRDeployGuide\GuideExample\put ECHO. ECHO Reboot to the RR to see the change pause c:\Program Files\Lenovo\Common\BMGR\bmgr32.exe /bw /r Create getlist.txt: \preboot\usrintfc\pdaguien.ini Scenario 2 - Installing with WIM files and Windows 7 Windows 7 deployment is based on disk imaging with ImageX. ImageX utilizes file based imaging with WIM files instead of sector-based image formats. Considering this formatting development, use the following steps when installing and deploying the Rescue and Recovery program on the Windows 7 operating system: 1. Boot to Windows PE 2.0 2. Launch Diskpart 3. Select Disk 4. Clean Disk 5. Create desired primary partition of size desired 6. Make the partition active 7. Assign the drive letter (C) 8. Exit Diskpart 9. Format disk such as c: /fs:ntfs /q /y /v:WinXP 10. Run bootsect /nt52 11. Run BMGR32.EXE /Fbootmgr.bin /M1 /IBM /THINK 12. Use Imagex.exe to apply your WIM file to C: 48 Rescue and Recovery 4.5 Deployment Guide
-
 1
1 -
2
-
3
-
4
-
5
-
6
-
7
-
8
-
9
-
10
-
11
-
12
-
13
-
14
-
15
-
16
-
17
-
18
-
19
-
20
-
21
-
22
-
23
-
24
-
25
-
26
-
27
-
28
-
29
-
30
-
31
-
32
-
33
-
34
-
35
-
36
-
37
-
38
-
39
-
40
-
41
-
42
-
43
-
44
-
45
-
46
-
47
-
48
-
 49
49 -
 50
50 -
 51
51 -
 52
52 -
 53
53 -
 54
54 -
 55
55 -
 56
56 -
 57
57 -
 58
58 -
 59
59 -
60
-
61
-
62
-
63
-
64
-
65
-
66
-
67
-
68
-
69
-
70
-
71
-
72
-
73
-
74
-
75
-
76
-
77
-
78
-
79
-
80
-
81
-
82
-
83
-
84
-
85
-
86
 |
 |
