Lexmark 2470m User's Guide - Page 58
Tips for faxing using the Imaging Studio, Cannot send or receive a fax
 |
UPC - 734646077842
View all Lexmark 2470m manuals
Add to My Manuals
Save this manual to your list of manuals |
Page 58 highlights
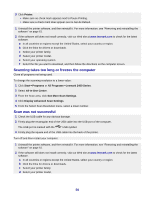
Tips for faxing using the Imaging Studio If you are faxing using the Imaging Studio, make sure: • The printer is connected to a computer that is equipped with a fax modem. • The computer is connected to a working phone line. • Both the printer and the computer are turned on. For additional help when you are using a fax application, see the documentation that came with the fax application. Cannot send or receive a fax If an error message appears, follow the instructions on the error message dialog. Place a test call to the telephone number to which you want to send a fax to make sure that it is working correctly. If the telephone line is being used by another device, wait until the other device is finished before sending a fax. Call Waiting can disrupt fax transmissions. Disable this feature before sending or receiving a fax. Call your telephone company to obtain the keypad sequence for temporarily disabling Call Waiting. Cannot print a fax or received fax has poor print quality Ask that the sender: • Check that the quality of the original document is satisfactory. • Resend the fax. There may have been a problem with the quality of the telephone line connection. • Increase the fax scan resolution. Check the ink level, and install a new cartridge if necessary. 1 Remove the print cartridge. 2 Make sure the sticker and tape have been removed. 3 Reinsert the print cartridge. If the light is not on, see "Power button is not lit" on page 48. Check for and clear any paper jams. Received fax is blank Ask the sender to verify the original document was loaded correctly. 58
-
 1
1 -
2
-
3
-
4
-
5
-
6
-
7
-
8
-
9
-
10
-
11
-
12
-
13
-
14
-
15
-
16
-
17
-
18
-
19
-
20
-
21
-
22
-
23
-
24
-
25
-
26
-
27
-
28
-
29
-
30
-
31
-
32
-
33
-
34
-
35
-
36
-
37
-
38
-
39
-
40
-
41
-
42
-
43
-
44
-
45
-
46
-
47
-
48
-
49
-
50
-
51
-
52
-
 53
53 -
 54
54 -
 55
55 -
 56
56 -
 57
57 -
 58
58 -
 59
59 -
 60
60 -
 61
61 -
 62
62 -
 63
63 -
64
-
65
-
66
-
67
-
68
-
69
-
70
 |
 |