Lexmark T630n Setup Guide - Page 17
holes on top of any drawer help, The tab, round peg, and square
 |
UPC - 734646532211
View all Lexmark T630n manuals
Add to My Manuals
Save this manual to your list of manuals |
Page 17 highlights
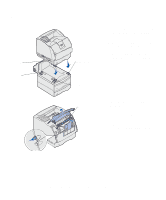
1 Remove the tray from the support unit. Remove all packing material and tape from both the support unit and the tray. 2 Place the support unit on top of any previously installed drawers, or the table or printer cabinet where you plan to use the printer. The tab, round peg, and square holes on top of any drawer help you position the support unit so the edges are aligned properly. Make sure the support unit is securely in place. Square hole 3 Attach another optional drawer, a Tab duplex unit, or the printer. Round peg Set up the printer and print media handling options 12
-
 1
1 -
2
-
3
-
4
-
5
-
6
-
7
-
8
-
9
-
10
-
11
-
 12
12 -
 13
13 -
 14
14 -
 15
15 -
 16
16 -
 17
17 -
 18
18 -
 19
19 -
 20
20 -
 21
21 -
 22
22 -
23
-
24
-
25
-
26
-
27
-
28
-
29
-
30
-
31
-
32
-
33
-
34
-
35
-
36
-
37
-
38
-
39
-
40
-
41
-
42
-
43
-
44
-
45
-
46
-
47
-
48
-
49
-
50
-
51
-
52
-
53
-
54
-
55
-
56
-
57
-
58
-
59
-
60
-
61
-
62
-
63
-
64
-
65
-
66
-
67
 |
 |

12
Set up the printer and print media handling options
1
Remove the tray from the support
unit. Remove all packing material
and tape from both the support
unit and the tray.
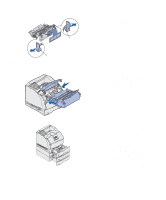
2
Place the support unit on top of
any previously installed drawers,
or the table or printer cabinet
where you plan to use the printer.
The tab, round peg, and square
holes on top of any drawer help
you position the support unit so the
edges are aligned properly. Make
sure the support unit is securely in
place.
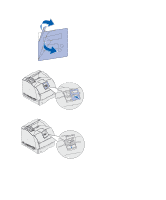
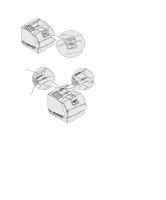
3
Attach another optional drawer, a
duplex unit, or the printer.
Square hole
Round peg
Tab