Lexmark T630n Setup Guide - Page 40
Coax/Twinax Adapter for SCS, Parallel 1284-B Interface Card
 |
UPC - 734646532211
View all Lexmark T630n manuals
Add to My Manuals
Save this manual to your list of manuals |
Page 40 highlights
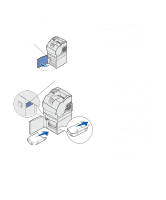
Warning: Electronic components are easily damaged by static electricity. Touch something metal on the printer before you touch the card. Connector 1 Connector 2 • Parallel 1284-B Interface Card • Coax/Twinax Adapter for SCS Refer to the documentation included with each card for detailed information about that specific card. Use a small Phillips screwdriver to install these options. 1 Locate the card connectors on the system board. If you are installing a tall card, install it in connector 1. If you are installing two short cards on a model with multiple connectors, use connector 1 first and then connector 2. Adapter plate Cover plate 2 Remove the two screws and the cover plate and save them. If you are installing a tall card, remove and save the adapter plate screw and the adapter plate. 3 Unpack the card. Save the packaging materials. Install memory and option cards 35
-
 1
1 -
2
-
3
-
4
-
5
-
6
-
7
-
8
-
9
-
10
-
11
-
12
-
13
-
14
-
15
-
16
-
17
-
18
-
19
-
20
-
21
-
22
-
23
-
24
-
25
-
26
-
27
-
28
-
29
-
30
-
31
-
32
-
33
-
34
-
 35
35 -
 36
36 -
 37
37 -
 38
38 -
 39
39 -
 40
40 -
 41
41 -
 42
42 -
 43
43 -
 44
44 -
 45
45 -
46
-
47
-
48
-
49
-
50
-
51
-
52
-
53
-
54
-
55
-
56
-
57
-
58
-
59
-
60
-
61
-
62
-
63
-
64
-
65
-
66
-
67
 |
 |
