Lexmark T630n Setup Guide - Page 41
Replacing the shield, the printer system board, follow these
 |
UPC - 734646532211
View all Lexmark T630n manuals
Add to My Manuals
Save this manual to your list of manuals |
Page 41 highlights
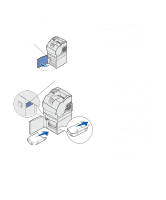
4 Align the connection points on the card with the connector on the system board and push the card firmly into the system board connector. 5 Insert the two screws saved from the cover plate (or the extra screws shipped with the card). 6 Tighten the screws to secure the card. Replacing the shield After you have installed option cards on the printer system board, follow these steps to reattach the shield and close the doors. 1 Grasp the shield by the tabs and align the three keyholes on the shield with the top three screws. Holding the shield by the tabs, Install memory and option cards 36
-
 1
1 -
2
-
3
-
4
-
5
-
6
-
7
-
8
-
9
-
10
-
11
-
12
-
13
-
14
-
15
-
16
-
17
-
18
-
19
-
20
-
21
-
22
-
23
-
24
-
25
-
26
-
27
-
28
-
29
-
30
-
31
-
32
-
33
-
34
-
35
-
 36
36 -
 37
37 -
 38
38 -
 39
39 -
 40
40 -
 41
41 -
 42
42 -
 43
43 -
 44
44 -
 45
45 -
 46
46 -
47
-
48
-
49
-
50
-
51
-
52
-
53
-
54
-
55
-
56
-
57
-
58
-
59
-
60
-
61
-
62
-
63
-
64
-
65
-
66
-
67
 |
 |

36
Install memory and option cards
4
Align the connection points on the
card with the connector on the
system board and push the card
firmly into the system board
connector.
5
Insert the two screws saved from
the cover plate (or the extra screws
shipped with the card).
6
Tighten the screws to secure the
card.
Replacing the shield
After you have installed option cards on
the printer system board, follow these
steps to reattach the shield and close the
doors.
1
Grasp the shield by the tabs and
align the three keyholes on the
shield with the top three screws.
Holding the shield by the tabs,