Lexmark T630n Setup Guide - Page 26
The wire bail rests in the printer, that the bail curves downward.
 |
UPC - 734646532211
View all Lexmark T630n manuals
Add to My Manuals
Save this manual to your list of manuals |
Page 26 highlights
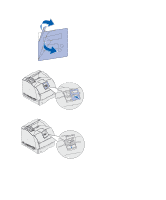
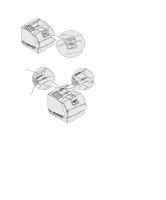
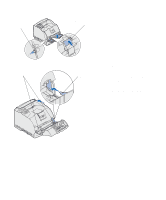
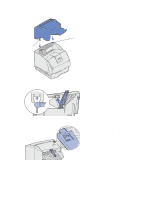
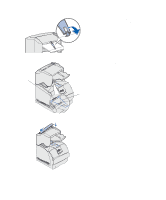
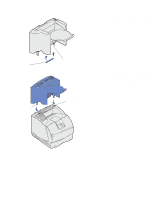
Plastic bracket 6 Rotate the paper bail hook down to prevent individual sheets from sliding forward. Snap the paper bail hook back into the storage position when not using it. 7 Place the tips of the wire bail into the ends of the plastic bracket so that the bail curves downward. The wire bail rests in the printer output bin. Wire bail 8 If you are not attaching any more print media handling options, attach the top cover to the finisher. Set up the printer and print media handling options 21
-
 1
1 -
2
-
3
-
4
-
5
-
6
-
7
-
8
-
9
-
10
-
11
-
12
-
13
-
14
-
15
-
16
-
17
-
18
-
19
-
20
-
 21
21 -
 22
22 -
 23
23 -
 24
24 -
 25
25 -
 26
26 -
 27
27 -
 28
28 -
 29
29 -
 30
30 -
 31
31 -
32
-
33
-
34
-
35
-
36
-
37
-
38
-
39
-
40
-
41
-
42
-
43
-
44
-
45
-
46
-
47
-
48
-
49
-
50
-
51
-
52
-
53
-
54
-
55
-
56
-
57
-
58
-
59
-
60
-
61
-
62
-
63
-
64
-
65
-
66
-
67
 |
 |

21
Set up the printer and print media handling options
6
Rotate the paper bail hook down to
prevent individual sheets from
sliding forward.
Snap
the paper
bail hook back into the storage
position when not using it.
7
Place the tips of the wire bail into
the ends of the plastic bracket so
that the bail curves downward.
The wire bail rests in the printer
output bin.
8
If you are not attaching any more
print media handling options,
attach the top cover to the finisher.
Plastic bracket
Wire bail