Lexmark X2550 User's Guide - Page 33
Printing photos using the computer, Printing photos from the Photo Library
 |
UPC - 734646044585
View all Lexmark X2550 manuals
Add to My Manuals
Save this manual to your list of manuals |
Page 33 highlights
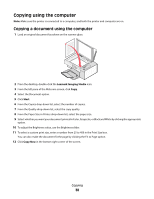
Printing photos using the computer Note: To print photos or images from a Web page, see "Printing photos or images from a Web page" on page 27. Printing photos from the Photo Library 1 Load paper. 2 From the desktop, double-click the Lexmark Imaging Studio icon. 3 Click View / Print Photo Library. 4 Click the photos you want to print. 5 Click Photo Prints. 6 Change the print settings as necessary. Notes: • From the Quality drop-down list, select a print quality. • From the Paper Size in Printer drop-down list, select the paper size. • You can also select other photo sizes, and print multiple copies of the photos. 7 Click Print Now. Printing all photos from a media device using the computer 1 Load photo paper with the glossy or printable side facing you. (If you are not sure which side is the printable side, see the instructions that came with the paper.) For more information, see "Loading paper" on page 21. 2 Insert your CD or any photo storage device into the computer. 3 If you are using Windows XP or Windows Vista, a "What do you want Windows to do?" screen appears. Click Transfer Photos to your computer using the Lexmark Imaging Studio. 4 Click Select photos to print. 5 Click Print. 6 From the Quality drop-down list, select a copy quality. 7 From the Paper Size in Printer drop-down list, select the paper size. 8 To select multiple prints of a photo, or to select photo sizes other than 4 x 6 in. (10 x 15 cm), select the options you want in the table. Use the drop-down list in the last column to view and select other sizes. 9 Click Print Now in the bottom right corner of the screen. 10 Remove your CD. Printing selected photos from a media device using the computer 1 Load photo paper with the glossy or printable side facing you. (If you are not sure which side is the printable side, see the instructions that came with the paper.) For more information, see "Loading paper" on page 21. 2 Insert your CD or any photo storage device into the computer. Working with photos 33
-
 1
1 -
2
-
3
-
4
-
5
-
6
-
7
-
8
-
9
-
10
-
11
-
12
-
13
-
14
-
15
-
16
-
17
-
18
-
19
-
20
-
21
-
22
-
23
-
24
-
25
-
26
-
27
-
 28
28 -
 29
29 -
 30
30 -
 31
31 -
 32
32 -
 33
33 -
 34
34 -
 35
35 -
 36
36 -
 37
37 -
 38
38 -
39
-
40
-
41
-
42
-
43
-
44
-
45
-
46
-
47
-
48
-
49
-
50
-
51
-
52
-
53
-
54
-
55
-
56
-
57
-
58
-
59
-
60
-
61
-
62
-
63
-
64
-
65
-
66
-
67
-
68
-
69
-
70
-
71
-
72
-
73
-
74
-
75
-
76
-
77
-
78
-
79
-
80
-
81
-
82
-
83
-
84
 |
 |