Lexmark X852E Setup Guide - Page 16
Installing the duplex unit
 |
UPC - 734646002806
View all Lexmark X852E manuals
Add to My Manuals
Save this manual to your list of manuals |
Page 16 highlights
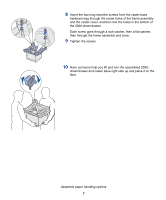
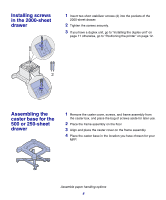
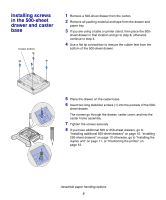
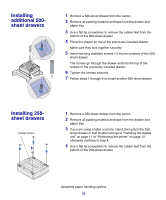
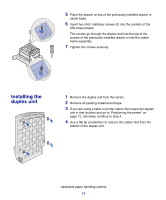
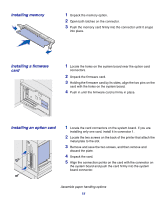
5 Place the drawer on top of the previously installed drawer or caster base. 6 Insert two short stabilizer screws (2) into the pockets of the 250-sheet drawer. The screws go through the drawer and into the top of the screws of the previously installed drawer or into the caster frame assembly. 7 Tighten the screws securely. Installing the duplex unit 1 Remove the duplex unit from the carton. 2 Remove all packing material and tape. 3 If you are using a table or printer stand, then place the duplex unit in that location and go to "Positioning the printer" on page 12, otherwise continue to step 4. 4 Use a flat tip screwdriver to remove the rubber feet from the bottom of the duplex unit. Assemble paper handling options 11
-
 1
1 -
2
-
3
-
4
-
5
-
6
-
7
-
8
-
9
-
10
-
 11
11 -
 12
12 -
 13
13 -
 14
14 -
 15
15 -
 16
16 -
 17
17 -
 18
18 -
 19
19 -
 20
20 -
 21
21 -
22
-
23
-
24
-
25
-
26
-
27
-
28
-
29
-
30
-
31
-
32
-
33
-
34
-
35
-
36
-
37
-
38
-
39
-
40
-
41
-
42
-
43
-
44
-
45
-
46
-
47
-
48
-
49
-
50
-
51
-
52
-
53
-
54
-
55
-
56
-
57
 |
 |

11
Assemble paper handling options
5
Place the drawer on top of the previously installed drawer or
caster base.
6
Insert two short stabilizer screws (2) into the pockets of the
250-sheet drawer.
The screws go through the drawer and into the top of the
screws of the previously installed drawer or into the caster
frame assembly.
7
Tighten the screws securely.
Installing the
duplex unit
1
Remove the duplex unit from the carton.
2
Remove all packing material and tape.
3
If you are using a table or printer stand, then place the duplex
unit in that location and go to
“
Positioning the printer
”
on
page 12, otherwise continue to step 4.
4
Use a flat tip screwdriver to remove the rubber feet from the
bottom of the duplex unit.