Lexmark X852E Setup Guide - Page 25
Printing Quick Reference information, Configuring for TCP/IP, Printing a network, setup - manual
 |
UPC - 734646002806
View all Lexmark X852E manuals
Add to My Manuals
Save this manual to your list of manuals |
Page 25 highlights
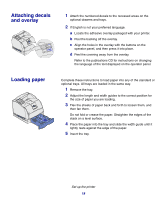
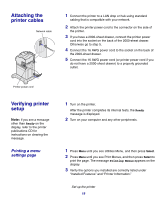
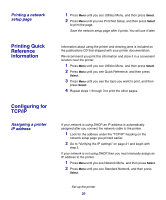
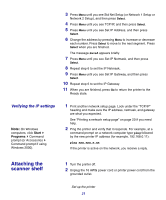
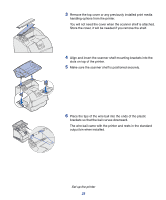
Printing a network setup page Printing Quick Reference information Configuring for TCP/IP Assigning a printer IP address 1 Press Menu until you see Utilities Menu, and then press Select. 2 Press Menu until you see Print Net Setup, and then press Select to print the page. Save the network setup page after it prints. You will use it later. Information about using the printer and clearing jams is included on the publications CD that shipped with your printer documentation. We recommend you print this information and store it in a convenient location near the printer. 1 Press Menu until you see Utilities Menu, and then press Select. 2 Press Menu until you see Quick Reference, and then press Select. 3 Press Menu until you see the topic you want to print, and then press Select. 4 Repeat steps 1 through 3 to print the other pages. If your network is using DHCP, an IP address is automatically assigned after you connect the network cable to the printer. 1 Look for the address under the "TCP/IP" heading on the network setup page you printed earlier. 2 Go to "Verifying the IP settings" on page 21 and begin with step 2. If your network is not using DHCP, then you must manually assign an IP address to the printer. 1 Press Menu until you see Network Menu, and then press Select. 2 Press Menu until you see Standard Network, and then press Select. Set up the printer 20
-
 1
1 -
2
-
3
-
4
-
5
-
6
-
7
-
8
-
9
-
10
-
11
-
12
-
13
-
14
-
15
-
16
-
17
-
18
-
19
-
 20
20 -
 21
21 -
 22
22 -
 23
23 -
 24
24 -
 25
25 -
 26
26 -
 27
27 -
 28
28 -
 29
29 -
 30
30 -
31
-
32
-
33
-
34
-
35
-
36
-
37
-
38
-
39
-
40
-
41
-
42
-
43
-
44
-
45
-
46
-
47
-
48
-
49
-
50
-
51
-
52
-
53
-
54
-
55
-
56
-
57
 |
 |
