Lexmark X852E Setup Guide - Page 24
Attaching the printer cables, Verifying printer setup, Printing a menu, settings
 |
UPC - 734646002806
View all Lexmark X852E manuals
Add to My Manuals
Save this manual to your list of manuals |
Page 24 highlights
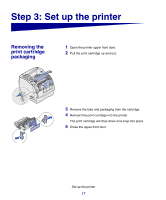
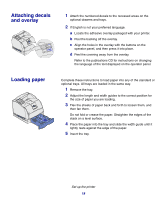
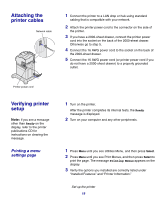
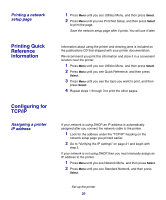
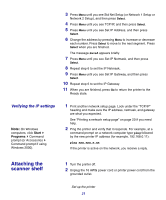
Attaching the printer cables Network cable 1 Connect the printer to a LAN drop or hub using standard cabling that is compatible with your network. 2 Attach the printer power cord to the connector on the side of the printer. 3 If you have a 2000-sheet drawer, connect the printer power cord into the socket on the back of the 2000-sheet drawer. Otherwise go to step 5. 4 Connect the 16 AWG power cord to the socket on the back of the 2000-sheet drawer. 5 Connect the 16 AWG power cord (or printer power cord if you do not have a 2000-sheet drawer) to a properly grounded outlet. Printer power cord Verifying printer setup Note: If you see a message other than Ready on the display, refer to the printer publications CD for instructions on clearing the message. Printing a menu settings page 1 Turn on the printer. After the printer completes its internal tests, the Ready message is displayed. 2 Turn on your computer and any other peripherals. 1 Press Menu until you see Utilities Menu, and then press Select. 2 Press Menu until you see Print Menus, and then press Select to print the page. The message Printing Menus appears on the display. 3 Verify the options you installed are correctly listed under "Installed Features" and "Printer Information." Set up the printer 19
-
 1
1 -
2
-
3
-
4
-
5
-
6
-
7
-
8
-
9
-
10
-
11
-
12
-
13
-
14
-
15
-
16
-
17
-
18
-
 19
19 -
 20
20 -
 21
21 -
 22
22 -
 23
23 -
 24
24 -
 25
25 -
 26
26 -
 27
27 -
 28
28 -
 29
29 -
30
-
31
-
32
-
33
-
34
-
35
-
36
-
37
-
38
-
39
-
40
-
41
-
42
-
43
-
44
-
45
-
46
-
47
-
48
-
49
-
50
-
51
-
52
-
53
-
54
-
55
-
56
-
57
 |
 |
