Lexmark Z705 User's Guide - Page 45
Installing the cartridges, carrier. Depending on the part numbers you use
 |
UPC - 734646890007
View all Lexmark Z705 manuals
Add to My Manuals
Save this manual to your list of manuals |
Page 45 highlights
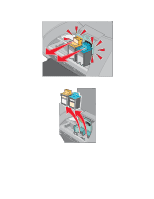
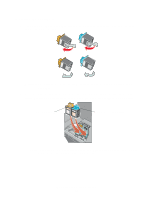
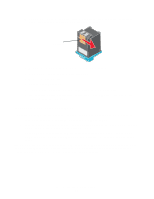
Installing the cartridges 1 If you are installing new cartridges, remove the sticker and transparent tape from the back and bottom of the cartridges Warning: Do not touch or remove the gold contact areas on the back and bottom of the cartridges. 2 Insert the color cartridge in the left carrier. Insert the black or photo cartridge in the right carrier. Depending on the part numbers you use, the color of the cartridge tops may vary. P/N 19, 20, or 25 P/N 48, 50, 55, or 90 (Photo) Note: To extend the life of your color cartridge and improve printing speed, install a black or photo cartridge along with the color cartridge. Replacing the print cartridges 45
-
 1
1 -
2
-
3
-
4
-
5
-
6
-
7
-
8
-
9
-
10
-
11
-
12
-
13
-
14
-
15
-
16
-
17
-
18
-
19
-
20
-
21
-
22
-
23
-
24
-
25
-
26
-
27
-
28
-
29
-
30
-
31
-
32
-
33
-
34
-
35
-
36
-
37
-
38
-
39
-
 40
40 -
 41
41 -
 42
42 -
 43
43 -
 44
44 -
 45
45 -
 46
46 -
 47
47 -
 48
48 -
 49
49 -
 50
50 -
51
-
52
-
53
-
54
-
55
-
56
-
57
-
58
-
59
-
60
-
61
-
62
-
63
-
64
-
65
-
66
-
67
-
68
-
69
-
70
-
71
-
72
-
73
 |
 |

Replacing the print cartridges
45
Installing the cartridges
1
If you are installing new cartridges, remove the sticker and transparent tape from the back
and bottom of the cartridges
Warning:
Do
not
touch or remove the gold contact areas on the back and bottom of the
cartridges.
2
Insert the color cartridge in the left carrier. Insert the black or photo cartridge in the right
carrier. Depending on the part numbers you use, the color of the cartridge tops may vary.
Note:
To extend the life of your color cartridge and improve printing speed, install a black
or photo cartridge along with the color cartridge.
P/N 19, 20, or 25
P/N 48, 50, 55, or 90 (Photo)