NEC NP-PE401H User's Manual - Page 19
Press VIDEO to choose VIDEO, Press HDMI to choose HDMI 1
 |
View all NEC NP-PE401H manuals
Add to My Manuals
Save this manual to your list of manuals |
Page 19 highlights
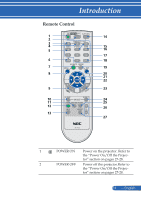
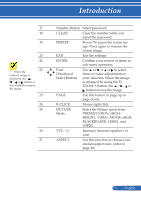
Introduction 3 4 5 6 7 8 9 10 11 12 13 14 15 16 English ... 12 COMPUTER 1 COMPUTER 2 COMPUTER 3 VIDEO NUM AV-MUTE MENU D-ZOOM L-CLICK KEYSTONE Correction ECO HELP AUTO ADJ. S-VIDEO HDMI Press "1" to choose COMPUTER IN connector. No function. Press "VIDEO" to choose VIDEO IN connector. Select password. When you input a password, you must press "NUM" and other number button simultaneously. Momentarily turn off/on the audio and video. Press "MENU" to launch the Onscreen display (OSD), back to the top level of OSD for the OSD main menu operation Zoom in/out the projected image. Mouse left click. Adjust the image to compensate for distortion caused by tilting the projector (vertical ± 40 degrees). Dim the projector lamp which will lower power consumption and extend the lamp life. (refer to page 52) This function ensures easy setup and operation. Automatically synchronize the projector to the input source. Press "S-VIDEO" to choose S-VIDEO IN connector. Press "HDMI" to choose HDMI 1 IN or HDMI 2 IN connector.
-
 1
1 -
2
-
3
-
4
-
5
-
6
-
7
-
8
-
9
-
10
-
11
-
12
-
13
-
 14
14 -
 15
15 -
 16
16 -
 17
17 -
 18
18 -
 19
19 -
 20
20 -
 21
21 -
 22
22 -
 23
23 -
 24
24 -
25
-
26
-
27
-
28
-
29
-
30
-
31
-
32
-
33
-
34
-
35
-
36
-
37
-
38
-
39
-
40
-
41
-
42
-
43
-
44
-
45
-
46
-
47
-
48
-
49
-
50
-
51
-
52
-
53
-
54
-
55
-
56
-
57
-
58
-
59
-
60
-
61
-
62
-
63
-
64
-
65
-
66
-
67
-
68
-
69
-
70
-
71
-
72
-
73
-
74
-
75
-
76
-
77
-
78
-
79
-
80
-
81
-
82
-
83
-
84
-
85
-
86
-
87
 |
 |