NEC NP-PE401H User's Manual - Page 31
Viewing 3D Images, LCD shutter eyeglasses, Steps for viewing 3D images on the projector
 |
View all NEC NP-PE401H manuals
Add to My Manuals
Save this manual to your list of manuals |
Page 31 highlights
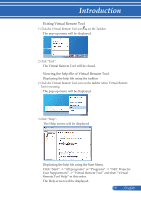
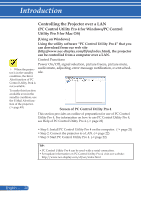
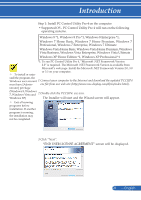
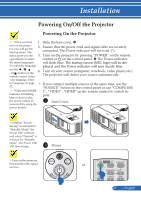
Introduction English ... 24 Viewing 3D Images The projector provides 3D images to a user wearing commercially available LCD shutter eyeglasses. CAUTION Health precautions Before viewing, be sure to read health care precautions that may be found in the user's manual included with your LCD shutter eyeglasses or your 3D compatible content such as DVDs, video games, computer's video files and the like. To avoid any adverse symptoms, heed the following: - Do not use LCD shutter eyeglasses for viewing any material other than 3D images. - Allow a distance of 2 m/7 feet or greater between the screen and a user. Viewing 3D images from too close a distance can strain your eyes. Avoid viewing 3D images for a prolonged period of time. Take a break of 15 minutes or longer after every hour of viewing. - If you or any member of your family has a history of light-sensitive seizures, consult a doctor before viewing 3D images. - While viewing 3D images, if you get sick such as nausea, dizziness, queasiness, headache, eyestrain, blurry vision, convulsions, and numbness, stop viewing them. If symptoms still persist, consult a doctor. - View 3D images from the front of the screen. Viewing from an angle may cause fatigue or eyestrain. LCD shutter eyeglasses • Use commercially available 3D eyeglasses which meet the following requirements: - DLP® Link compatible - Support vertical refresh rate up to 144 Hz. Steps for viewing 3D images on the projector 1. Connect the projector to your video equipment. 2. Turn on the projector, display the on-screen menu. 3. Select [3D SETTINGS] from [SCREEN] tab and then select [ON] for [3D]. - Set for [3D INVERT] and [3D STRUCTURE] as necessary. (see page 41) 4. Play your 3D compatible content and use the projector to display the image. 5. Put on your LCD shutter eyeglasses to view 3D images. Also refer to the user's manual accompanied with your LCD shutter eyeglasses for more information.
-
 1
1 -
2
-
3
-
4
-
5
-
6
-
7
-
8
-
9
-
10
-
11
-
12
-
13
-
14
-
15
-
16
-
17
-
18
-
19
-
20
-
21
-
22
-
23
-
24
-
25
-
 26
26 -
 27
27 -
 28
28 -
 29
29 -
 30
30 -
 31
31 -
 32
32 -
 33
33 -
 34
34 -
 35
35 -
 36
36 -
37
-
38
-
39
-
40
-
41
-
42
-
43
-
44
-
45
-
46
-
47
-
48
-
49
-
50
-
51
-
52
-
53
-
54
-
55
-
56
-
57
-
58
-
59
-
60
-
61
-
62
-
63
-
64
-
65
-
66
-
67
-
68
-
69
-
70
-
71
-
72
-
73
-
74
-
75
-
76
-
77
-
78
-
79
-
80
-
81
-
82
-
83
-
84
-
85
-
86
-
87
 |
 |